
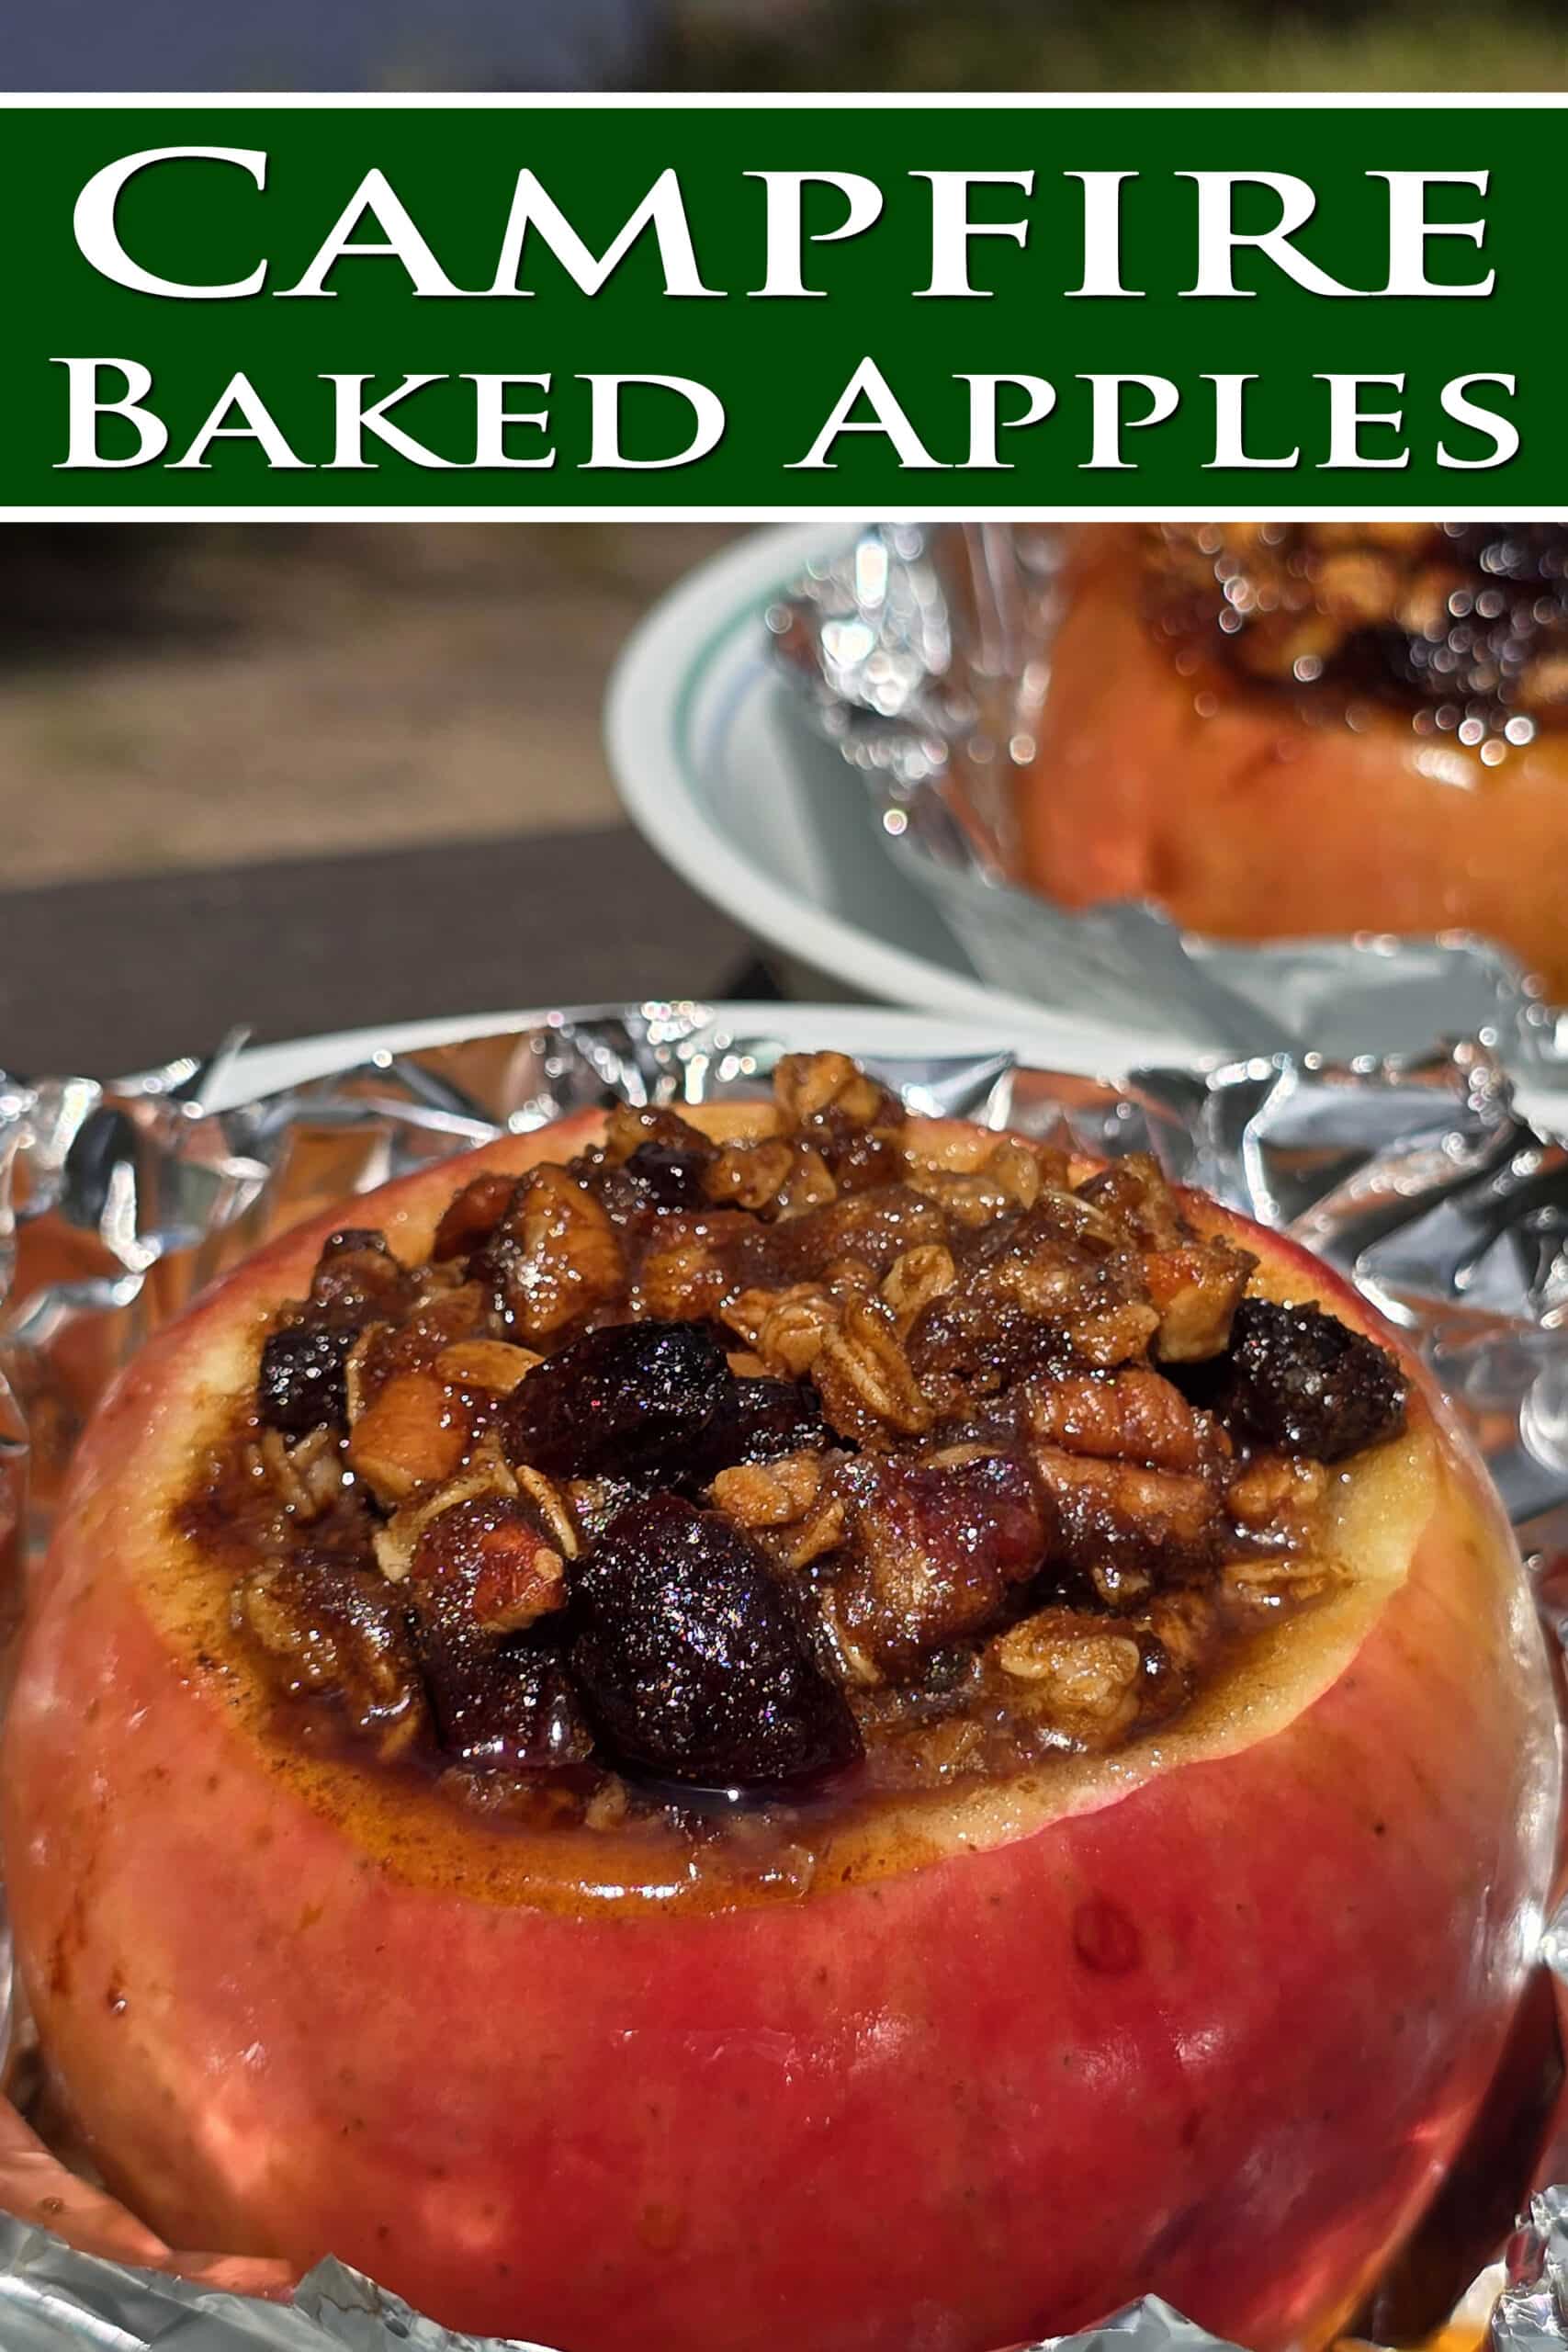
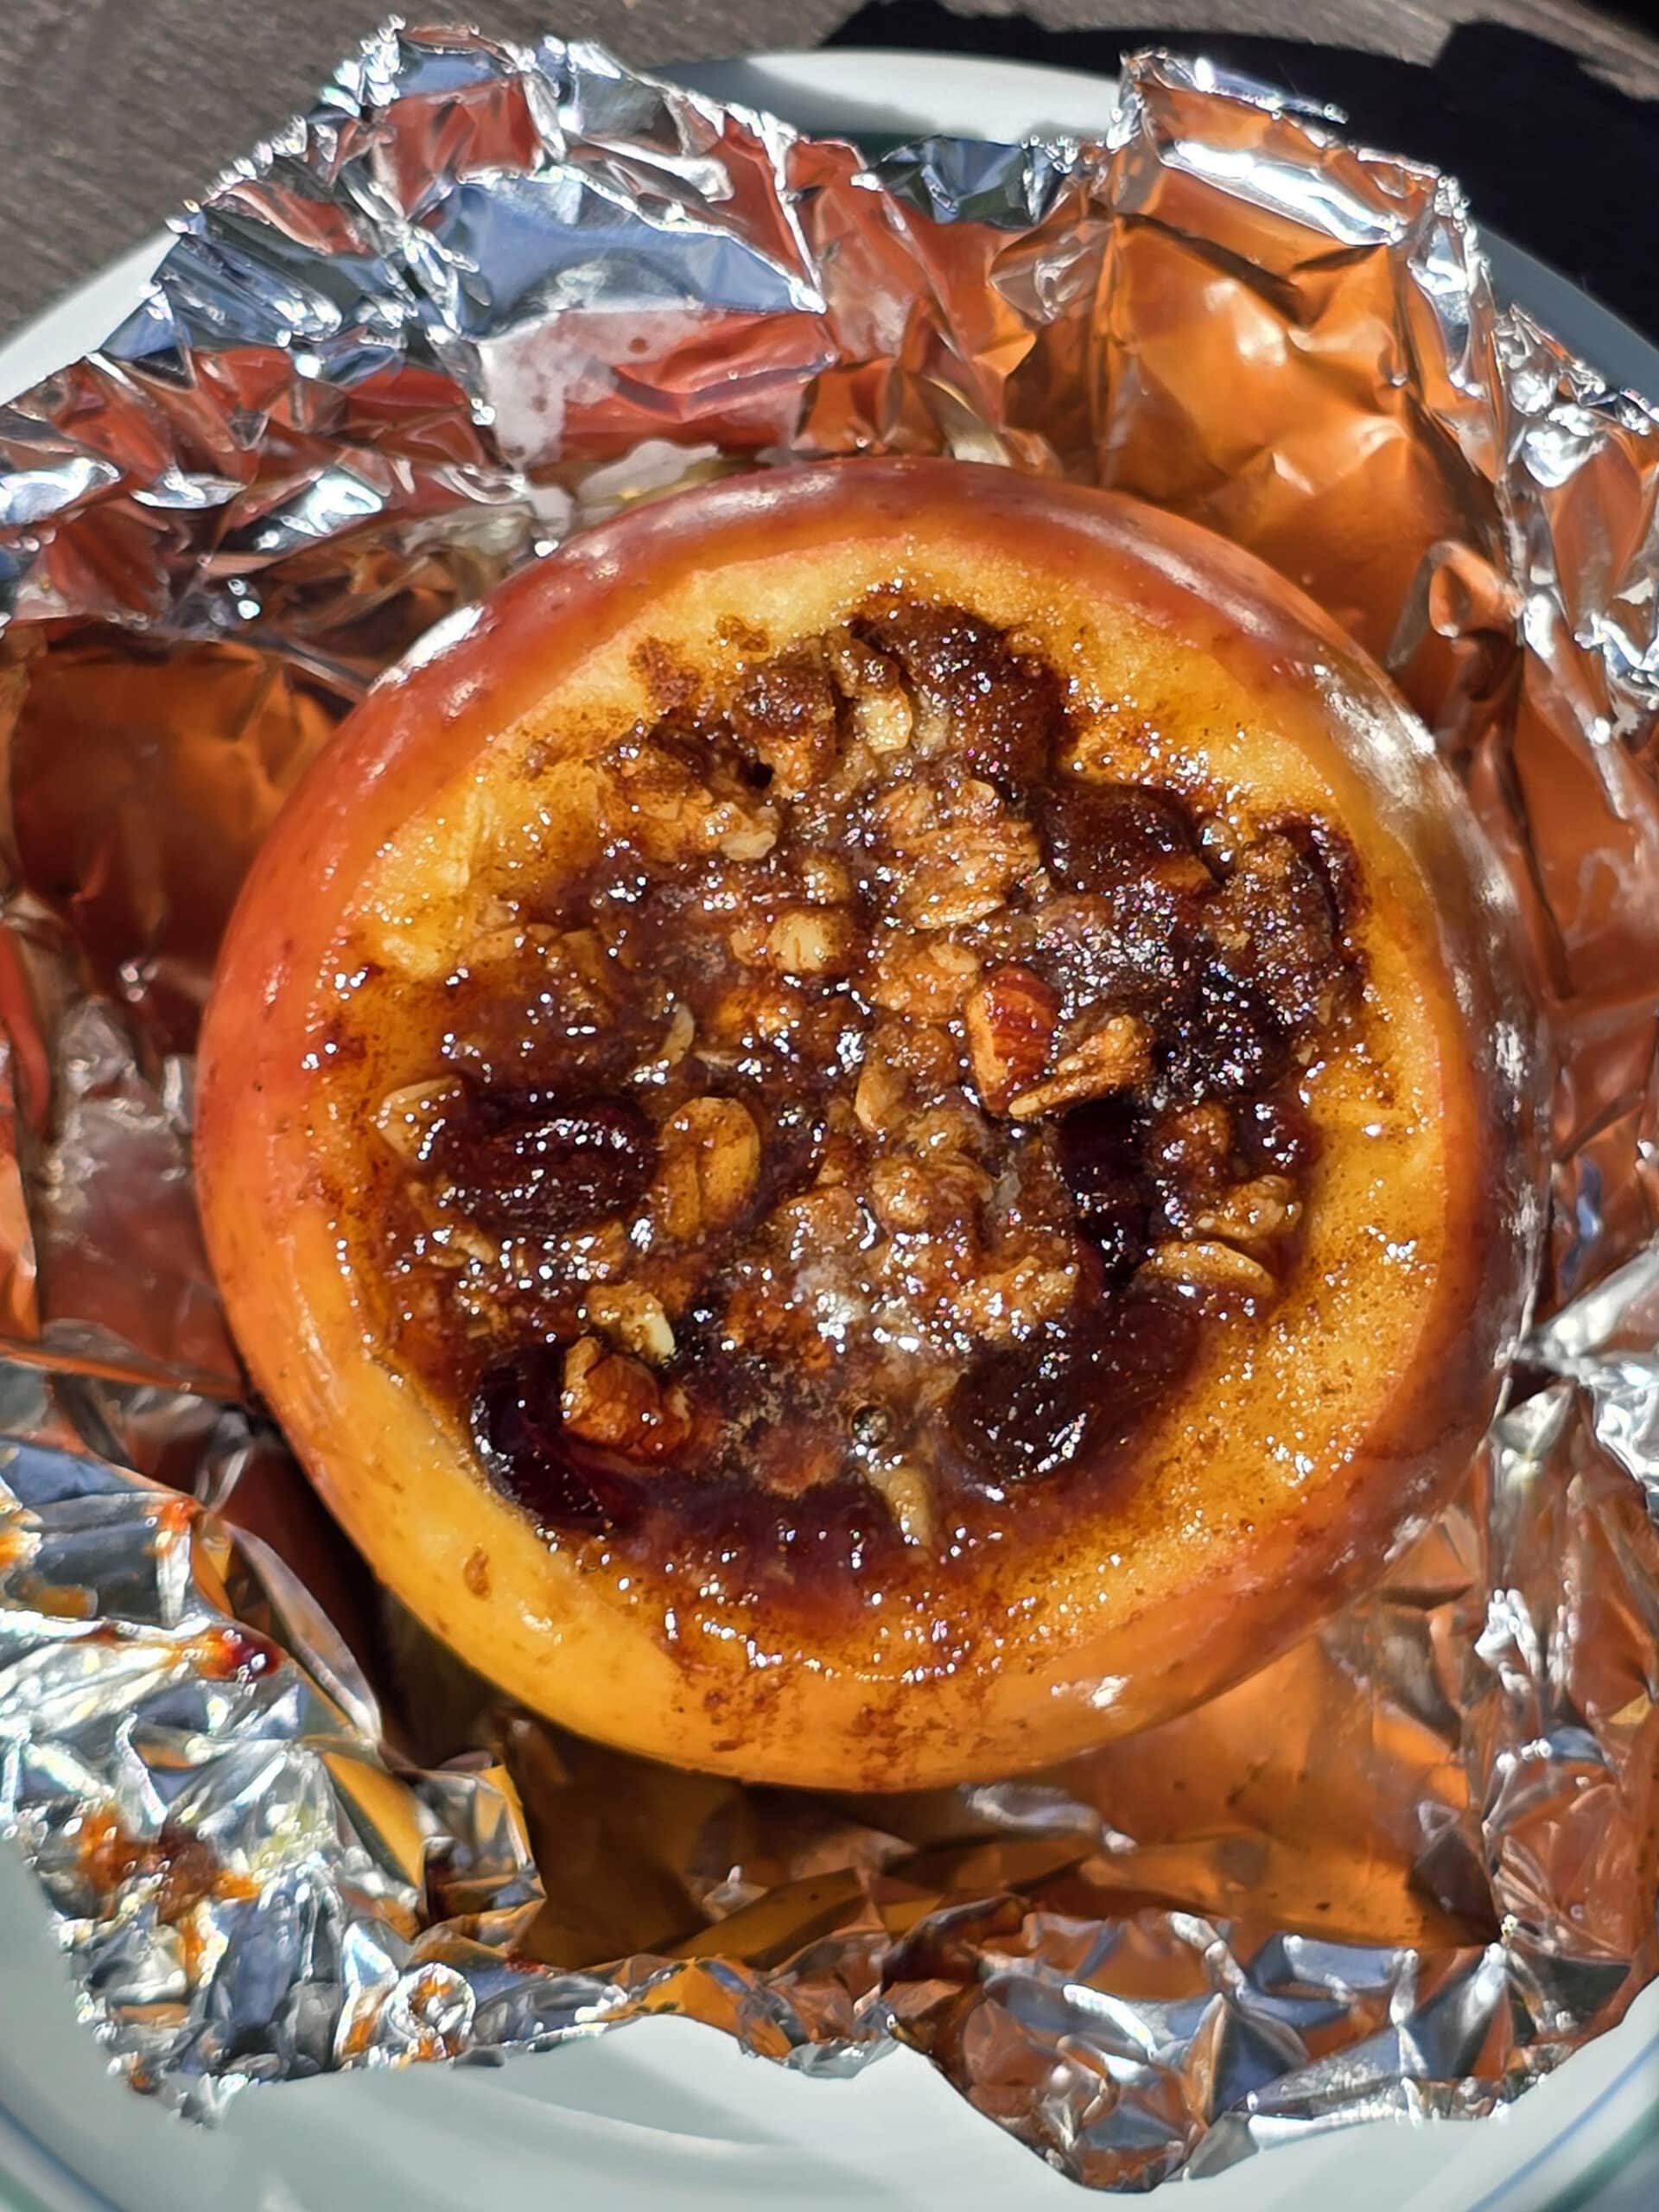
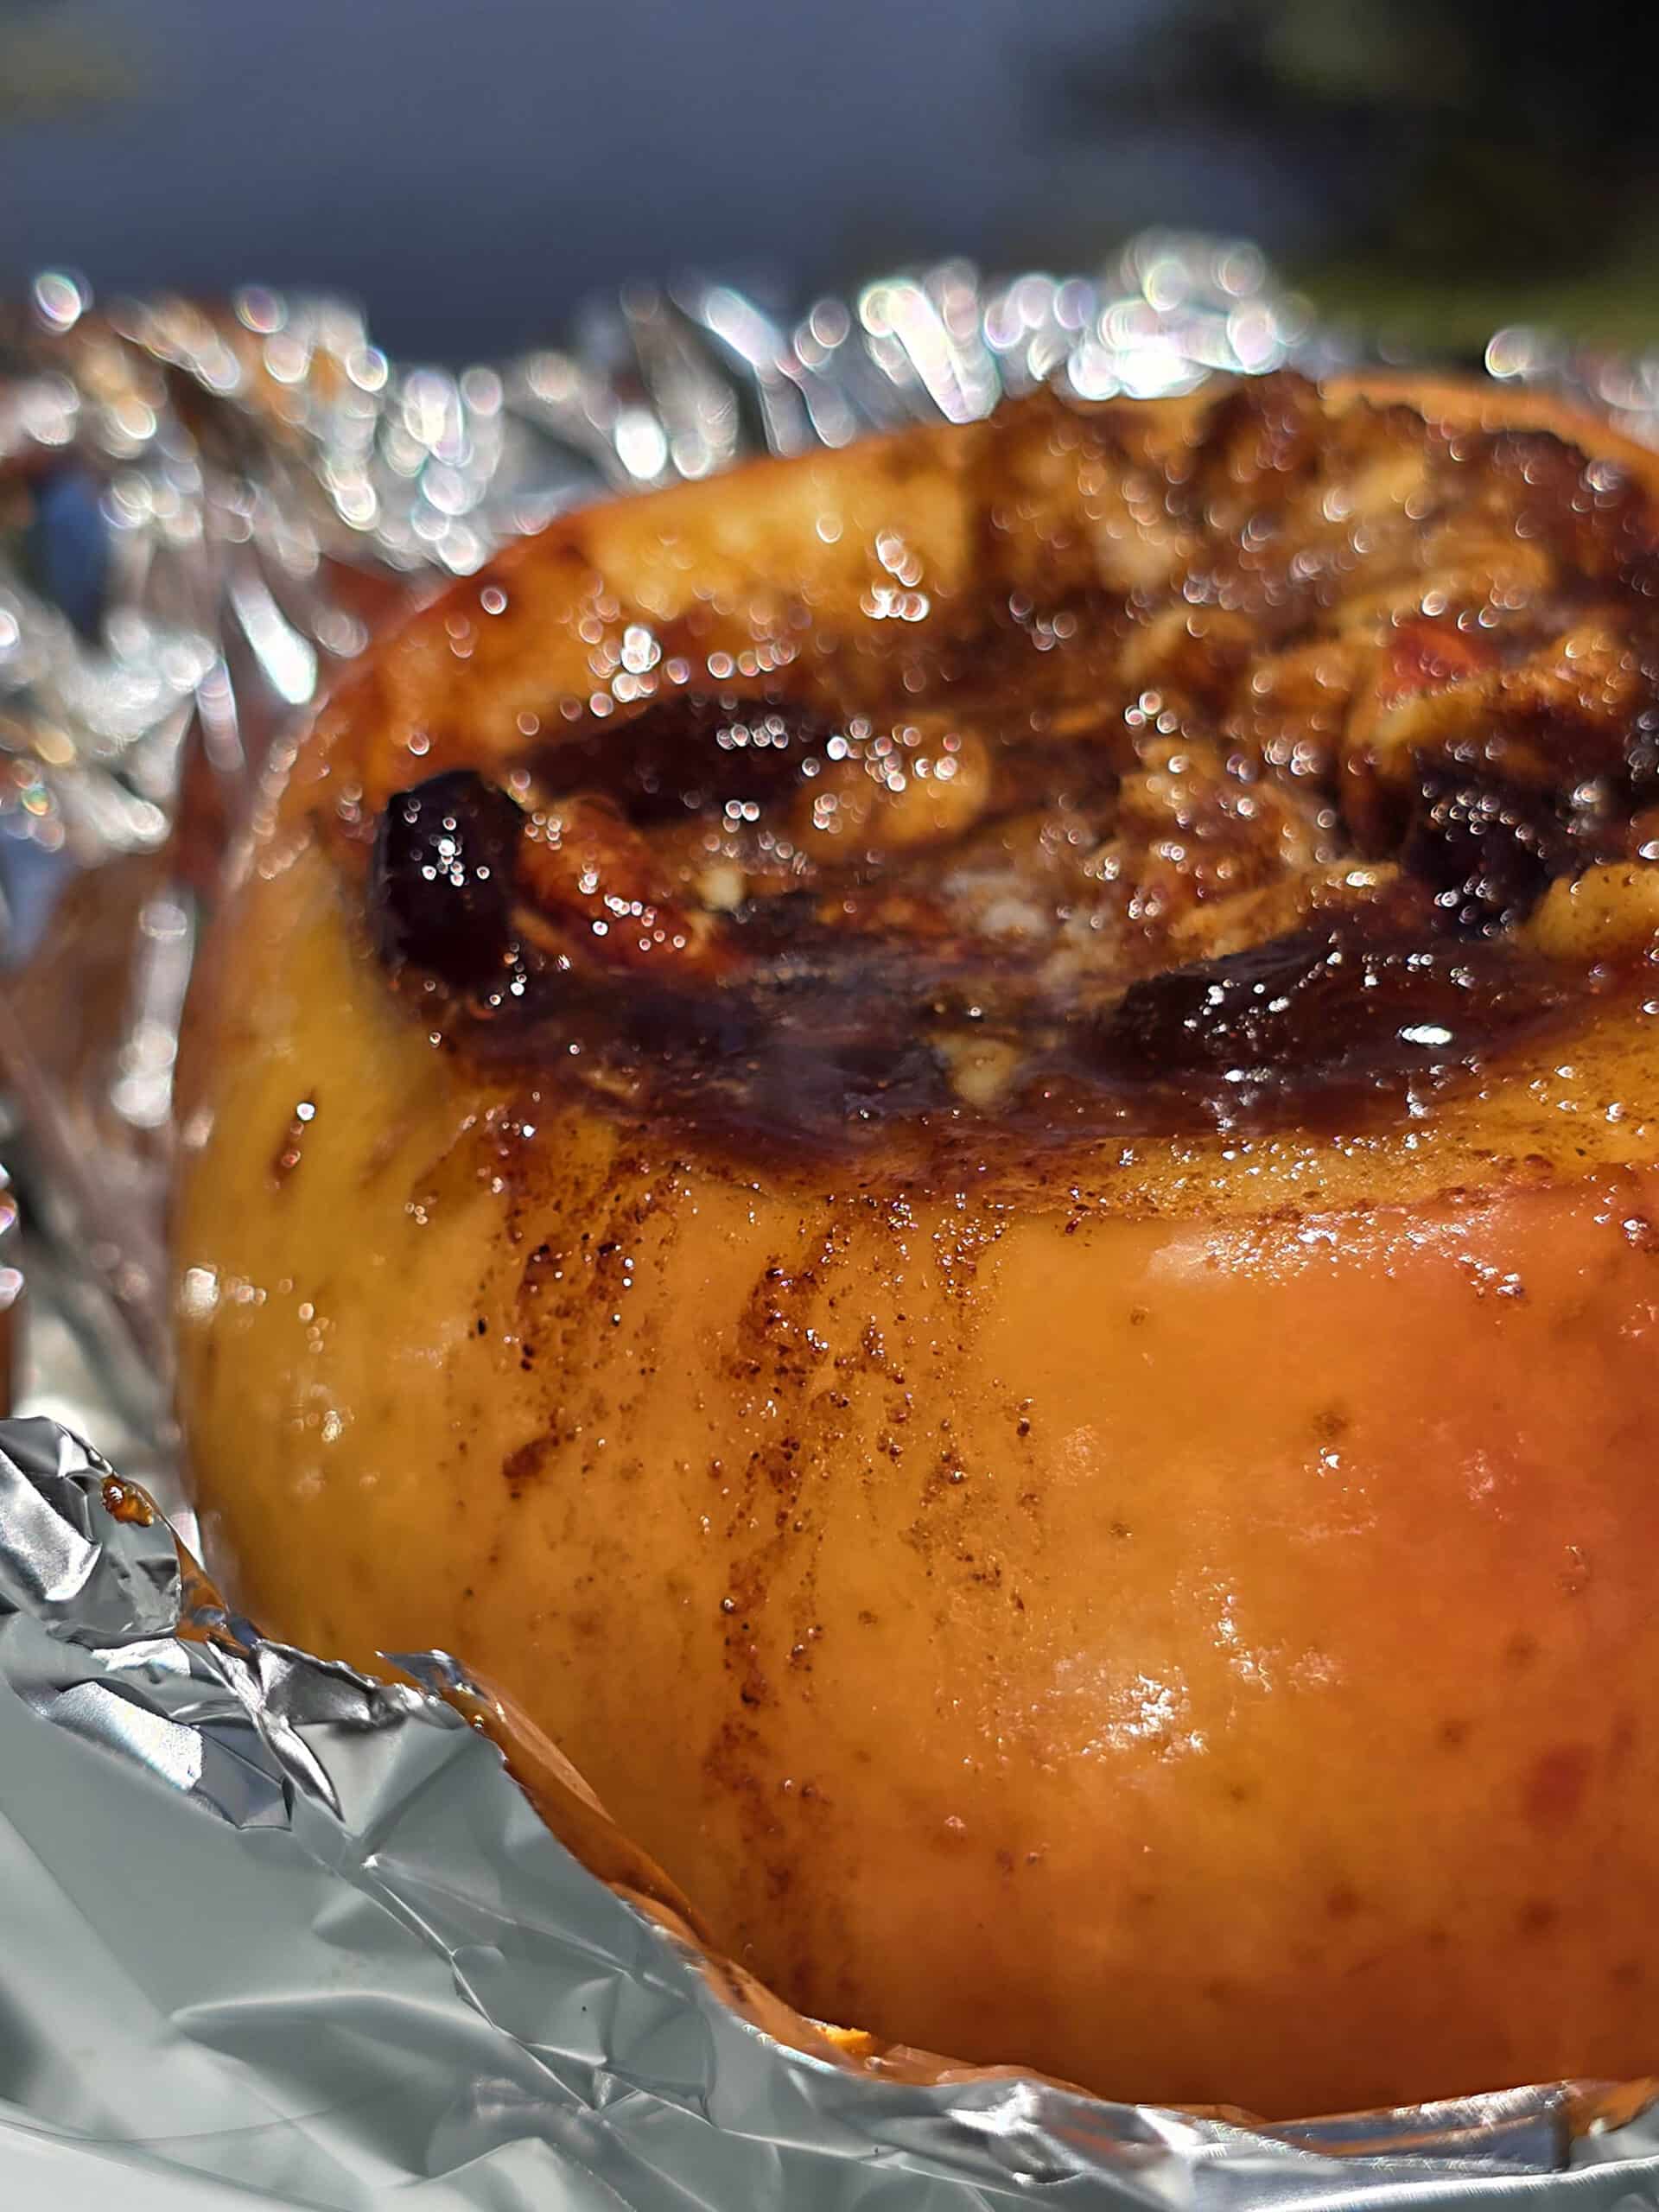
Campfire Baked Apples are a super easy dessert option for any camping trip. Deliciousness wrapped in foil, to cook over a grill or open fire!
Either way, it kicked off my love of apple desserts in general. Much less effort than making apple pie or apple crisp, too!
We do most of our camping in the fall season, so it was inevitable that we’d need to come up with a baked apple recipe suitable for cooking over a campfire.
This delightful dessert is an easy recipe to whip up on chilly nights in your campsite - like we did at Quetico Provincial Park, when we photographed this wonderful recipe!
The best part? You customize the in different ways, to suit your tastes!
Anyway, it’s definitely a camping dessert that your whole family will love... so let’s look at what you’ll need to have on hand:
Ingredients
This is a really simple recipe, with only a few basic ingredients.
The bulk of my ingredient notes have to do with the kind of apples you use. Really, you should be able to find everything you need in any grocery store.
As far as those ingredient notes go, though:
Fresh Apples
We tend to use Honeycrisp apples - the ones pictured in the photos here are Honey Crisp apples - but there are all kinds of different apples that will work well for this recipe.
Rome Beauties, Golden Delicious apples, Jonagold apples, Granny Smith apples, Fuji apples, Pink Lady apples... all good apples to use for .
During apple season, locally grown Mutsu apples are my apple of choice - all around, the BEST apples I’ve ever had. Crunchy, an amazing sweet-tart flavor, great texture, etc.
One thing to note, though: large apples are a LOT easier to work with - and all around better for this stuffed apples recipe - than smaller apples.
You want to have enough room for the good stuff, after all! (Those Mutsus tend to be huge!)
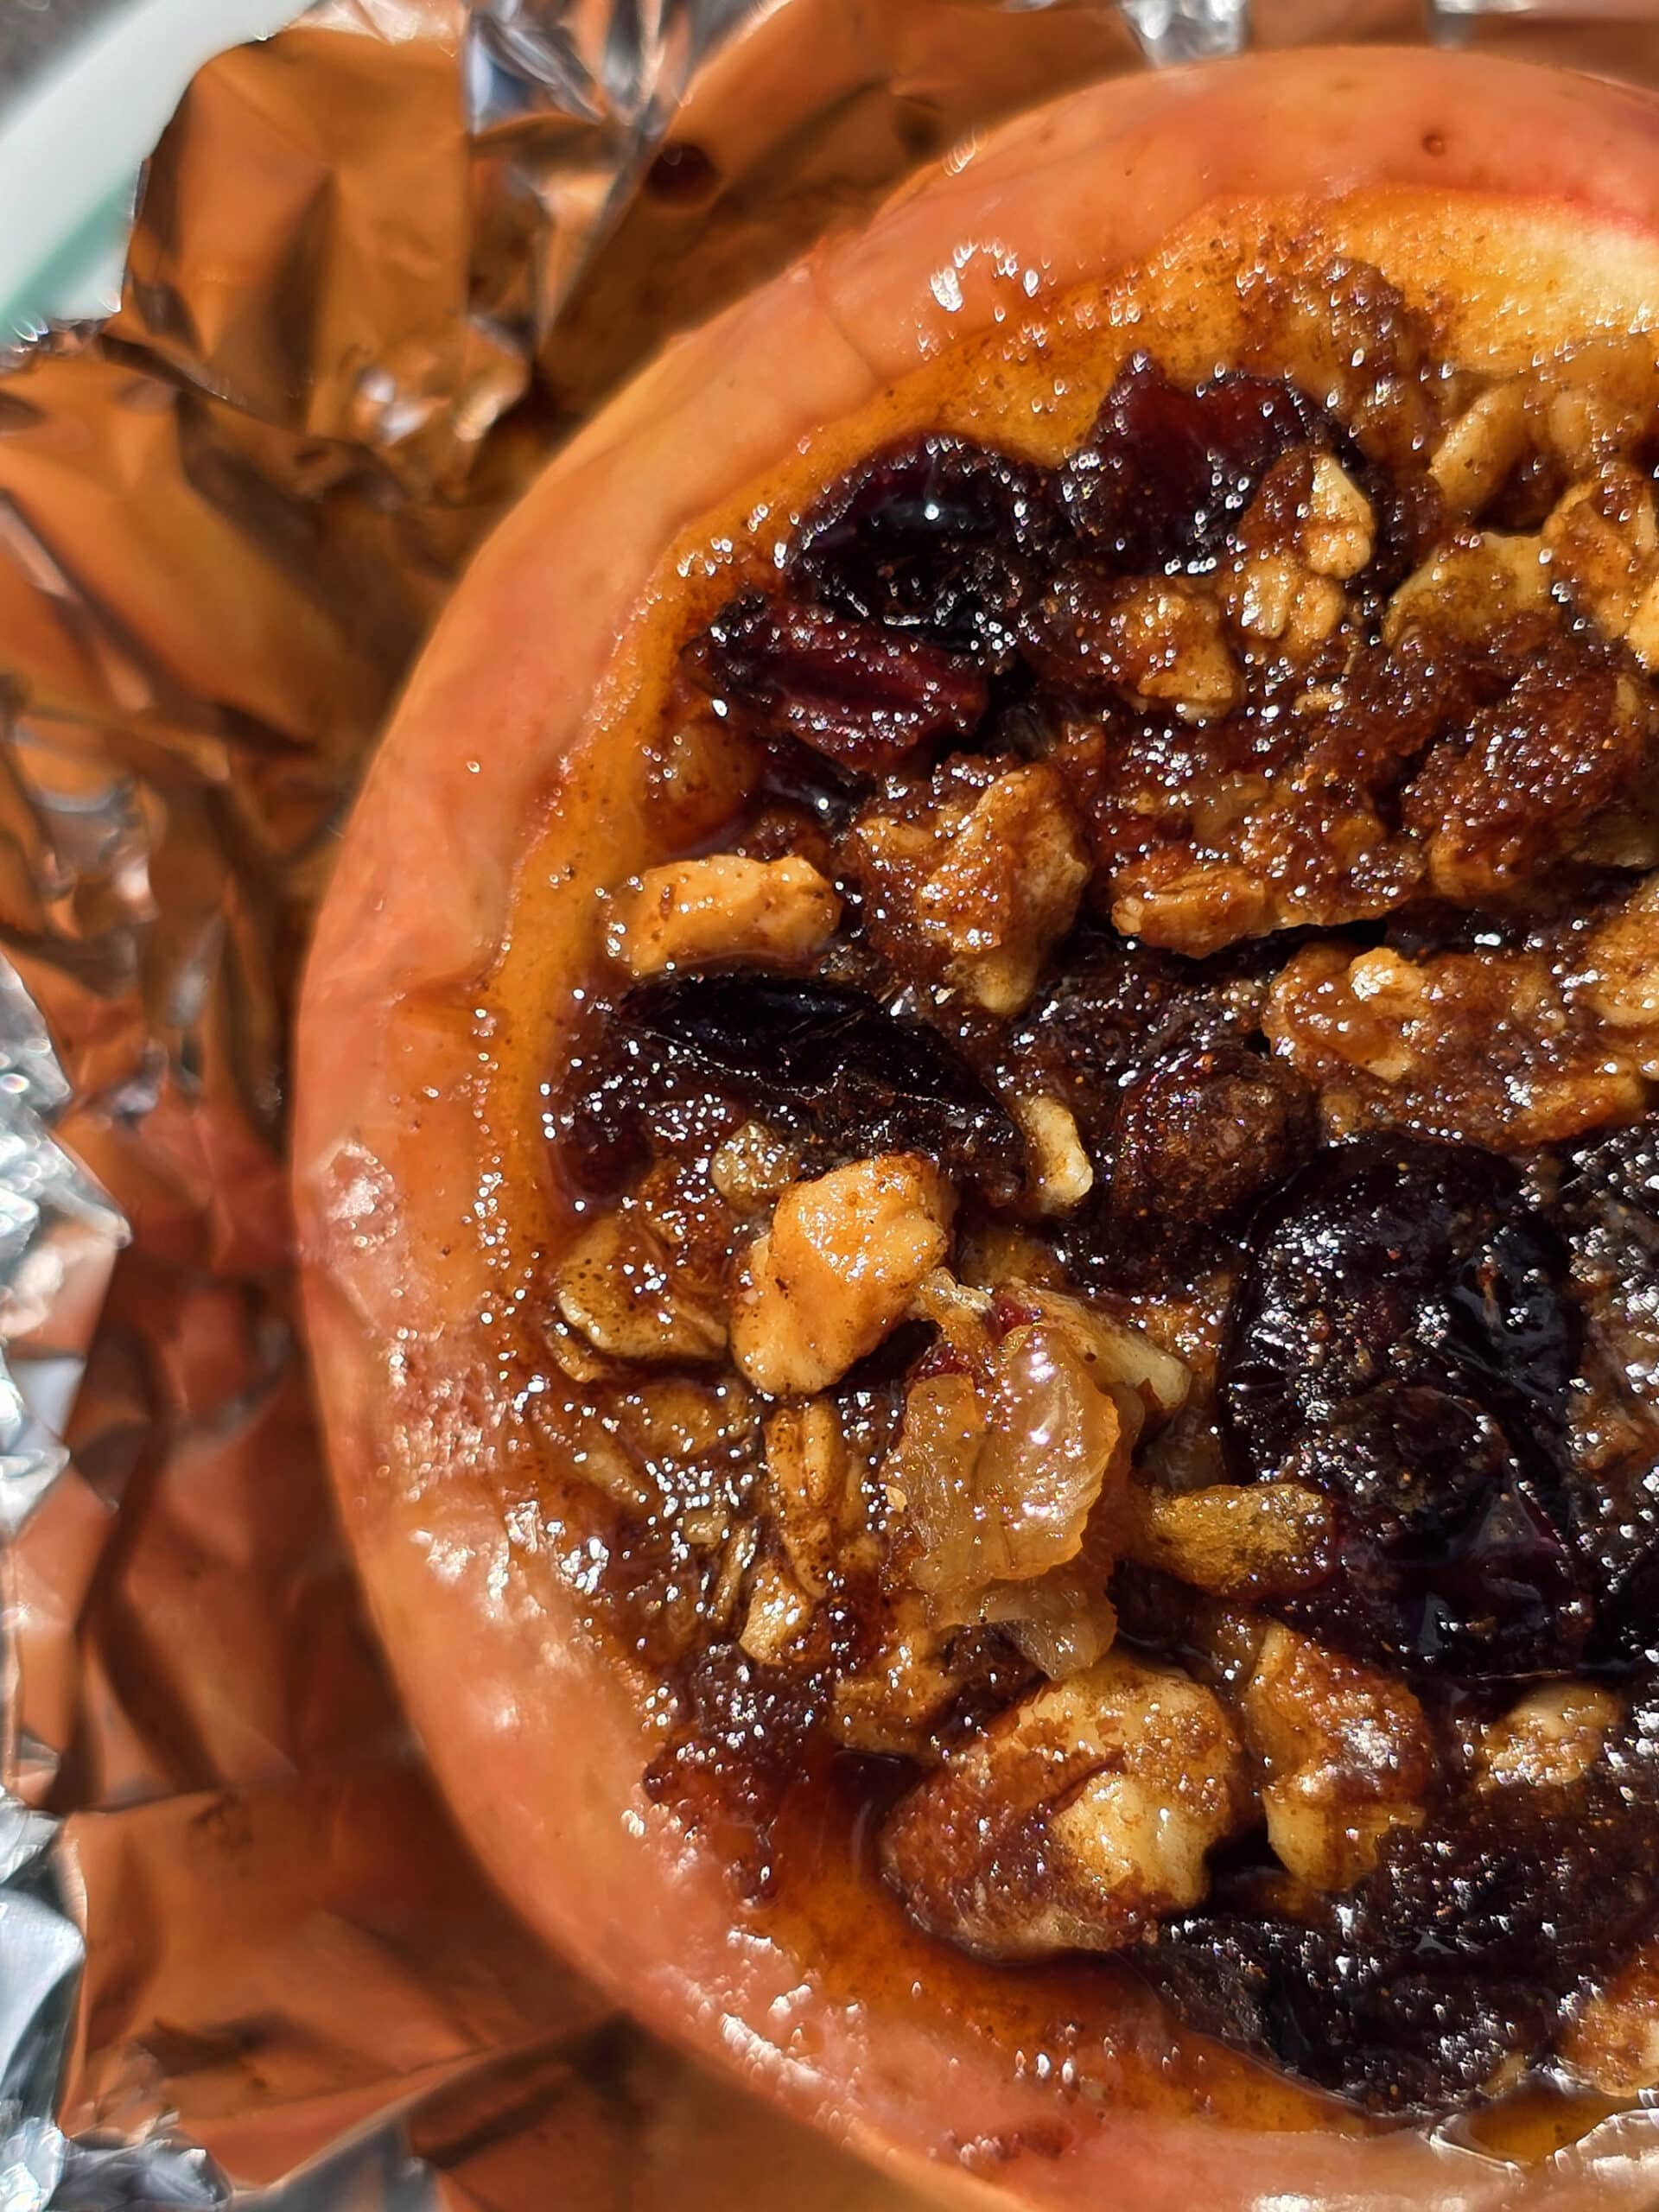
Main Filling Ingredients
This category is the “bulk” of the filling, and it can be a bit different every time we make it.
I see 3 main categories of stuff that we’ll use: Granola, Chopped Nuts, and Raisins.
Generally, I’ll use a mix of 2 or more of these ingredients, with the actual items and proportions depending on what we have on hand, and what we’re in the mood for.
I recommend starting with equal amounts of what you want to use, and adjusting from there.
Maple Syrup
Maple syrup is optional, but a nice flavour boost.
I don’t recommend replacing the brown sugar WITH the maple syrup, as the texture is all wrong and tends to end up with a big mess.
A little bit of maple syrup in addition to the brown sugar, though, works perfectly!
Everything Else
Rounding out this recipe, you will need:
Unsalted Butter (Omit salt if using salted butter)
Brown Sugar
Ground Cinnamon
Salt
... I just don’t have anything to add, as far as these last few ingredients go. Pretty basic stuff!
Share the Love!If you’ve made one of our recipes, be sure to take some pics of your handiwork! If you post it to Bluesky, be sure to tag us - @2NerdsInATruck, or you can tag us on TikTok, if you’re posting video. We're also on Pinterest, so you can save all your favourite recipes and park reviews to your own boards! Also, be sure to subscribe to our free email newsletter, so you never miss out on any of our nonsense. Well, the published nonsense, anyway! |
How to Make Campfire Baked Apples
The full recipe is in the printable recipe card at the end of this post, here is the visual walk through:
Start your heat source: Get a low fire going (and allow it to burn down to embers), preheat your grill to a low-medium heat, or preheat your oven to 375 degrees F.
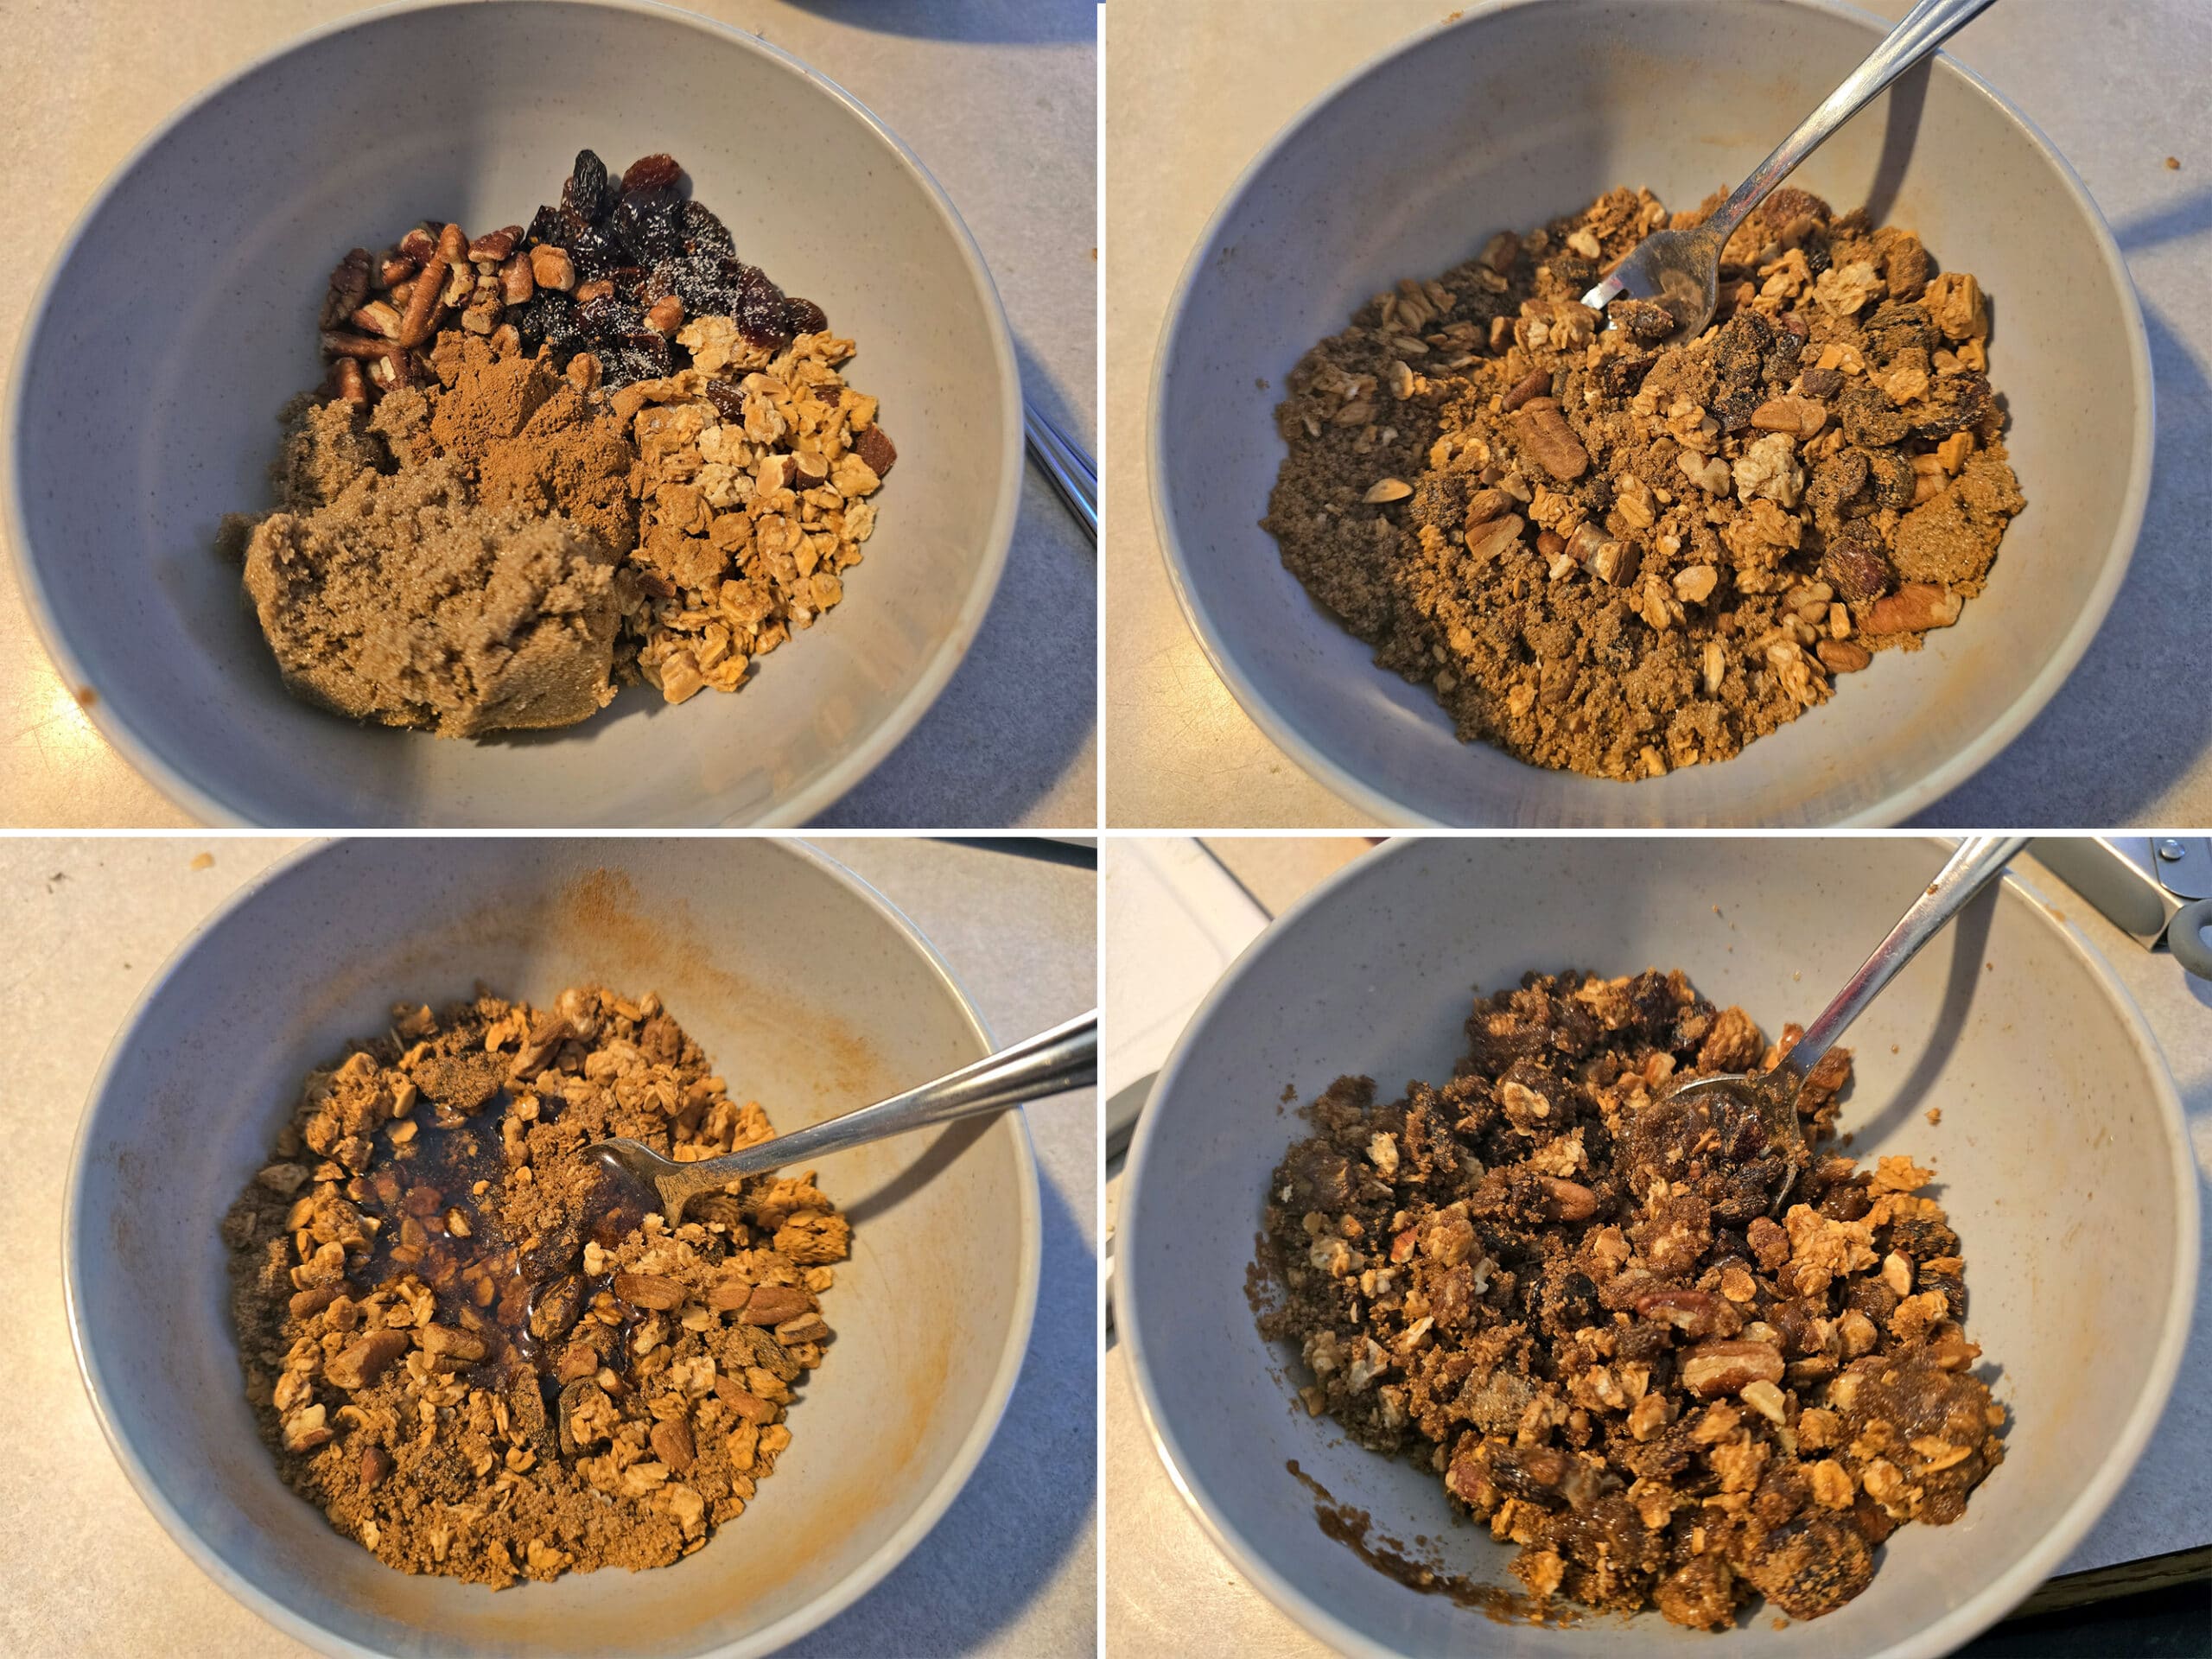
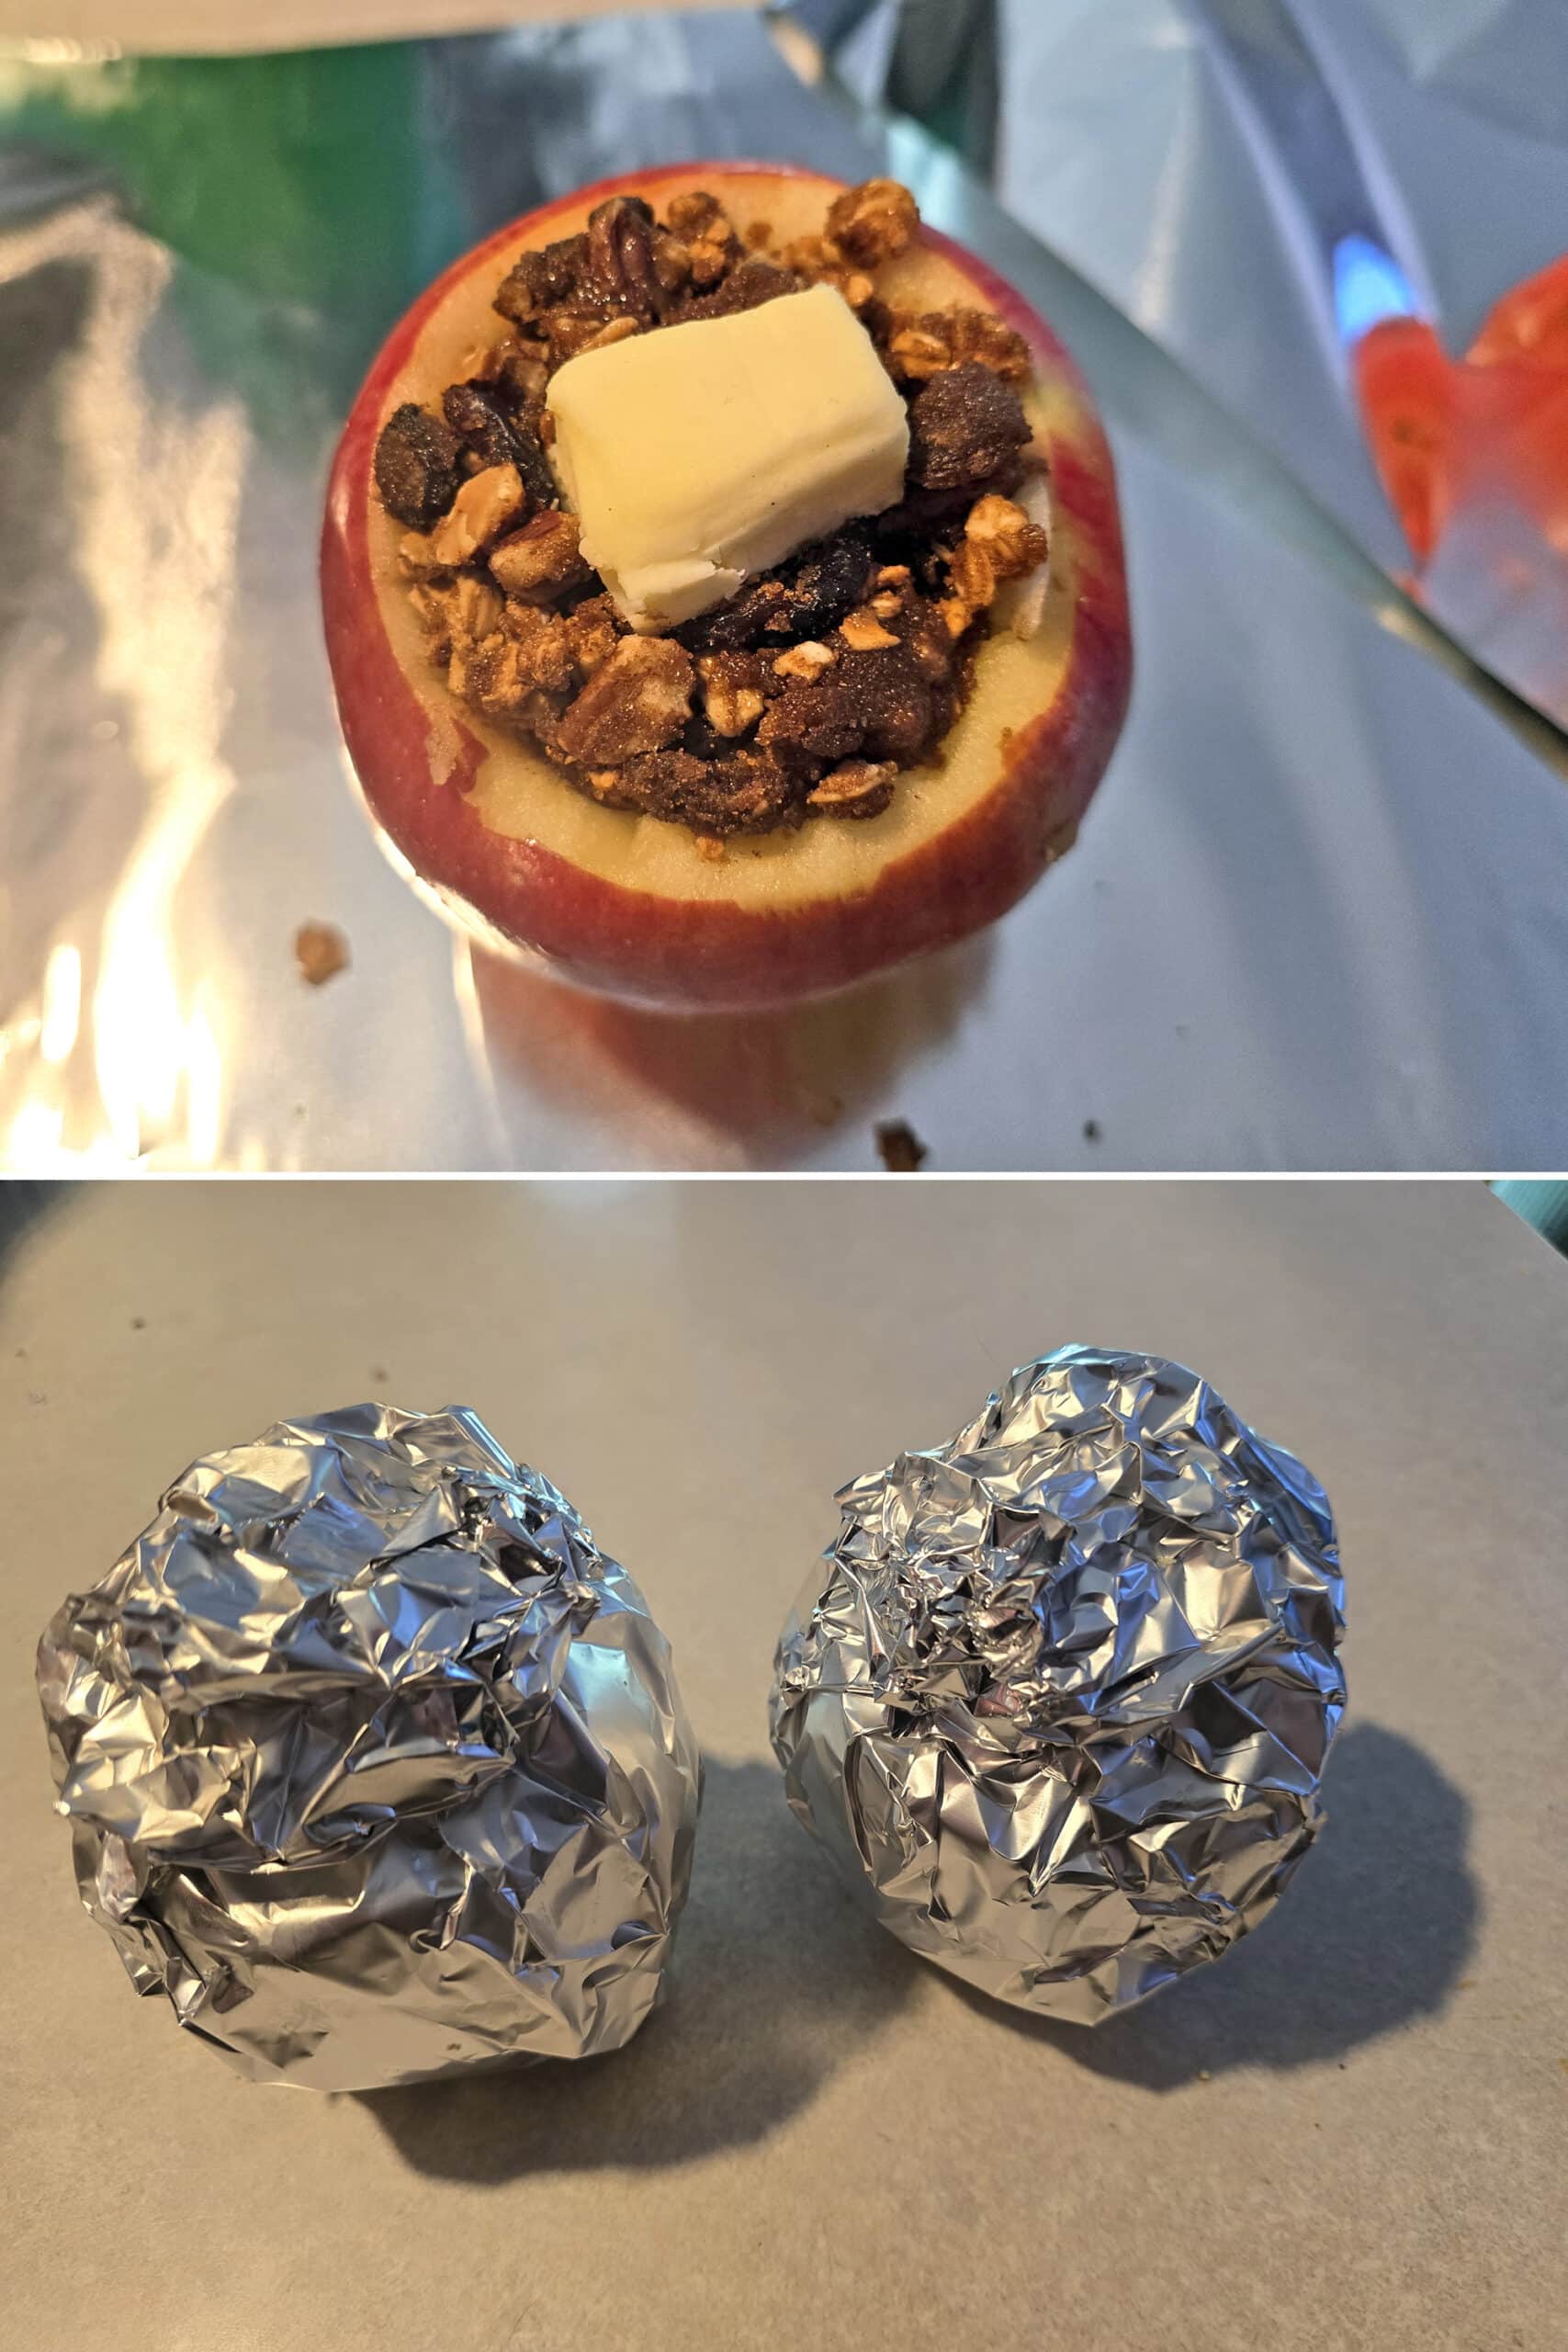
In a small bowl, mix together granola/raisins/chopped nuts, brown sugar, maple syrup (if using), cinnamon, and salt. Set aside.
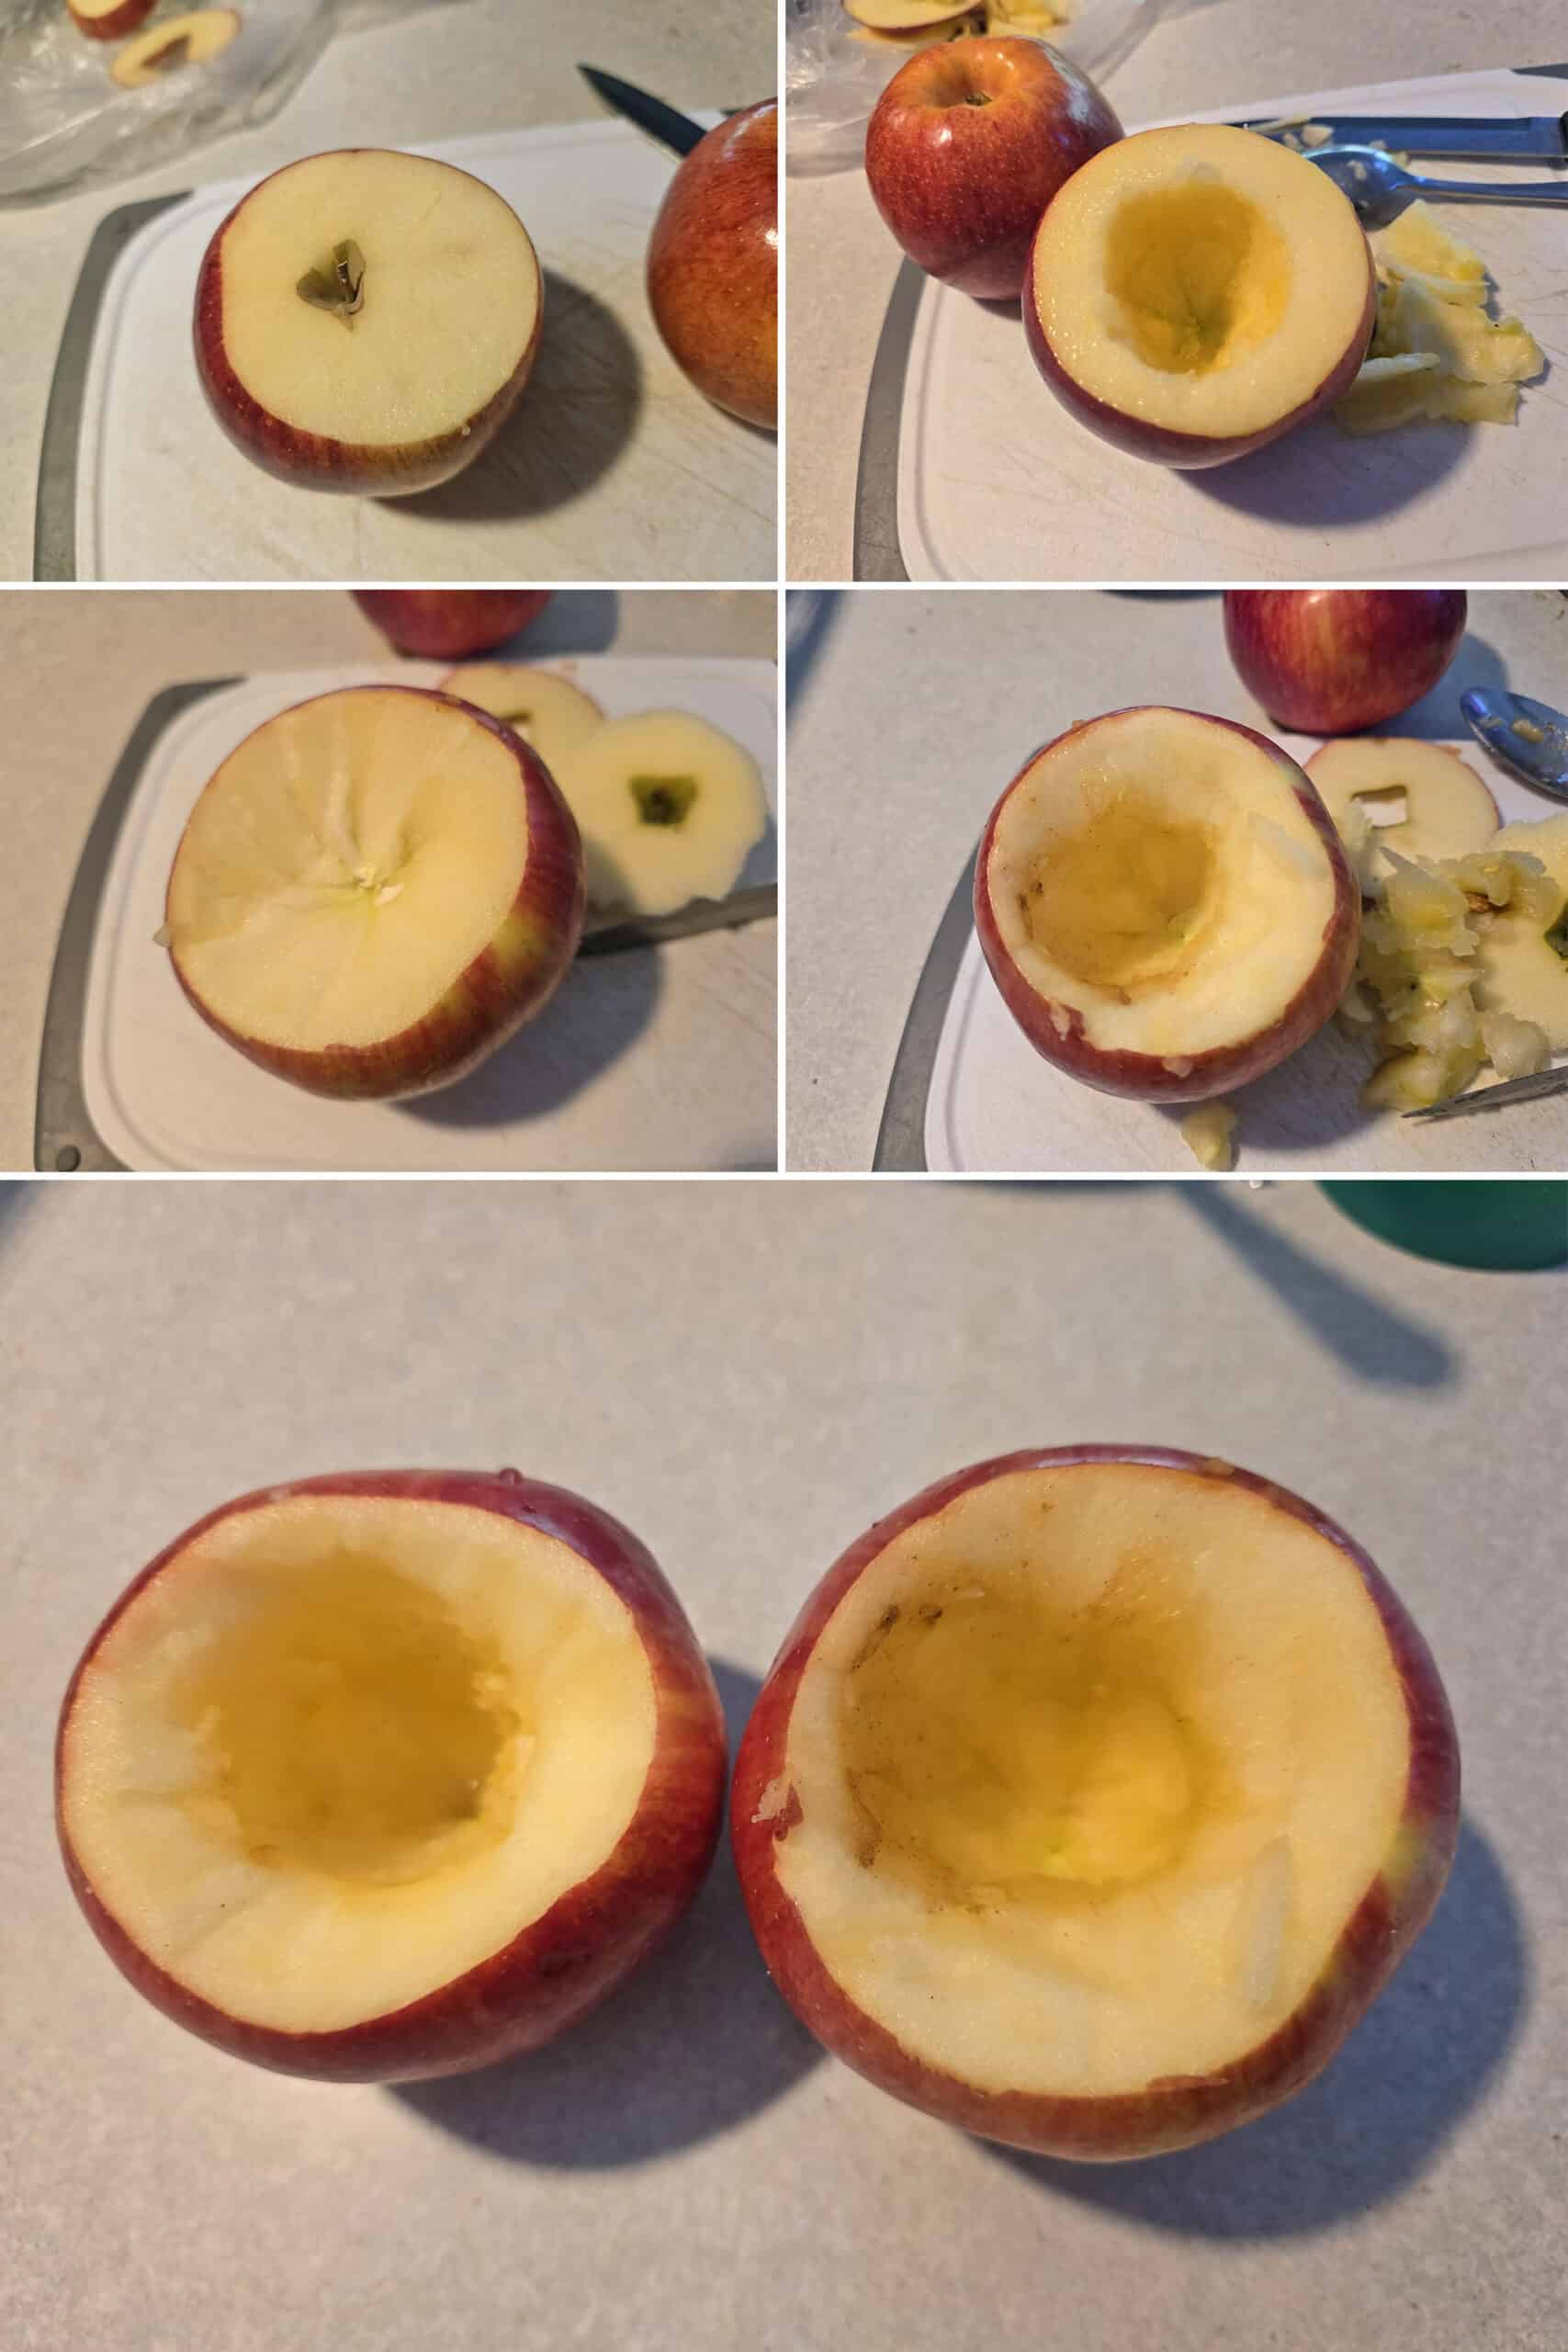
Use a sharp knife to slice a small amount off the top of the apple, then use a small spoon to carve out a deep cavity in the apple. (You can also use a sharp paring knife or melon baller, if you prefer)
It doesn’t need to be super wide the whole way down - I recommend tapering it down - a cone shaped opening - ending shortly below the seeds.
Be sure to scoop out all of the apple seeds, but don’t cut through the bottom of the apple - that’s why I don’t use an apple corer for this!
Repeat with remaining apples.
Carefully draw up the edges of the foil square over the apple, gathering them on top of the open end - this will help keep the apples upright when cooking.
I like to loosely wrap the apples, then, push foil downward as I’m twisting it together, creating a bit of a base / flat bottom to help it stand upright on the grill grates.
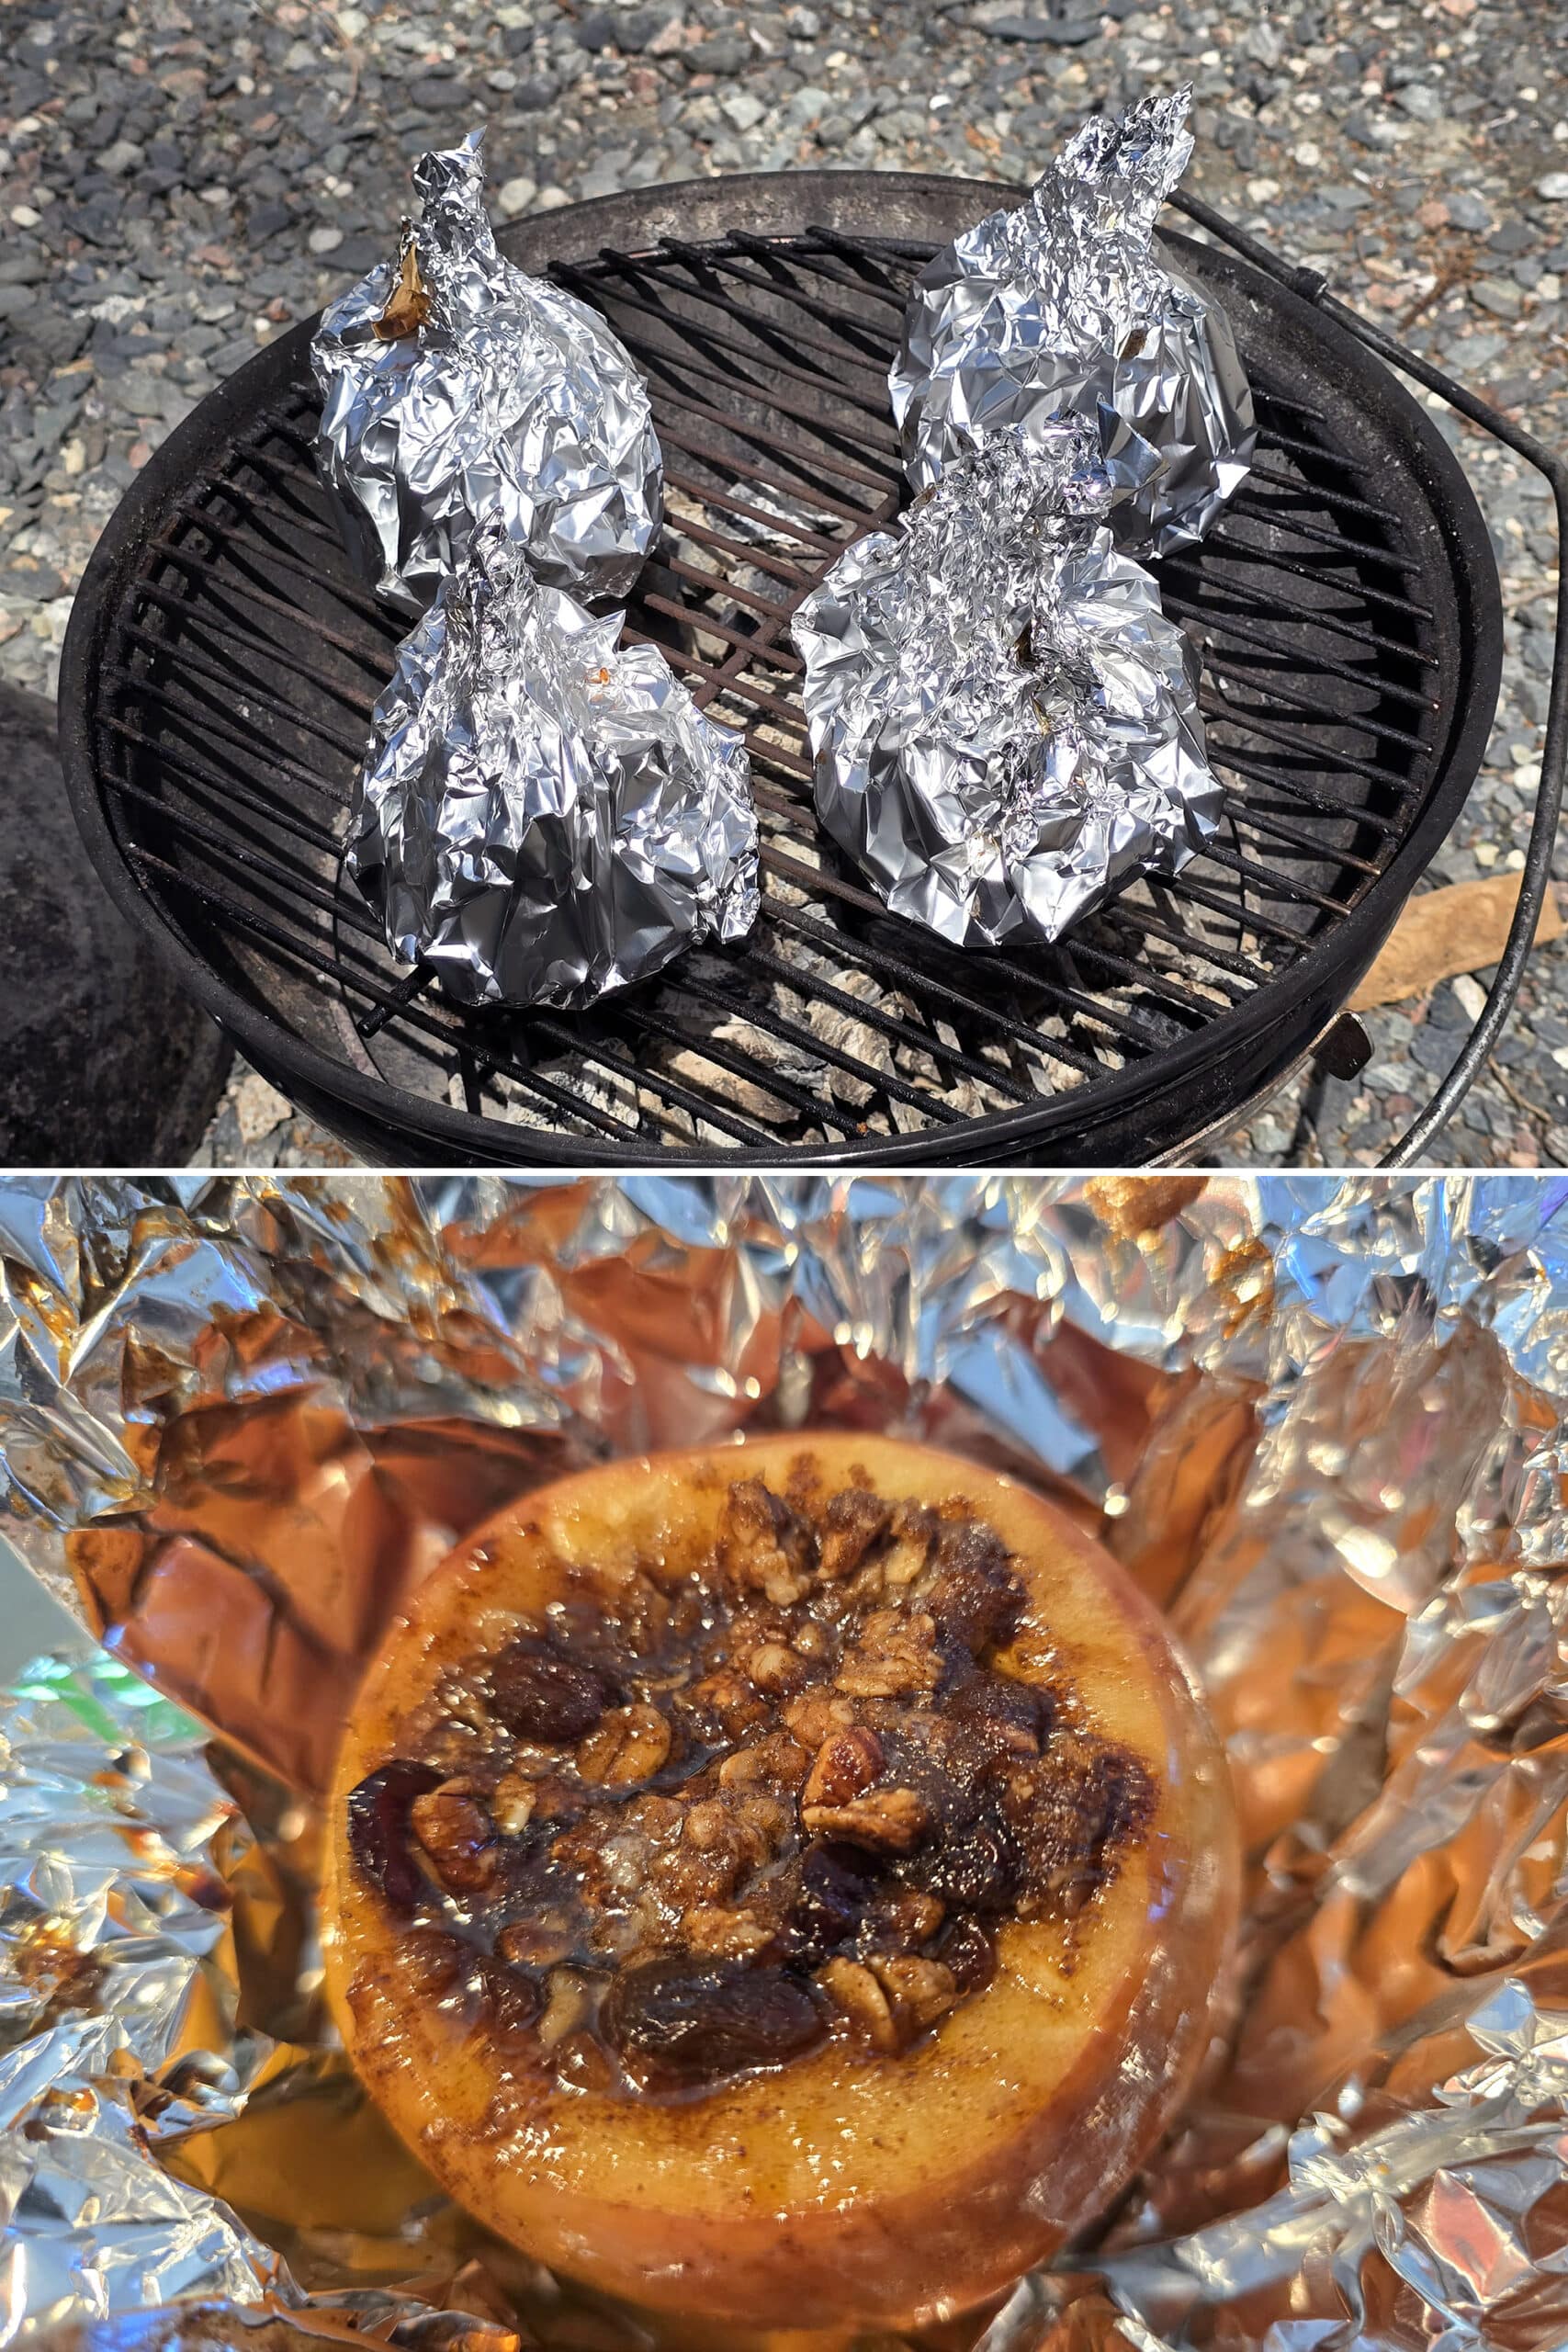
Grilled Baked Apples:
Place the wrapped apples on your grill, cover, and cook for 15-20 minutes, until cooked as soft as you’d like it.
Campfire Baked Apples:
Spread your embers around a bit - moving any large pieces of hot coals to the outside. Place your foil wrapped apples in the embers, cook for 5-10 minutes, or until as soft as you like them.
Oven Baked Apples:
Place the foil wrapped apples on a baking sheet. Bake in a preheated 375 F oven for 30-35 minutes, or until done to your liking.
Whichever way you cook them, keep an eye on your apples - the cooking time will vary wildly based on your heat source, the size and apple variety used, and how soft you like them.
Leftovers
Once cooled to room temperature, remove baked apples from the foil and transfer to an airtight container. Keep in the fridge for up to 4 days, serve reheated or cold.
More Camping Dessert Recipes
Looking for some sweet treats to cook over a campfire or grill? Here's a few of my favourites!
Apple Fritter Bread Pudding
Apple Fritter French Toast
Banana Boats
Campfire Cones
Campfire Haystack Cookies
Chocolate Peanut Butter No Bake Cookies
How to Make Maple Taffy
No Bake Cornflake Cookies
No-Bake S'Mores Bars
Peanut Butter No-Bake Cookies
Skillet Berry Crumble
S'mores Board
... But wait, there's more! Be sure to check out our other Camping Recipes, including Camping Desserts, Camping Snacks, Make-Ahead Camping Mix Recipes, and a ton of delicious Camping Main Dish Recipes.
Also, we had SO much fun designing gourmet jerky recipes for our camping trips, we started a whole new blog for them! Check out Dried & Tasty for all kinds of fun recipes to make in your food dehydrator!

Campfire Baked Apples
Equipment
- Heavy Duty Aluminum Foil
- Grill or Campfire
Ingredients
- ½ cup Granola, Raisins, and/or Chopped Nuts of Choice See post for details
- ¼ cup Packed Brown Sugar
- 2 tablespoon Maple Syrup
- ½- 1 teaspoon Ground Cinnamon
- Pinch Salt
- 4 Large Apples See post for recommendations
- 2 tablespoon Butter cut into 4 equal pieces
Instructions
- Start your heat source: Get a low fire going (and allow it to burn down to embers), preheat your grill to a low-medium heat, or preheat your oven to 375 degrees F.
- In a small bowl, mix together granola/raisins/chopped nuts, brown sugar, maple syrup (if using), cinnamon, and salt. Set aside.
- Remove any stickers from your apples, wash and dry.
- Use a sharp knife to slice a small amount off the top of the apple, then use a small spoon to carve out a deep cavity in the apple. (You can also use a small paring knife or melon baller, if you prefer)It doesn’t need to be super wide the whole way down - I recommend tapering it down - a cone shaped opening - ending shortly below the seeds.Be sure to scoop out all of the apple seeds, but don’t cut through the bottom of the apple - that’s why I don’t use an apple corer for this!
- Repeat with remaining apples.
- One at a time, place a cored apple on a square of heavy-duty aluminum foil, cut side up. Stuff with about ¼ of the brown sugar mixture, top with one piece of butter.
- Carefully draw up the edges of the foil square over the apple, gathering them on top of the open end - this will help keep the apples upright when cooking.
- I like to loosely wrap the apples, then, push foil downward as I’m twisting it together, creating a bit of a base / flat bottom to help it stand upright on the grill grates.
- Cook them according to your choice of method, listed in the notes section below.
- Whichever way you cook them, keep an eye on your apples - the cooking time will vary wildly based on your heat source, the size and variety of apple used, and how soft you like them.
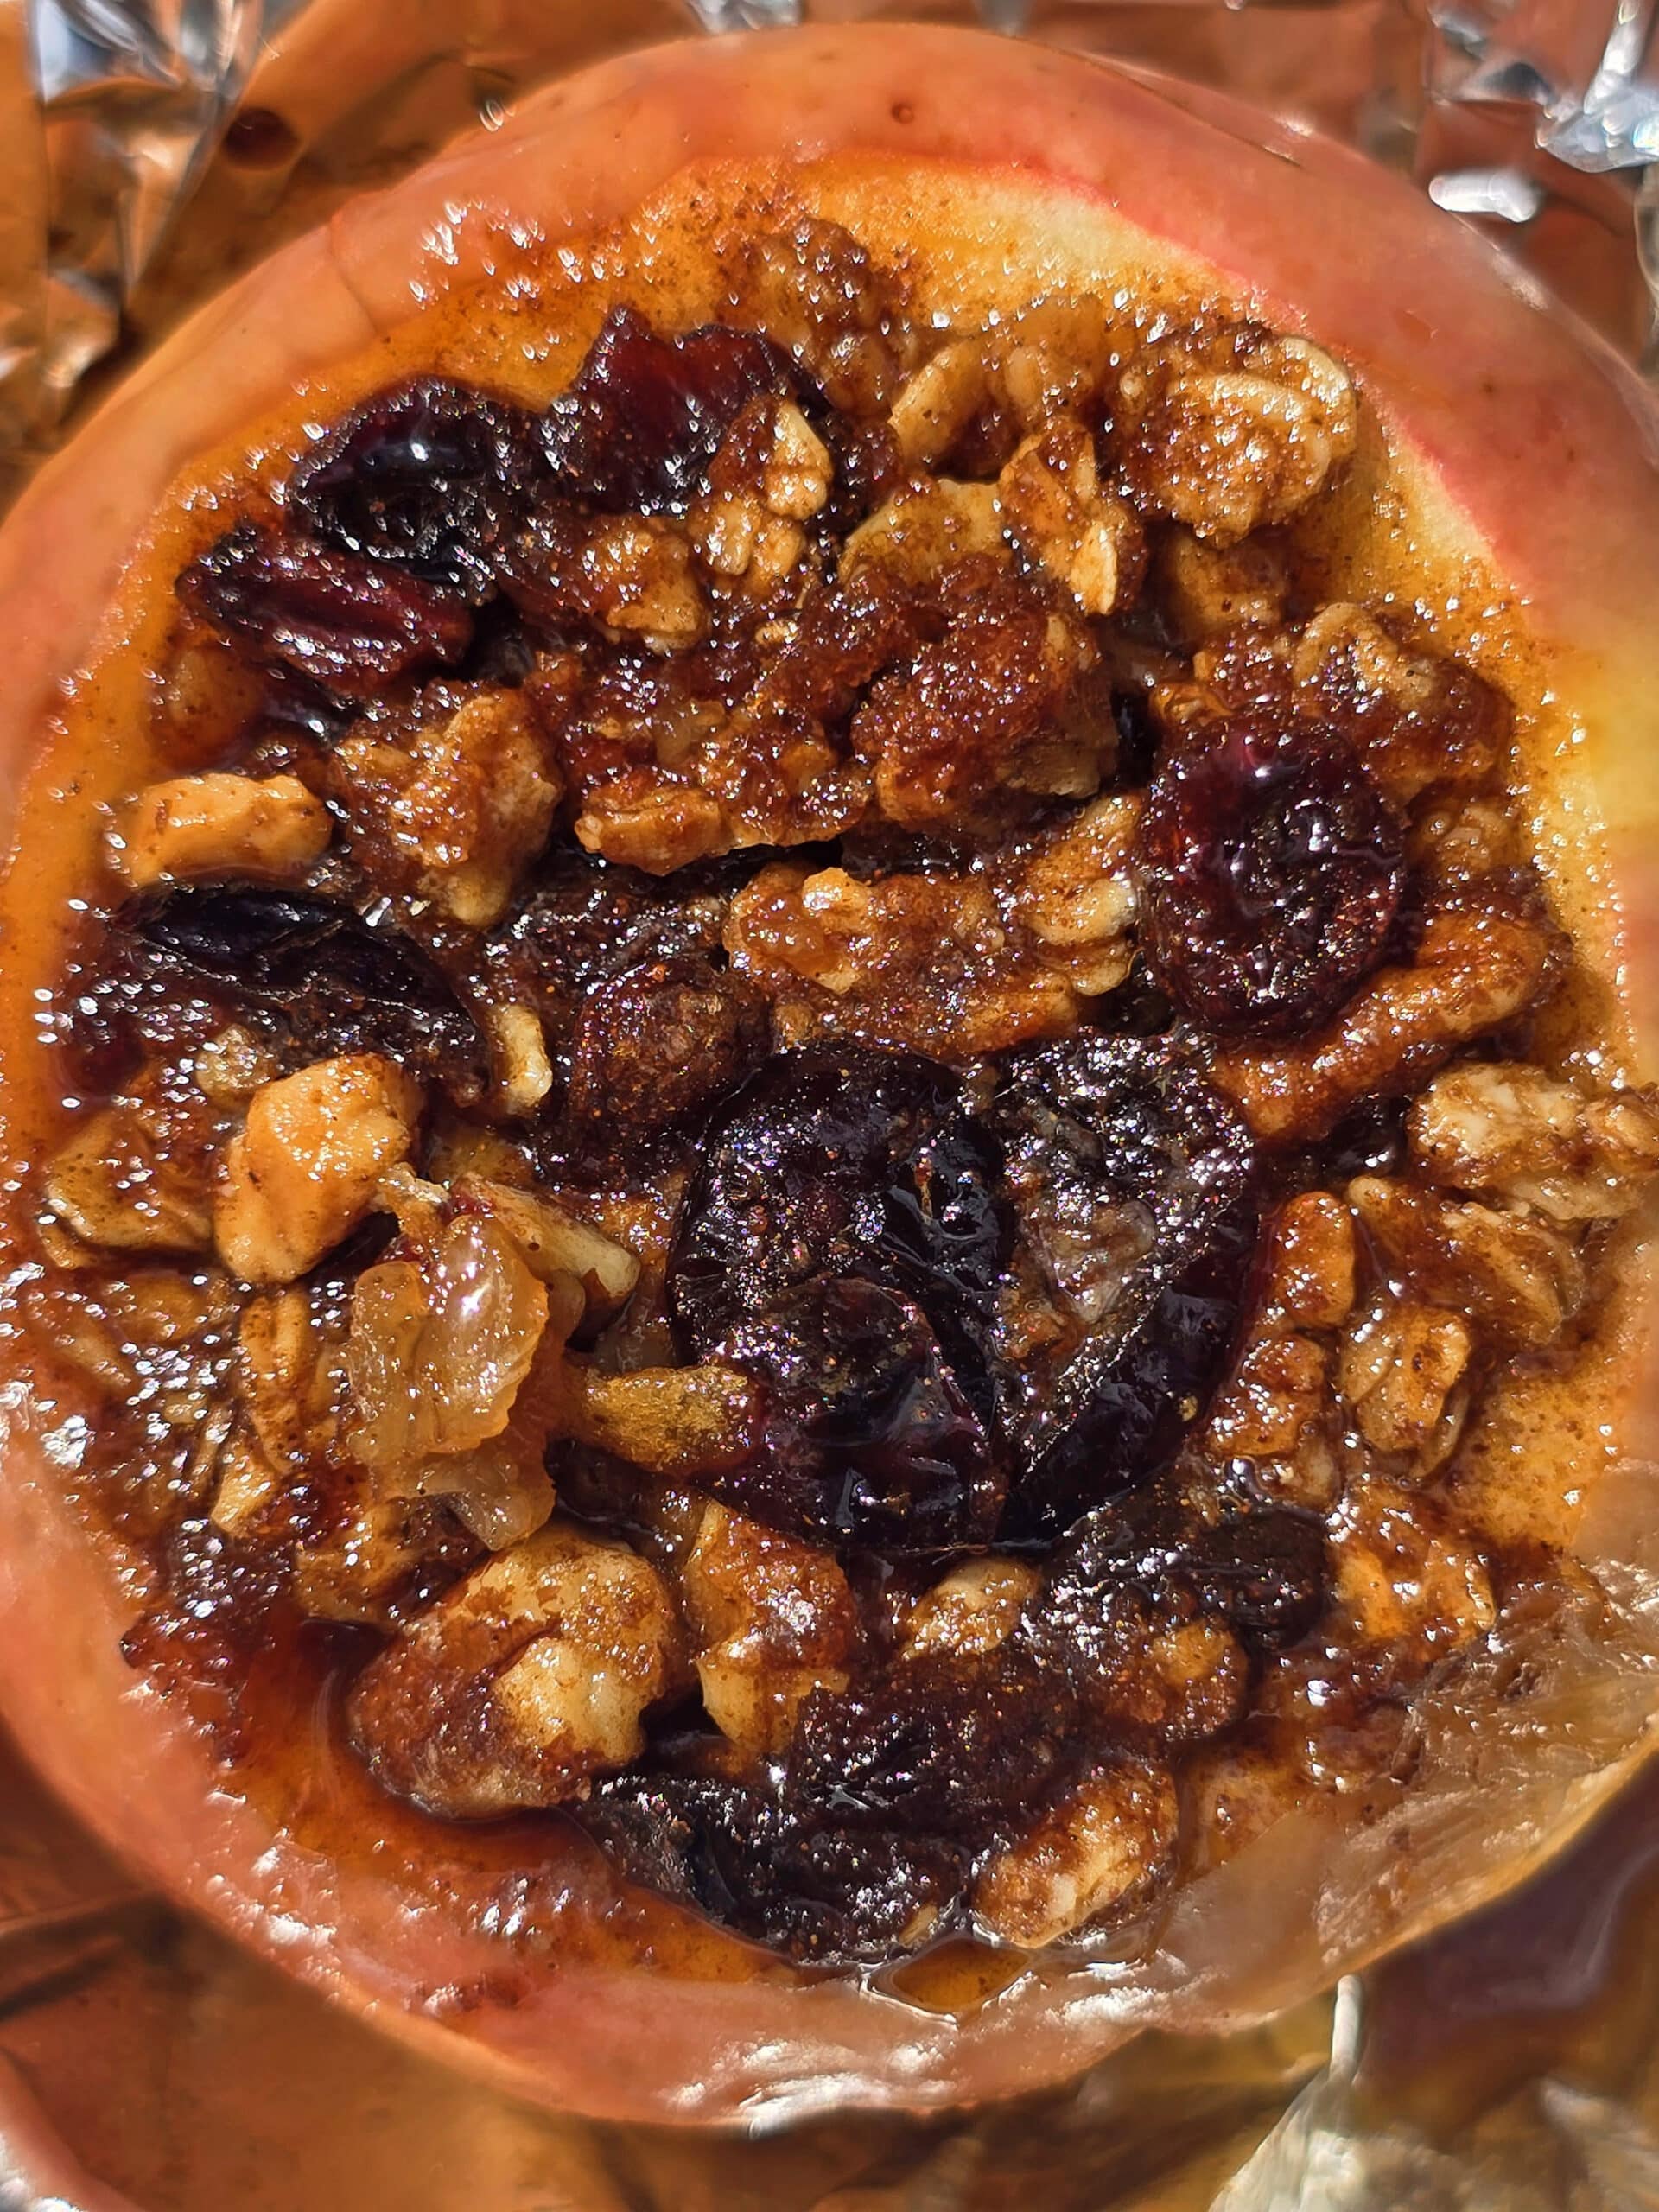
- Once they’re cooked as cooked as you like them, remove them from the grill. Allow the baked apples to cool slightly, then serve hot as-is, or topped with a scoop of vanilla ice cream, caramel sauce - or salted caramel sauce! - and/or whipped cream.
Notes
Nutrition

Thanks for Reading!If you loved this post - or have any questions about it - please leave a comment below! We'd also love it if you would consider sharing the link on social media! |


Marie & Michael Porter
One of our favourite camping desserts - hope you love it too!