Reflectix is a popular way to make DIY RV window shades, for shade, privacy, and temperature control. Here's my way to make them look nicer - and more functional!

The best option for night shades.
Sure, I’d already replaced the old curtains throughout the entire RV when we bought it, with new, brightly coloured custom RV window treatments.
They were cute, but didn’t exactly do anything to keep the RV cool in the hot summer months... and they DEFINITELY didn’t function as blackout shades.
After looking at some of popular options out there - exterior shades, roller shades, blackout rv shades - we came up with the PERFECT way to tick all of the boxes: Homemade Reflective Window Shades.
This technique will work on any kind of recreational vehicle, whether you’re in a motorhome like us, towing a fifth wheel or toy hauler, or any travel trailer, really. RV windows are RV windows!
Anyway, these shades provide many benefits.
It protects surfaces inside from destructive UV rays, which means your furniture, flooring, and walls will stay looking newer, longer.
They also help keep the interior of your RV protected from extreme temperatures outside, insulating each of the windows.
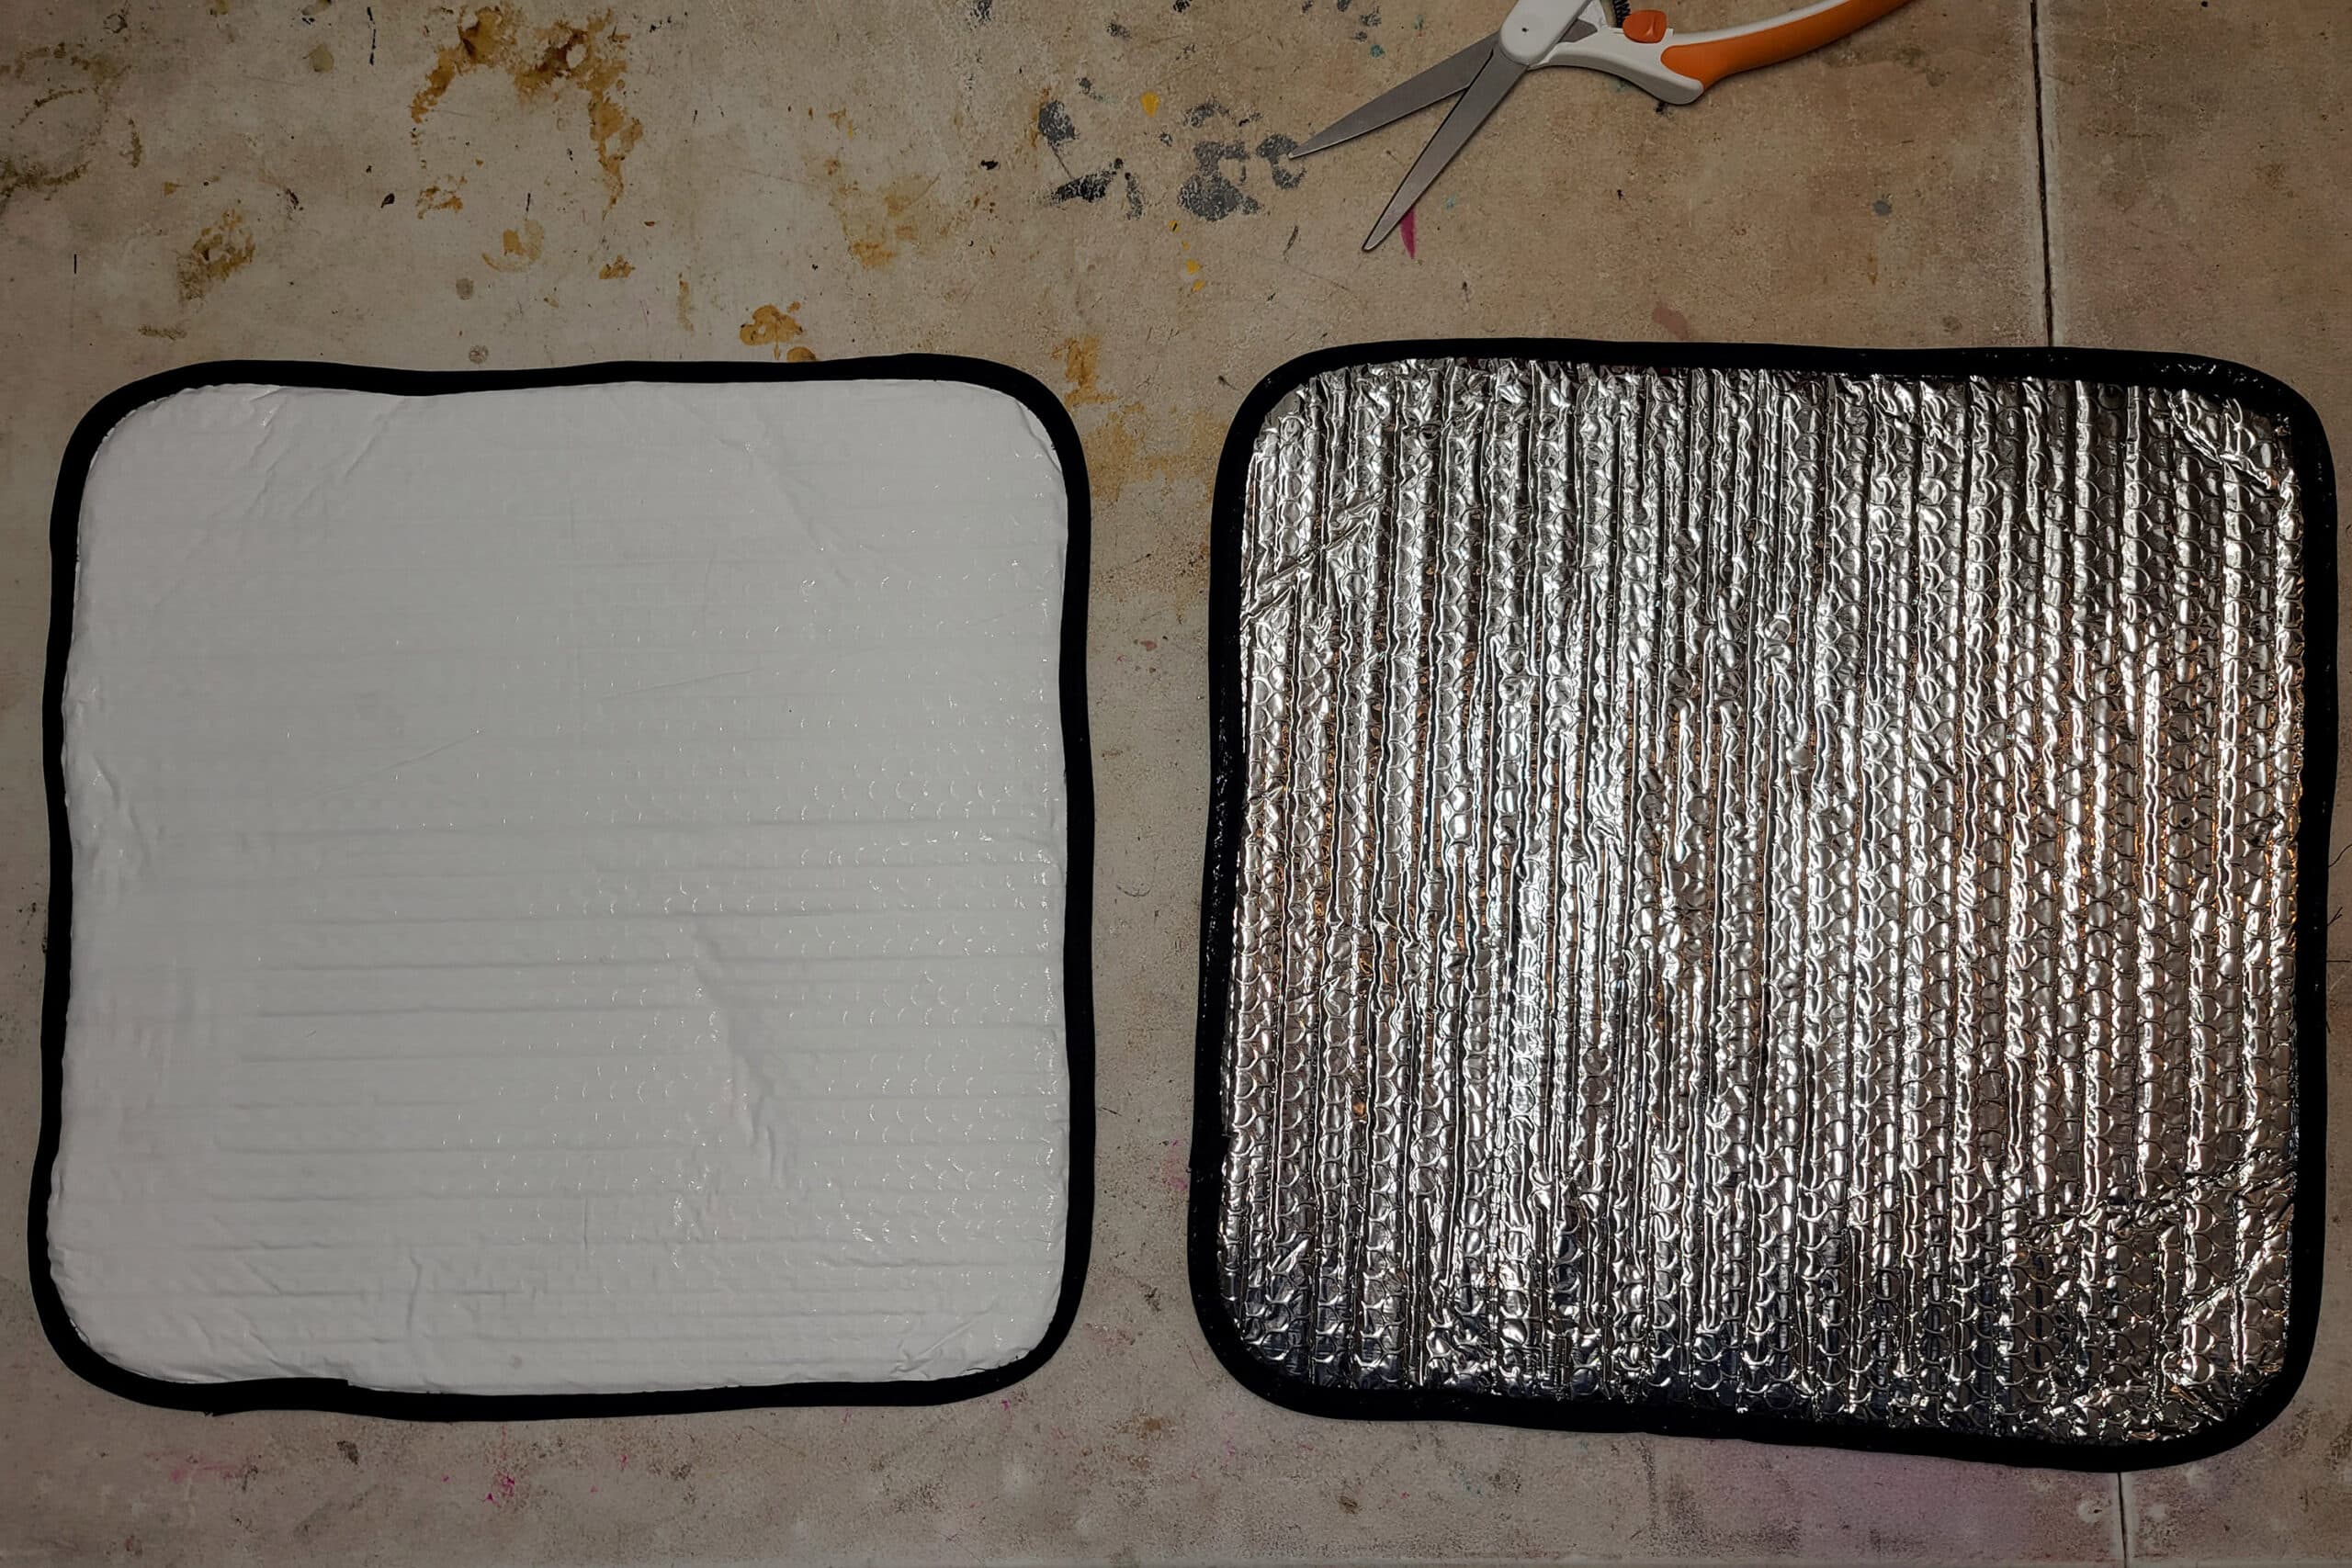
Rather than just using straight insulation, I cover and trim each of the window shades. We add magnets for quick installation when we want to use them.
Anyway, the end result is a relatively elegant solution to several problems. It’s a great design, as it’s both utilitarian for protecting your RV when it’s not in use, while ALSO being attractive enough to employ while you’re enjoying the open road.
This is a two part post. In this tutorial, I show you how to make the shades themselves - I even have a video tutorial, I’ll include it near the end of this post.
In the next one - Installing RV Window Shades - I’ll show you how we finish the set up, for easy use going forward.
Let’s get to it!
Supplies & Tools
There are a few supplies and tools you’ll need to have on hand, to make these window coverings. Some notes for you:
Supplies:
Fabric
Realistically, between the fabric types, patterns, and variety of colors available... your fabric options are almost endless.
Spending some time - and budget - on the fabric you use can be one of the best investments for the interior of your RV - when it comes to aesthetics, anyway.
We went for a basic white Broadcloth, for a clean look. The walls of our motorhome are white, and having white shades makes it look big, bright, and open.
Personally, I like to keep it pretty neutral, as to not limit my options later. If I change my curtains later, I don’t have to worry about how they’ll look with the reflector window shades.
That said, go wild with it, if you want. You can do up your window shades in any number of statement colours or prints, if that’s your thing.
If you have the inclination and budget, you could even get large-scale custom prints of your favourite scenic camping photos custom printed on fabric to use.
Yes, I briefly considered doing so, LOL!
I figured it would do double duty - both as functional window shades, and essentially as artwork for the RV living room. A nice sunset or hiking vista could be nice!
Anyway, while you don’t need a super durable fabric - the Reflectix provides the structure - try to get something that isn’t too sheer, or you could see the silver colour through them.
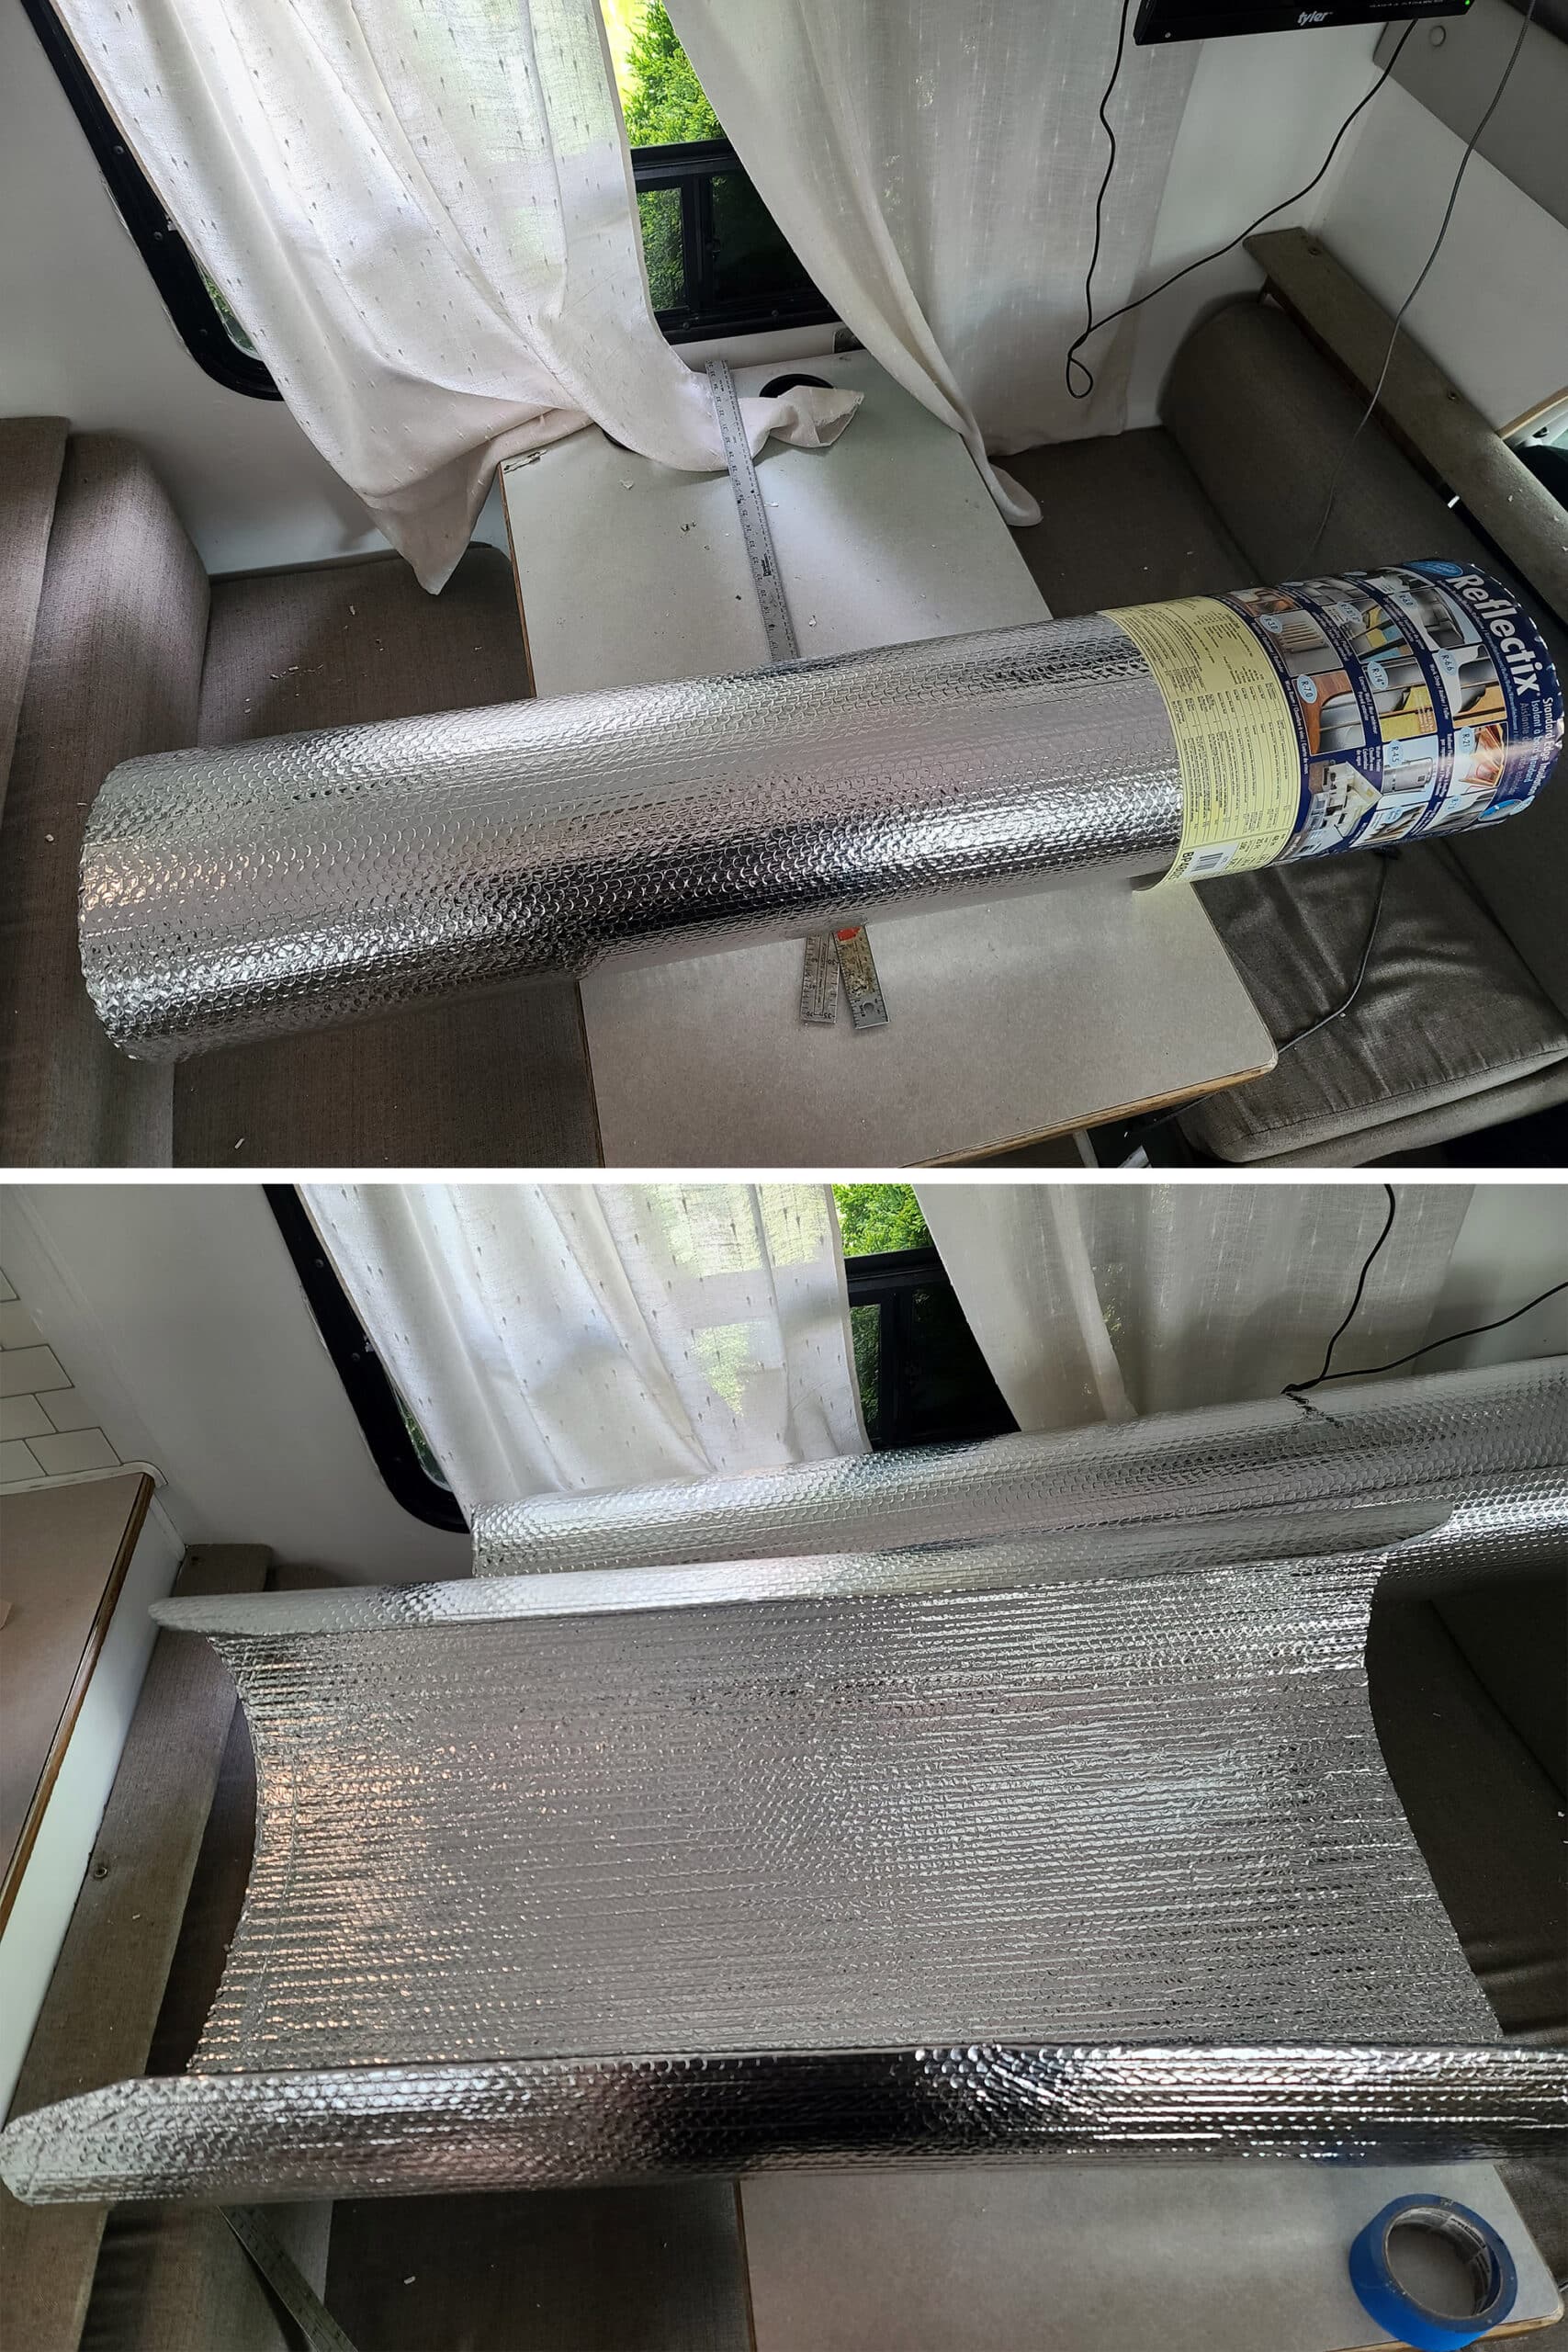
Reflectix
I use Reflectix as our shade material of choice.
It’s a double reflective insulation material, available in a range of sizes.
The reflective surface is great at keeping the intense heat of the summer sun out - A big deal for me, AND for our air conditioner!
It’s also good at keeping heat IN, when camping in the winter.
Pro tip: Buy a Reflectix roll that will fit your largest exterior window, and cut that piece first. Work your way down - cutting largest pieces first, and smallest from any scraps that are big enough.
If one roll doesn’t do it, you’re left with the smallest of your windows - and can buy a smaller, more narrow roll to finish it out. This can save a ton of money!
Spray Adhesive
There are two main types of spray adhesive I recommend using.
If you’re making small - or smalli-ish - window shades, or are really experienced with this kind of thing (I am, from my Spandex Costuming!), I recommend using Super 77 Spray.
It’s a good, strong, permanent spray adhesive.
That said, it can be rough to deal with if you’re not accurate with your placement. It’s not really intended to be repositionable - you CAN sort of peel it back, but it’s fussy.
This is an important thing to keep in mind when dealing with really large window reflectors.
If any of this is of concern, I recommend using Odif's 505 Temporary Fabric Adhesive.
This turns anything you spray it onto into basically a giant Post-It note. Great when you have to reposition, or fuss with fabric placement.
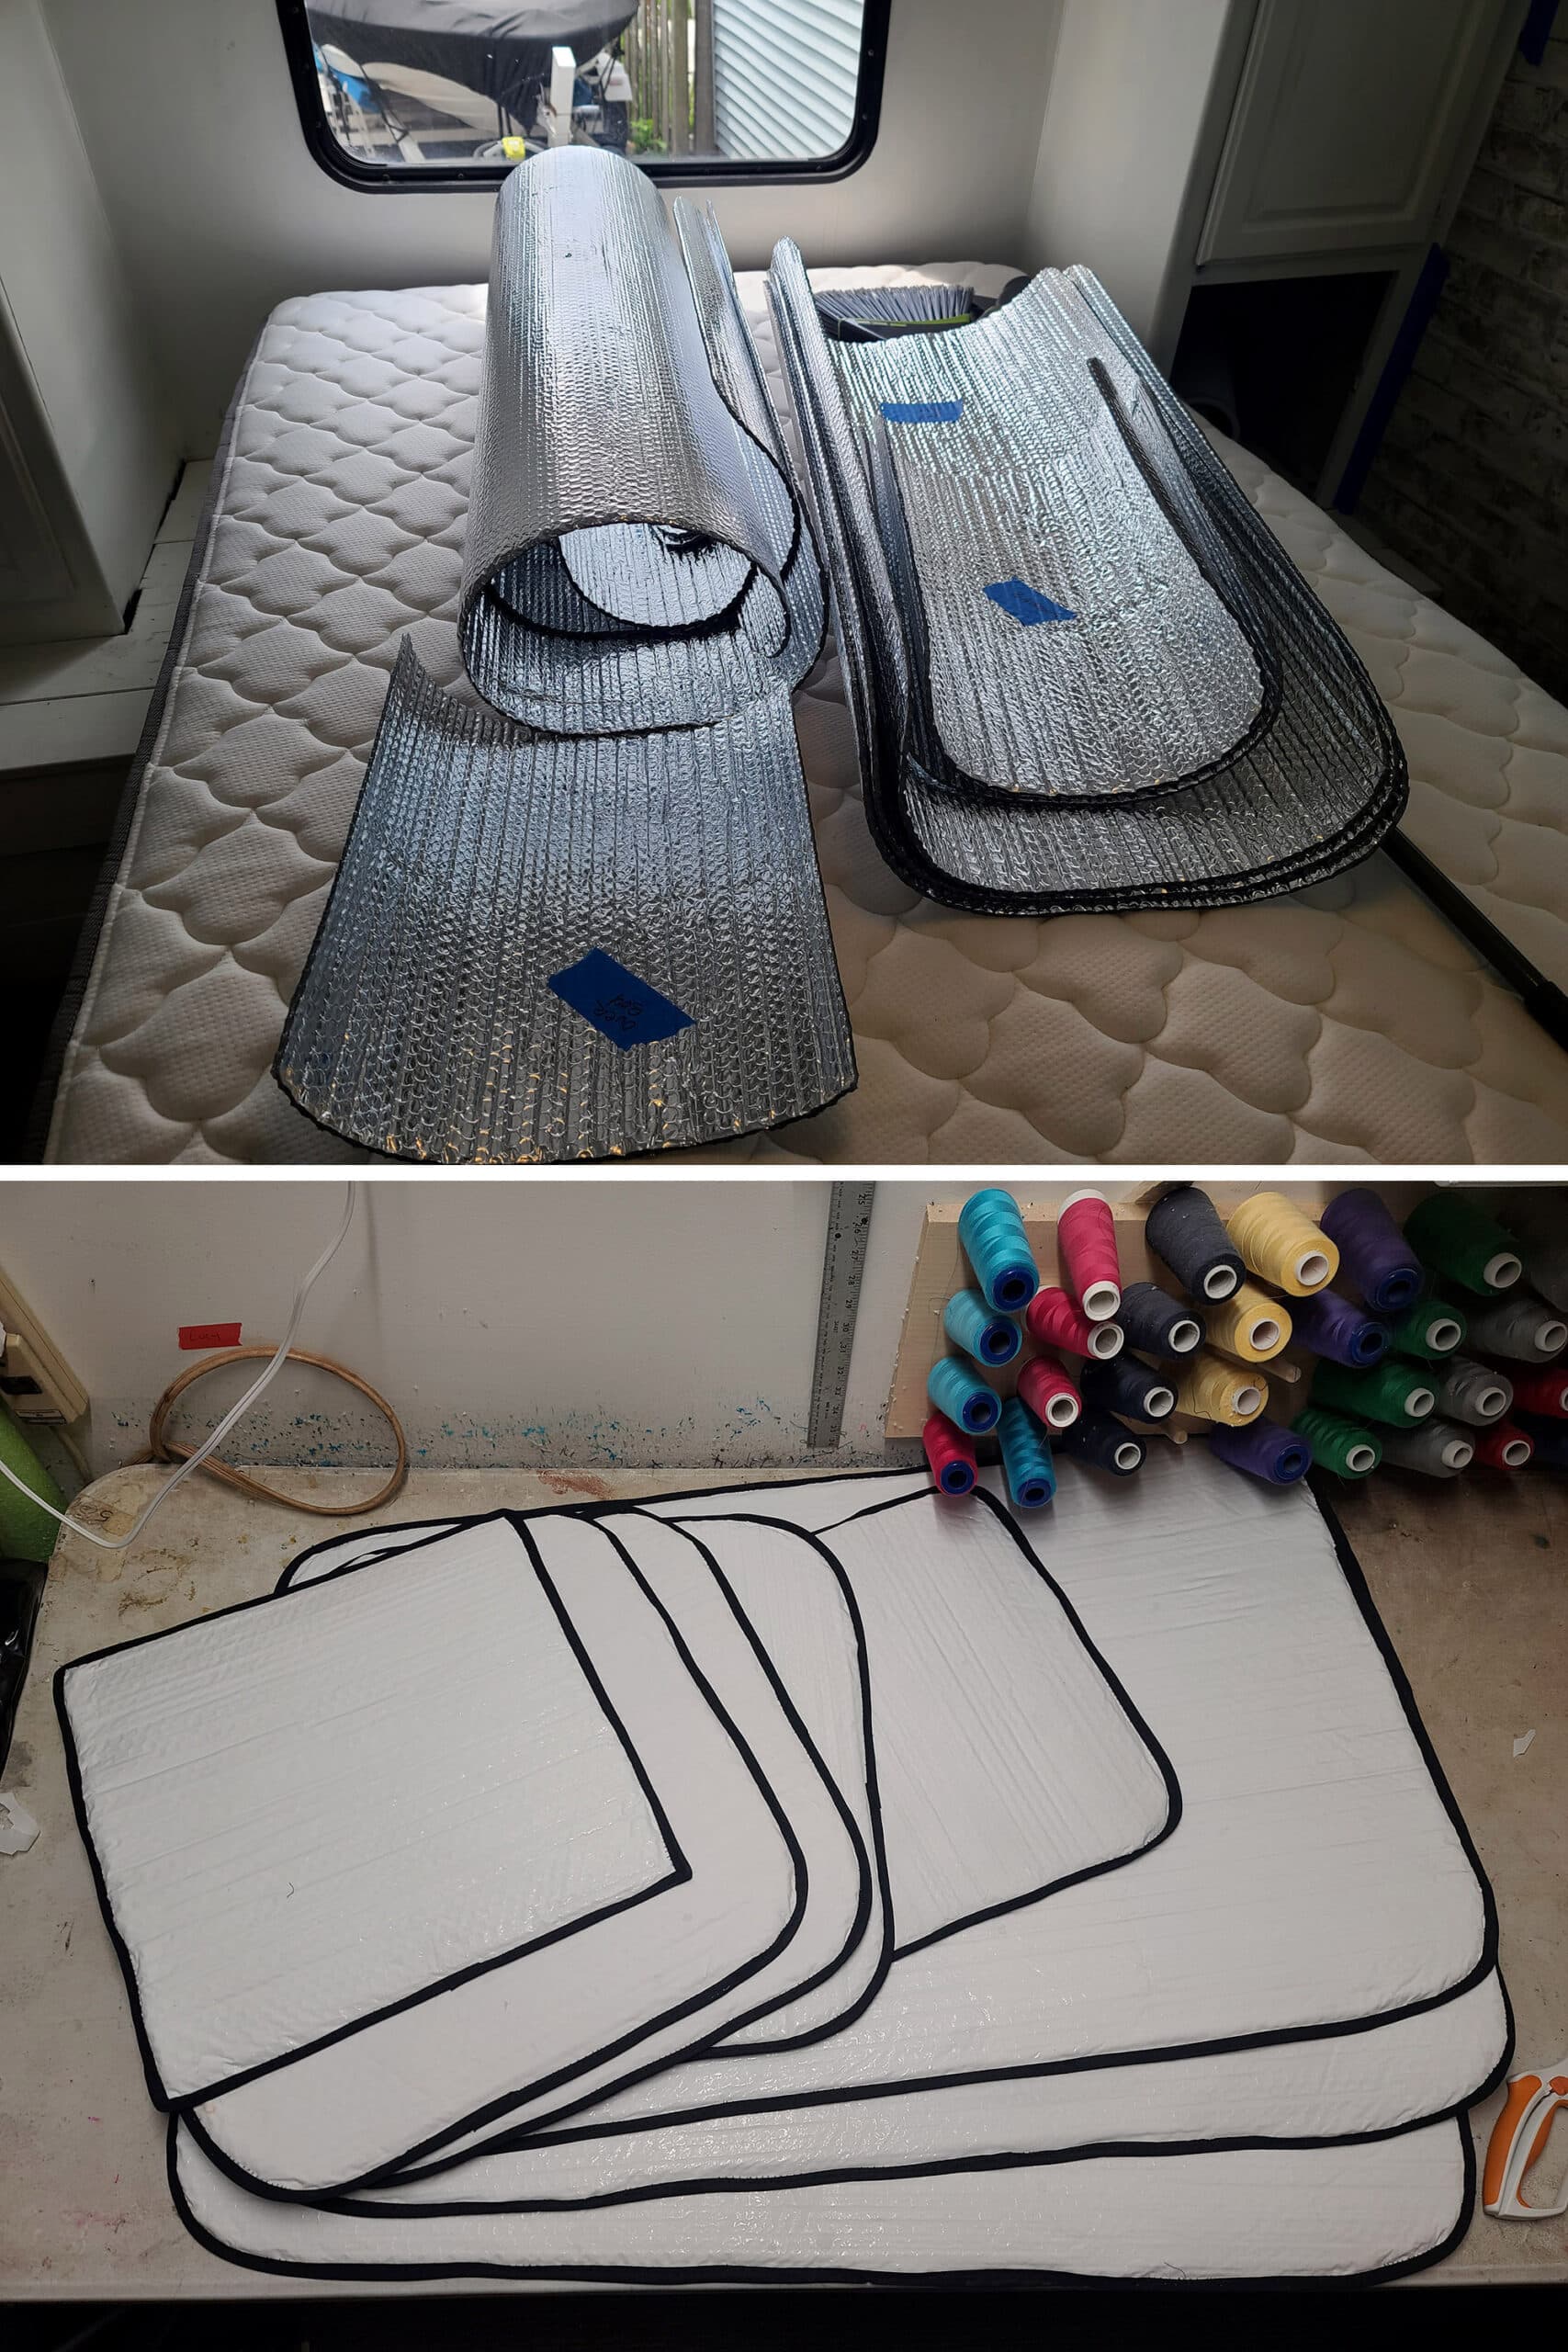
Bias Tape
Next, you’ll need some bias tape / binding tape, to finish the raw edges of your RV window shades.
I use 1" Bias Tape, as it gives you enough width to work with.
You’re folding it over maybe ¼" of thickness from the fabric and reflective insulation, and then you want some wiggle room as well.
1" binding tape is easy to find in black and white, but also comes in a few other colours. You can either match it to your chosen fabric, or pick a contrasting colour, as we did.
Normally, I would have used white... but I knew I’d be doing this post, eventually. Black photographed better than white would have.
Paper
I use 2 different kinds of paper in this project: A sheet of regular white printer paper, and rosin paper.
The printer paper is for patterning the corners of the window shades, as ours have rounded edges.
The rosin paper - you could use a wide roll of brown Craft Paper, or even newspapers if you want - is what I use for a drop cloth, when gluing the insulation.
I don’t bother patterning the overall window size for each, I just cut them while using a yard stick and a framing square.
If you prefer to use an actual pattern, you can make them out of the craft / rosin paper.
I get my rolls of rosin paper at home improvement stores - they last a long time, for what I use them for!
Everything Else
The last few supplies you’ll need to make your own reflective window shades are just a marker and some masking tape.
That’s it!
Tools:
Along with your supplies, you’ll need a few tools:
Sewing Machine
Yard Stick
Framing Square
Scissors.
As far as the sewing machine goes, you’ll want something that can do a wide zig zag.
In terms of the scissors, I like Fiskars Easy Action Scissors.
Share the Love!If you’ve made one of our recipes, be sure to take some pics of your handiwork! If you post it to Bluesky, be sure to tag us - @2NerdsInATruck, or you can tag us on TikTok, if you’re posting video. We're also on Pinterest, so you can save all your favourite recipes and park reviews to your own boards! Also, be sure to subscribe to our free email newsletter, so you never miss out on any of our nonsense. Well, the published nonsense, anyway! |
How to Make Fabric Covered RV Window Shades
The specifics about sizing and shape will vary wildly based on the window(s) you’re planning to make shades for, but here’s the basic idea.
Gather the Data
Start by getting the basic measurements for the windows you’re going to be covering - length and width.
As I was making shades for every window in our RV at the time, I made a chart with the window location, width, length, and “notes”.
Notes were for anything else to keep in mind, as I was taking the measurements.
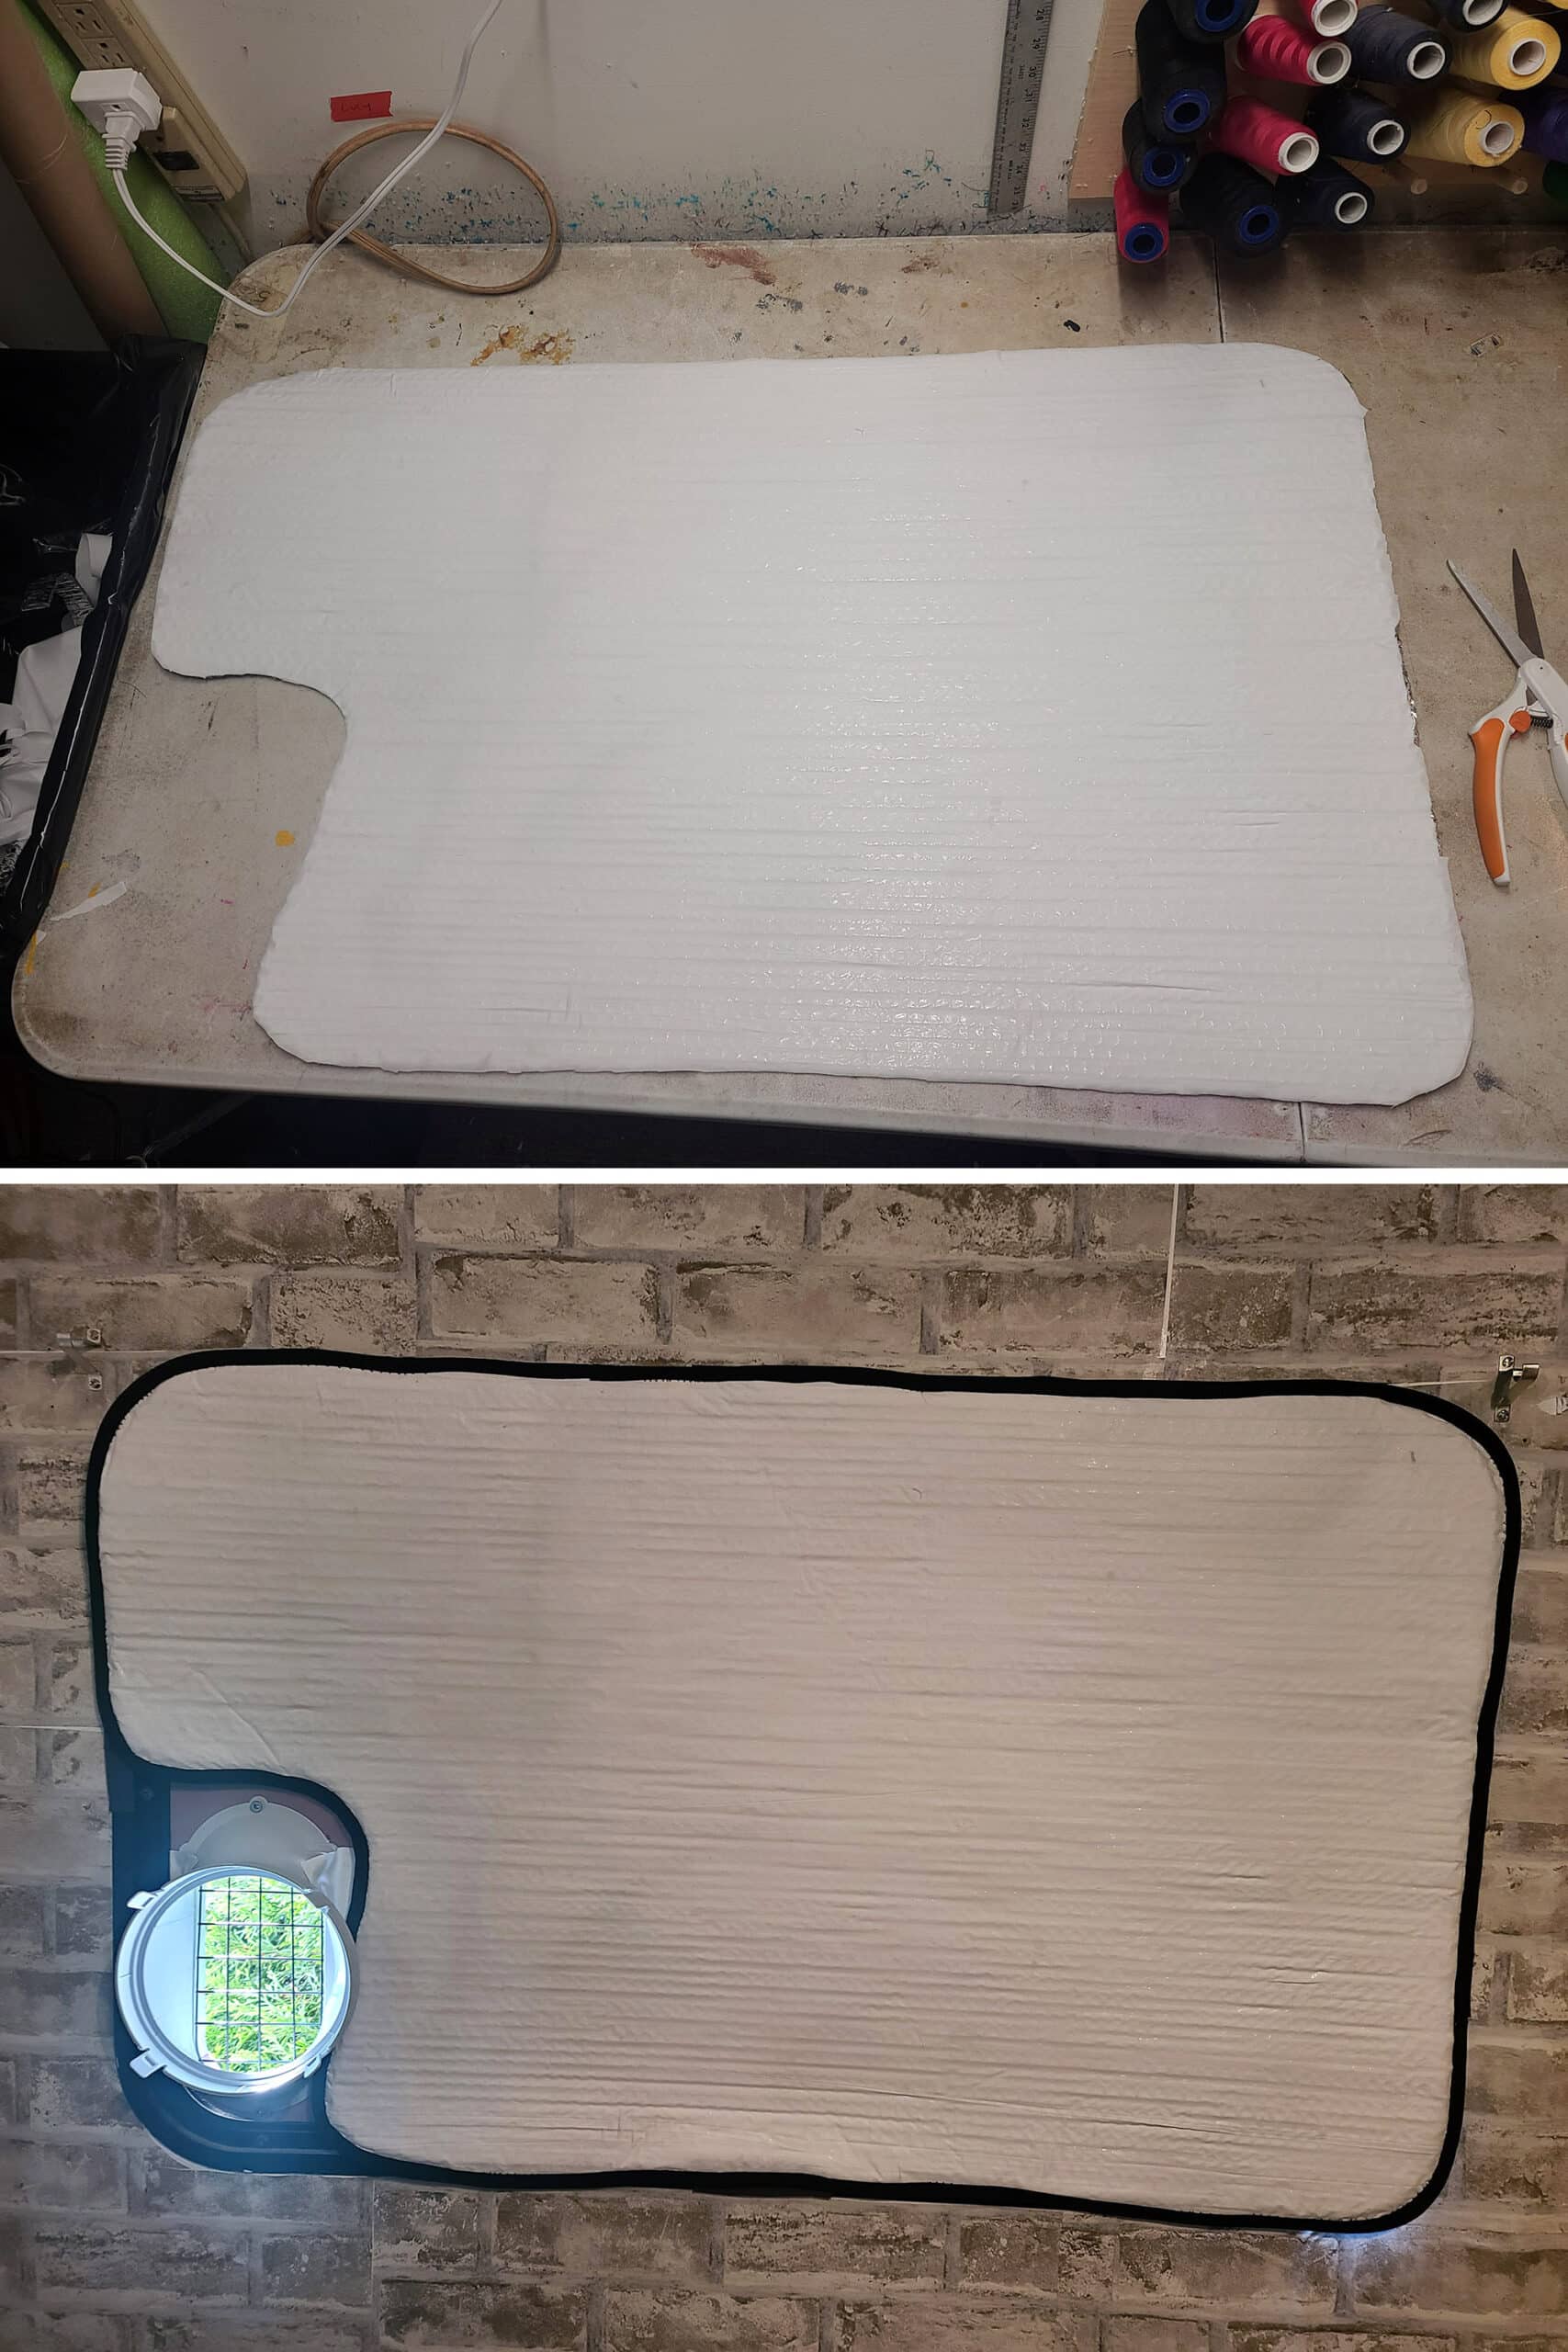
For instance, 3 of our window shades would need a little cutout for the window crank handle.
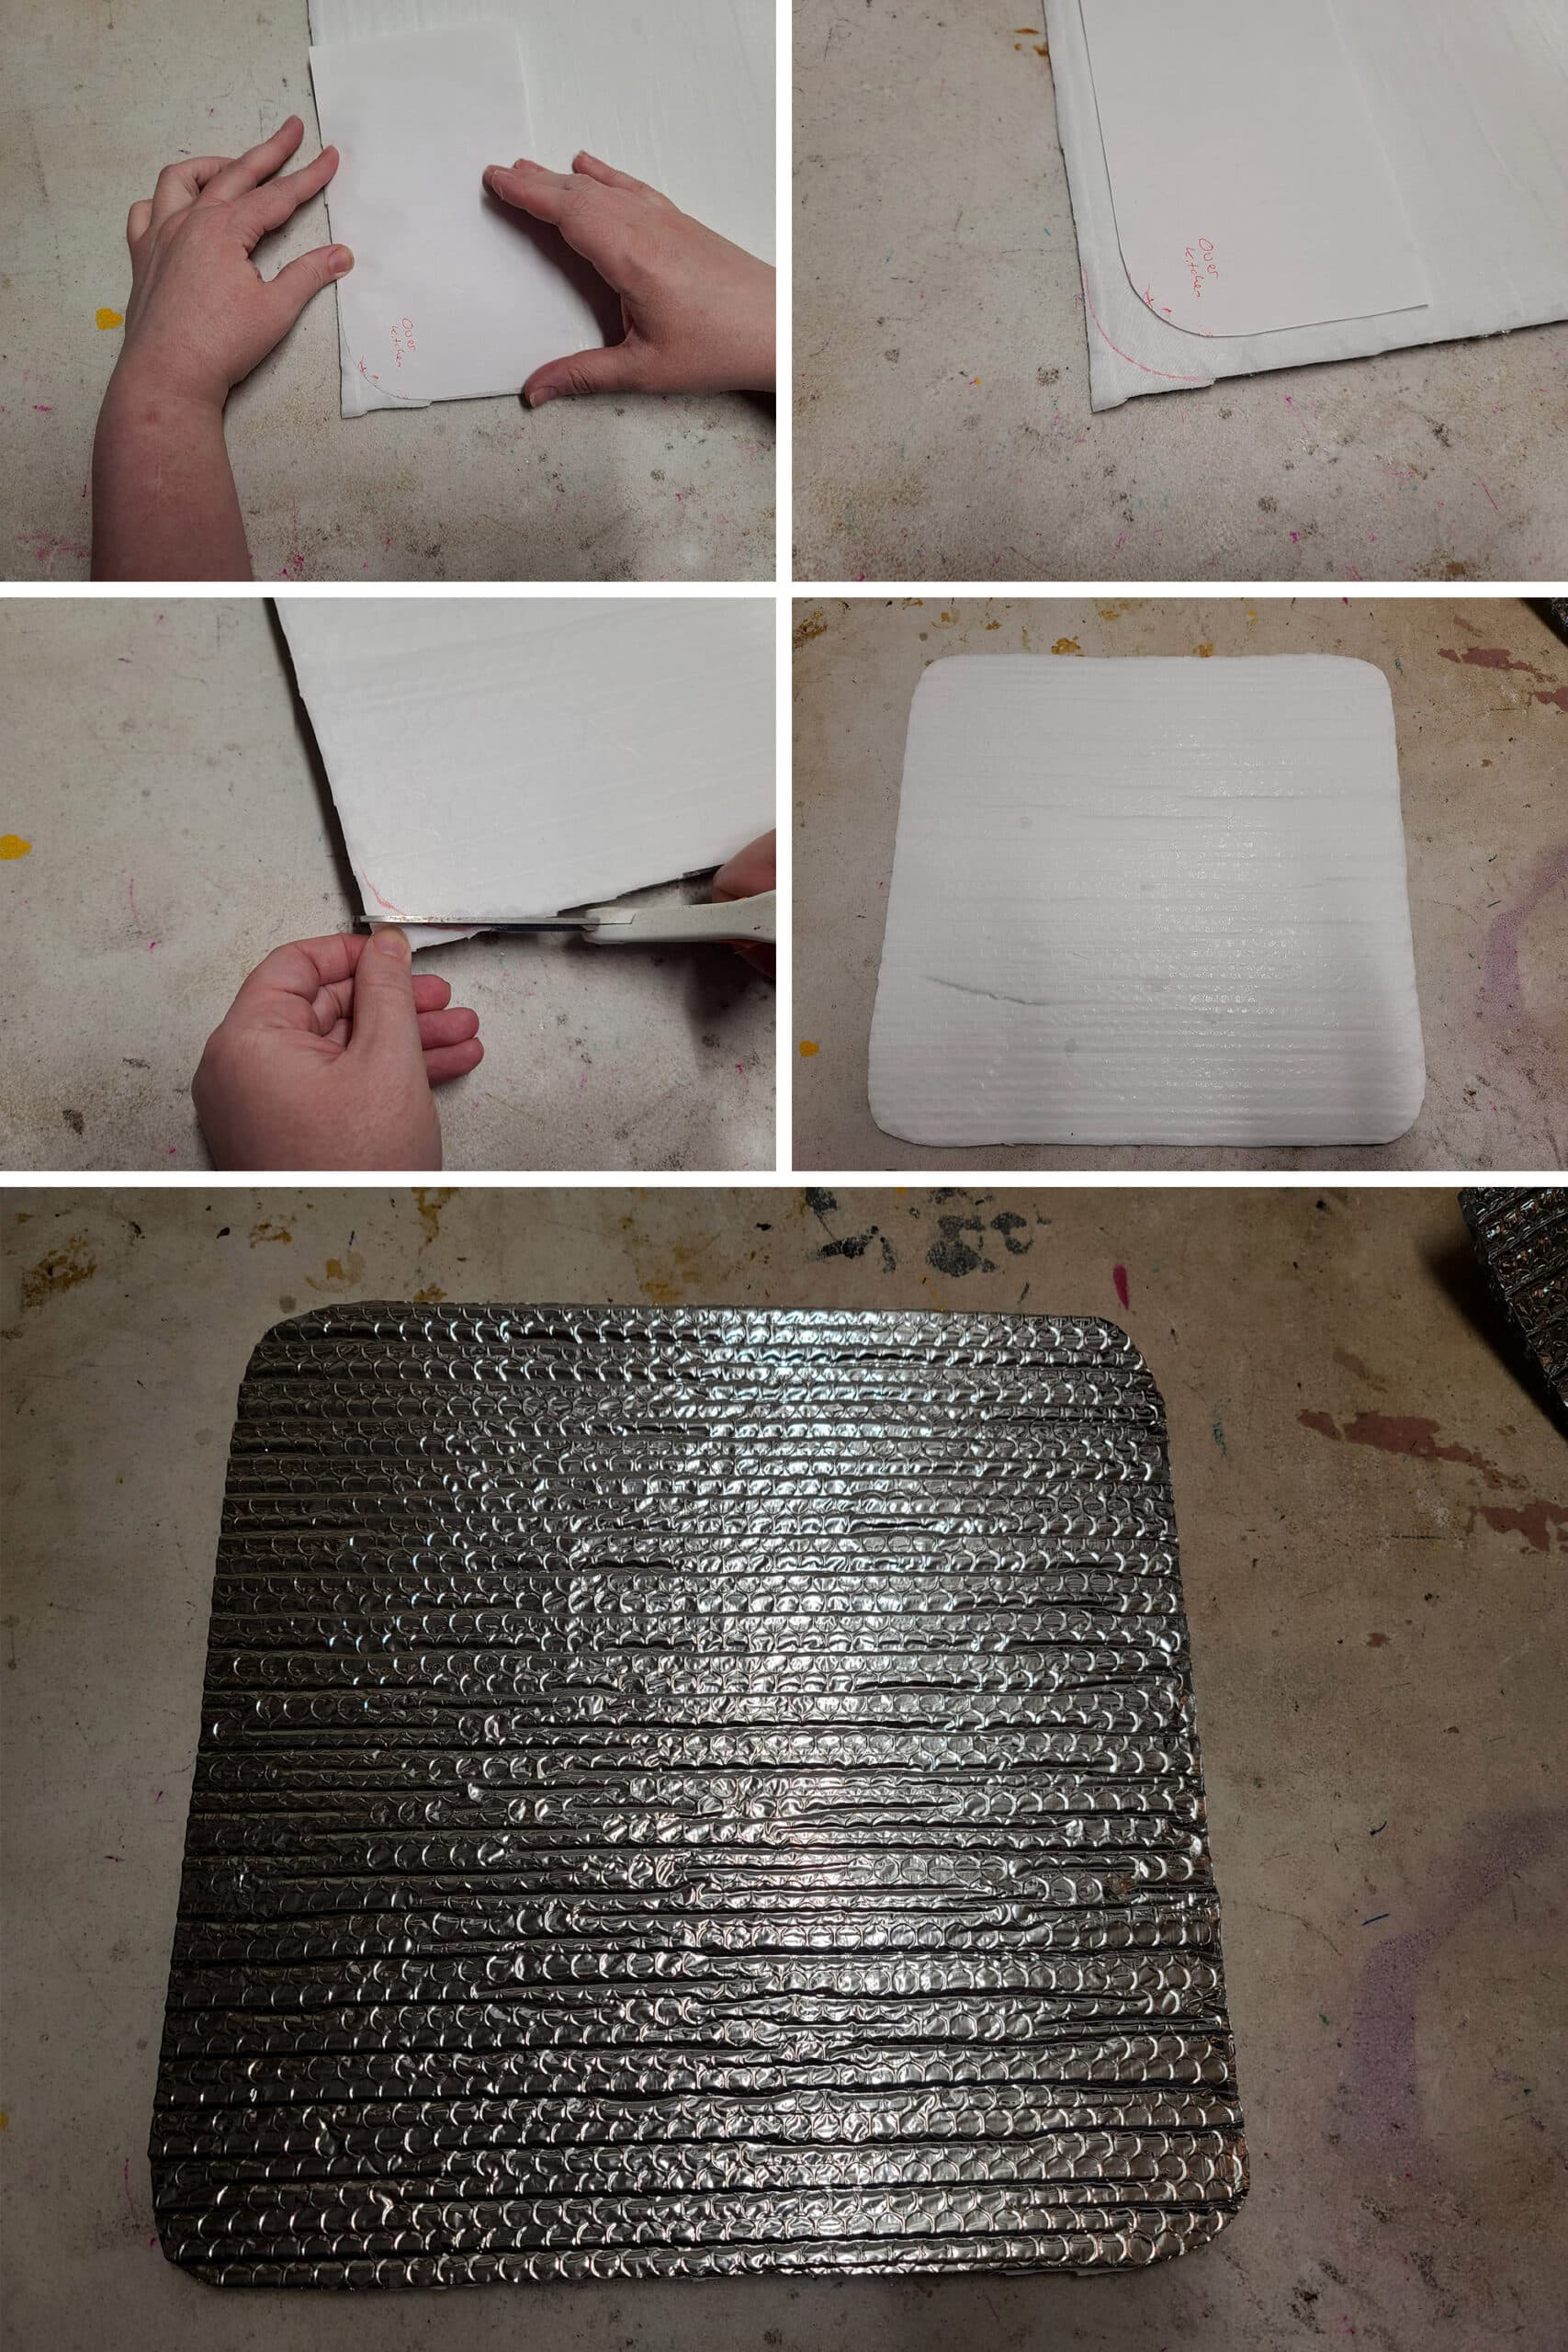
Patterning
You can make paper patterns for each window, or just very CAREFULLY cut each piece out from the roll of Reflectix.
If your windows don’t have square corners, though... you’ll want to make a pattern for the corners.
In our case, every window had 4 rounded corners.
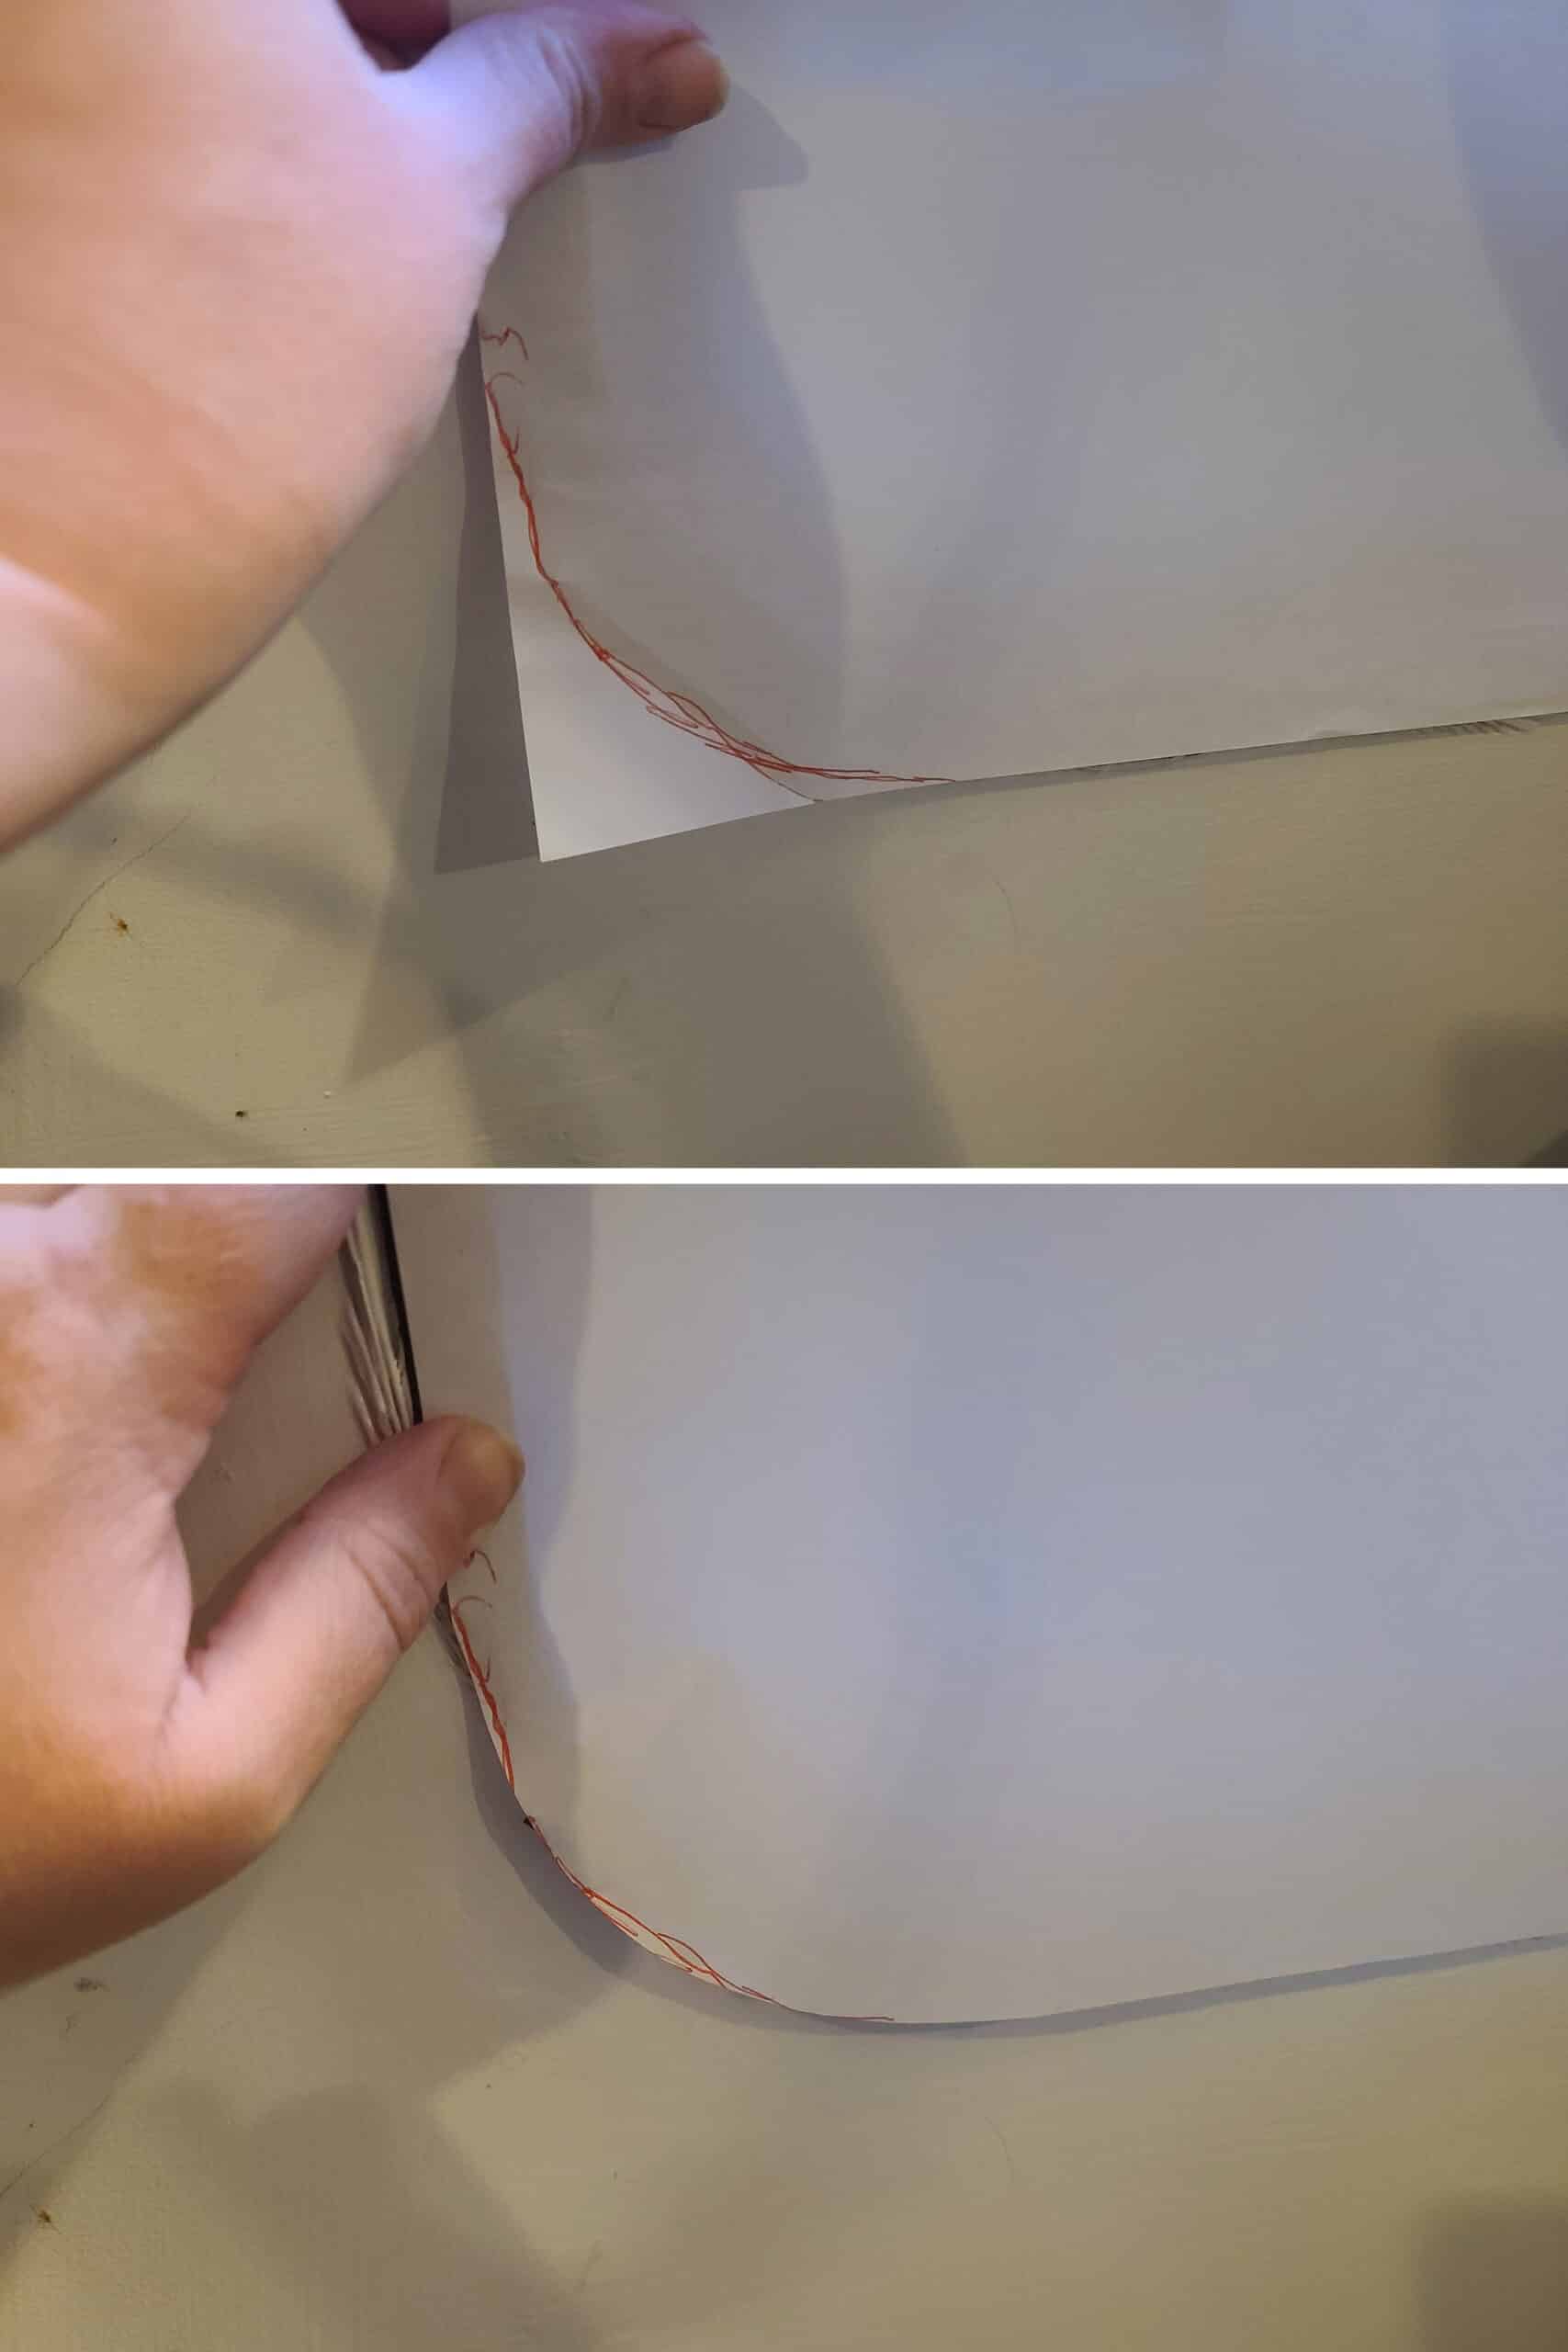
First, I held a piece of regular 8.5" x 11" paper up to one of the corners, making sure to line one length and one width of the paper up with the applicable edges of the corner, as shown below.
Then. I used a pen to trace ROUGHLY around the corner curve of the outer edge of the window frame.
Once I was happy I had a perfect fit, I trimmed the paper and checked it against the actual edge.
Cutting
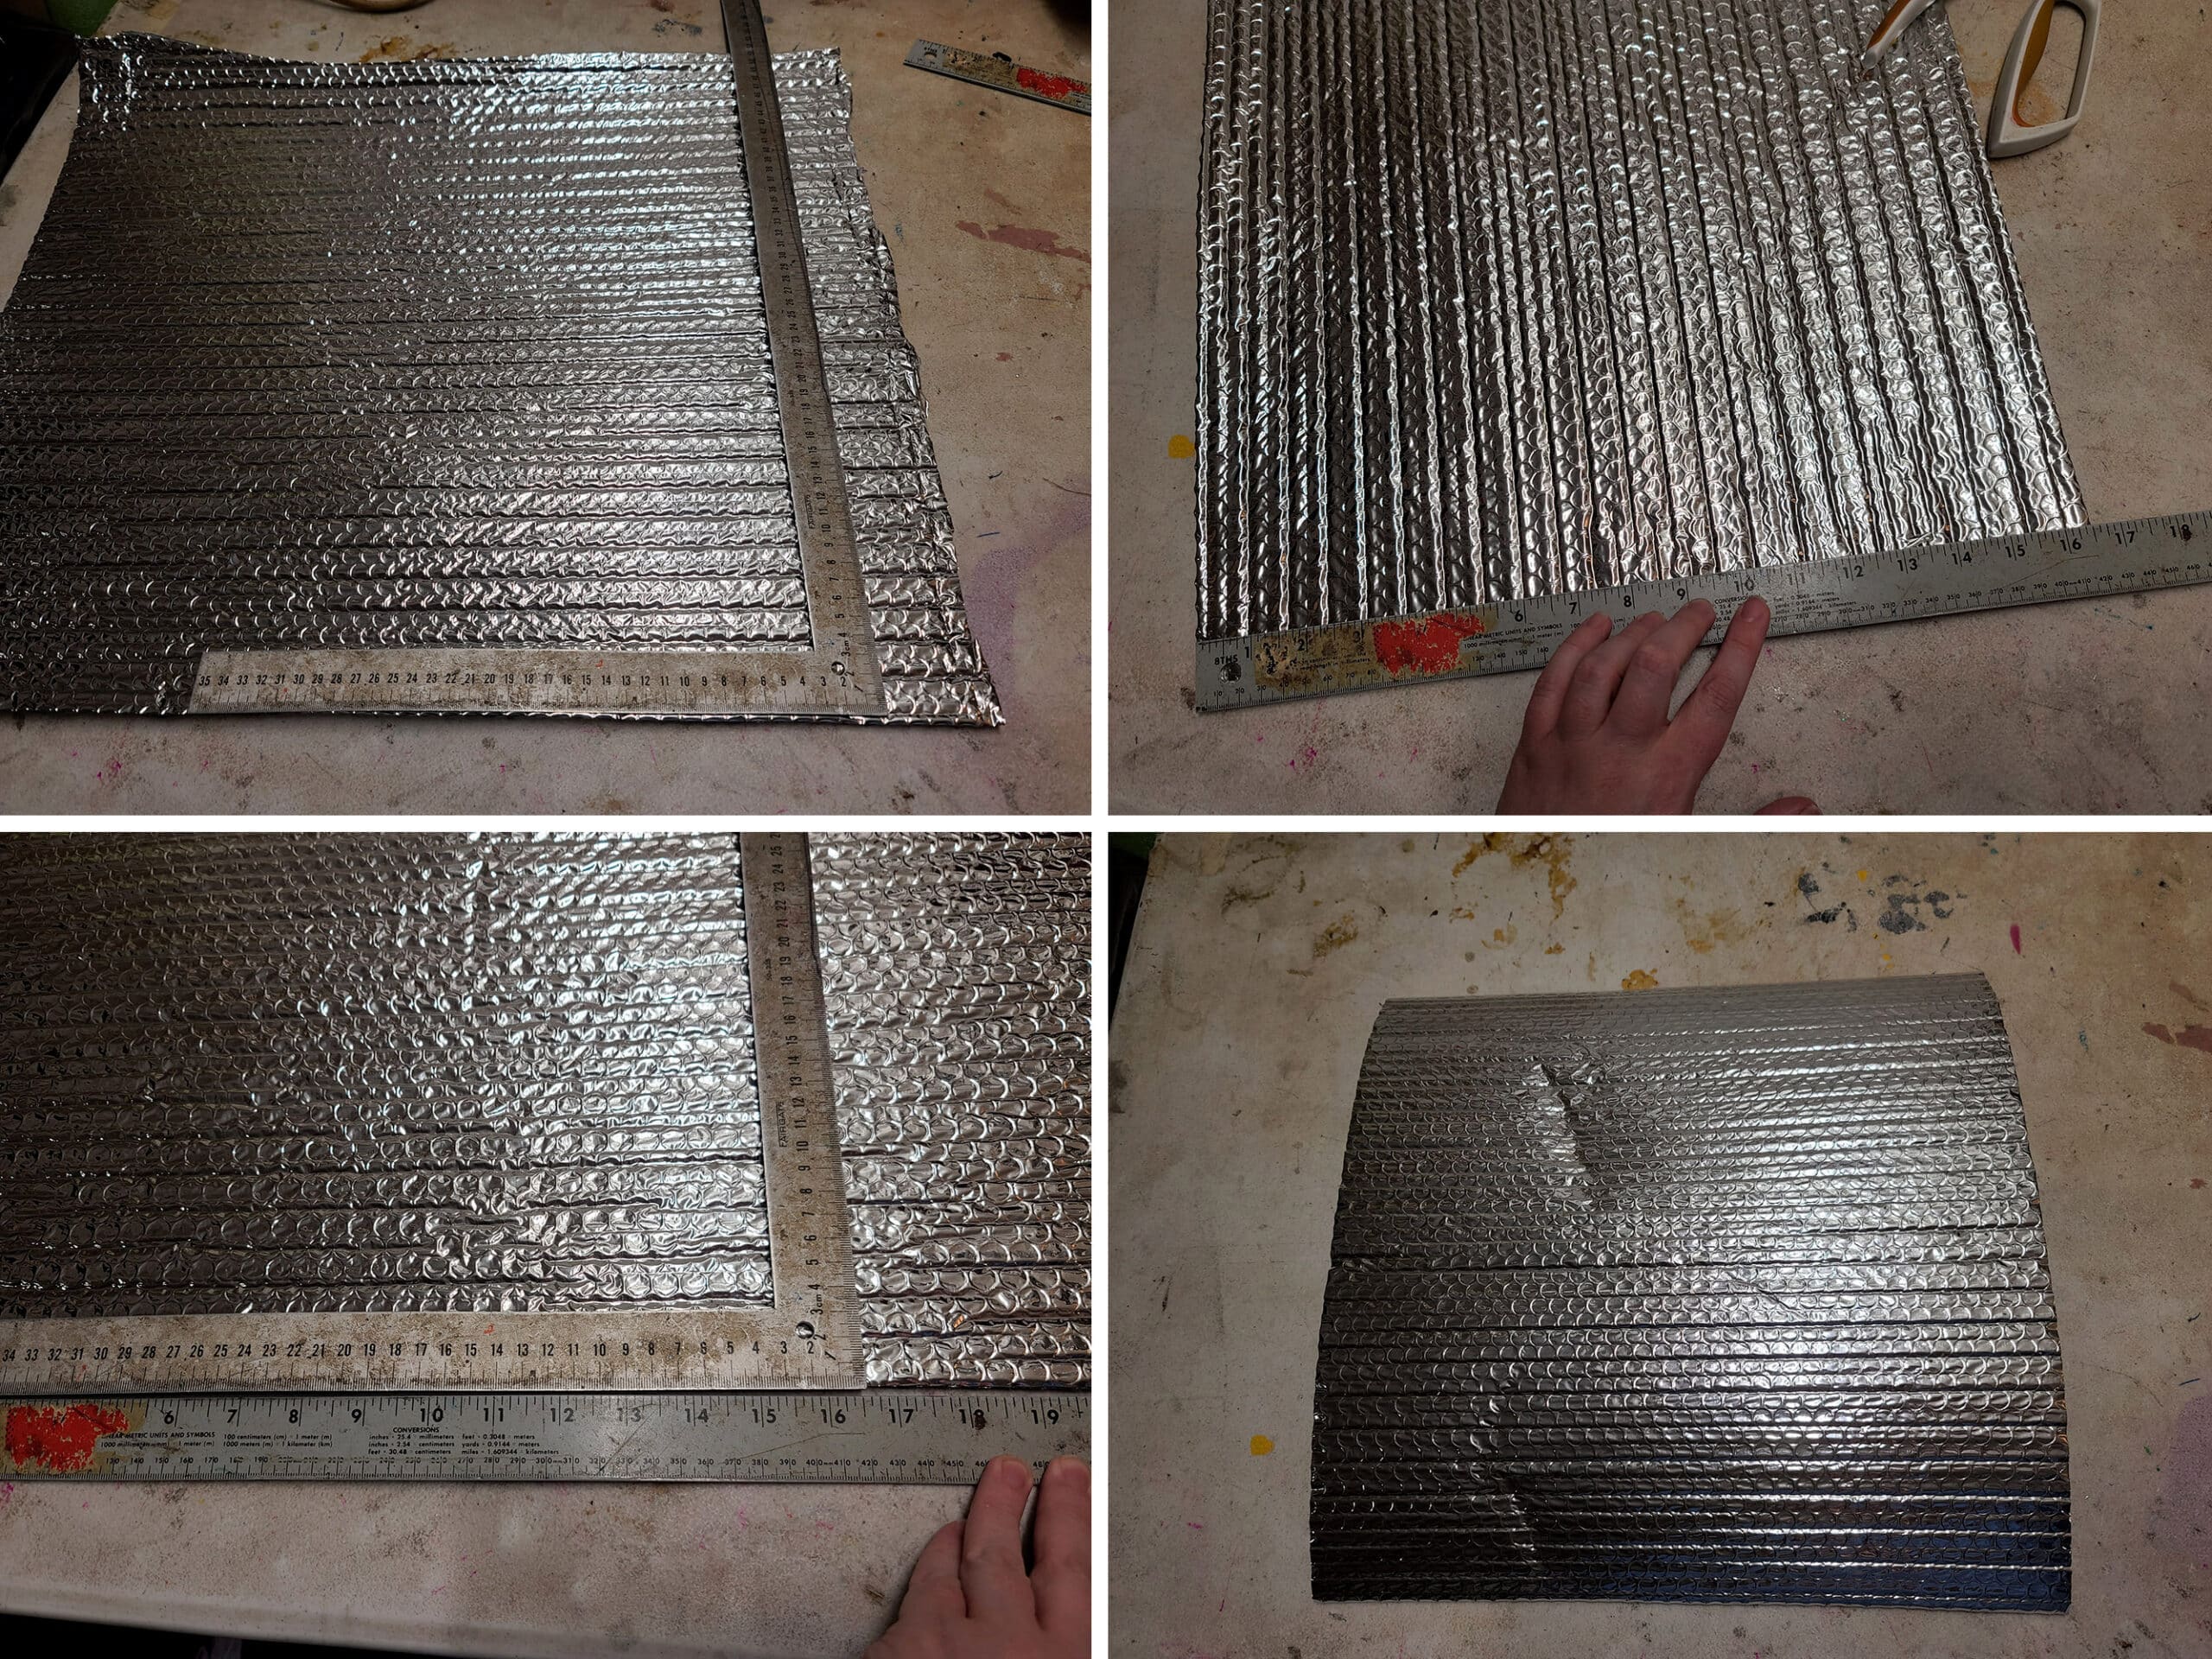
Using a yard stick and a framing square, carefully cut out each of your window shades.
I like to cut each of them so that the channels in the Reflectix run along the length - side to side, if you were to hold it in place against the window it’s intended for.
If you’re doing multiple sizes / shapes, I find it helpful to use a piece of masking tape to label each: “Driver’s Side Front”, “Dining Table”, “Door”, “Washroom”, “Passenger Side Bedroom”, etc.
Preparing the Sewing Area
Lay your fabric out on a clean work surface, right side facing down. This piece of fabric should be larger than the piece of Reflectix being applied to it.
If you’re using a fabric with any kind of directionality, decide how you want it to look when your window shades are installed. Then, make note of that, when laying it out.
For instance, if there are vertical stripes, I’ll lay the fabric out so that the lines are facing away from me, and I consider the furthest edge to be the “top”.
How you arrange this is up to you, and will depend on the size and shape of your windows and your work space. Go with whatever makes sense, then just keep that idea in place for the remaining window covers.
Once you’ve decided on positioning, make sure your fabric is laid out flat and even, with no warping, stretching, or wrinkles.
Pro Tip: Iron the fabric if it needs it!
This is just to protect your belongings and work surfaces when you’re spraying glue - it can be REALLY difficult to clean off!
Bond the Fabric to the Reflectix
Lay one of your cut pieces of Reflectix out on your drop cloth, so that the edges are curling DOWN towards the table.
Spray generously with your choice of adhesive - see the supplies section for important information.
When spraying, be careful to not get globs of glue dripping on your Reflectix - they can seep through the fabric.
If you do end up with globs, it’s best to take the time to wipe them off as much as you can, and re-spray.
Invert the glued surface of the Reflectix over the wrong side of your fabric, making sure that it’s lined up such that the length/width/direction of the fabric is lined up where it should be, on the cut Reflectix.
Flip the whole thing over, and smooth out any wrinkles that may have happened.
This might involve peeling back some of the fabric and repositioning it. If that’s the case, take care to *smooth* it back down, rather than stretching or warping it.
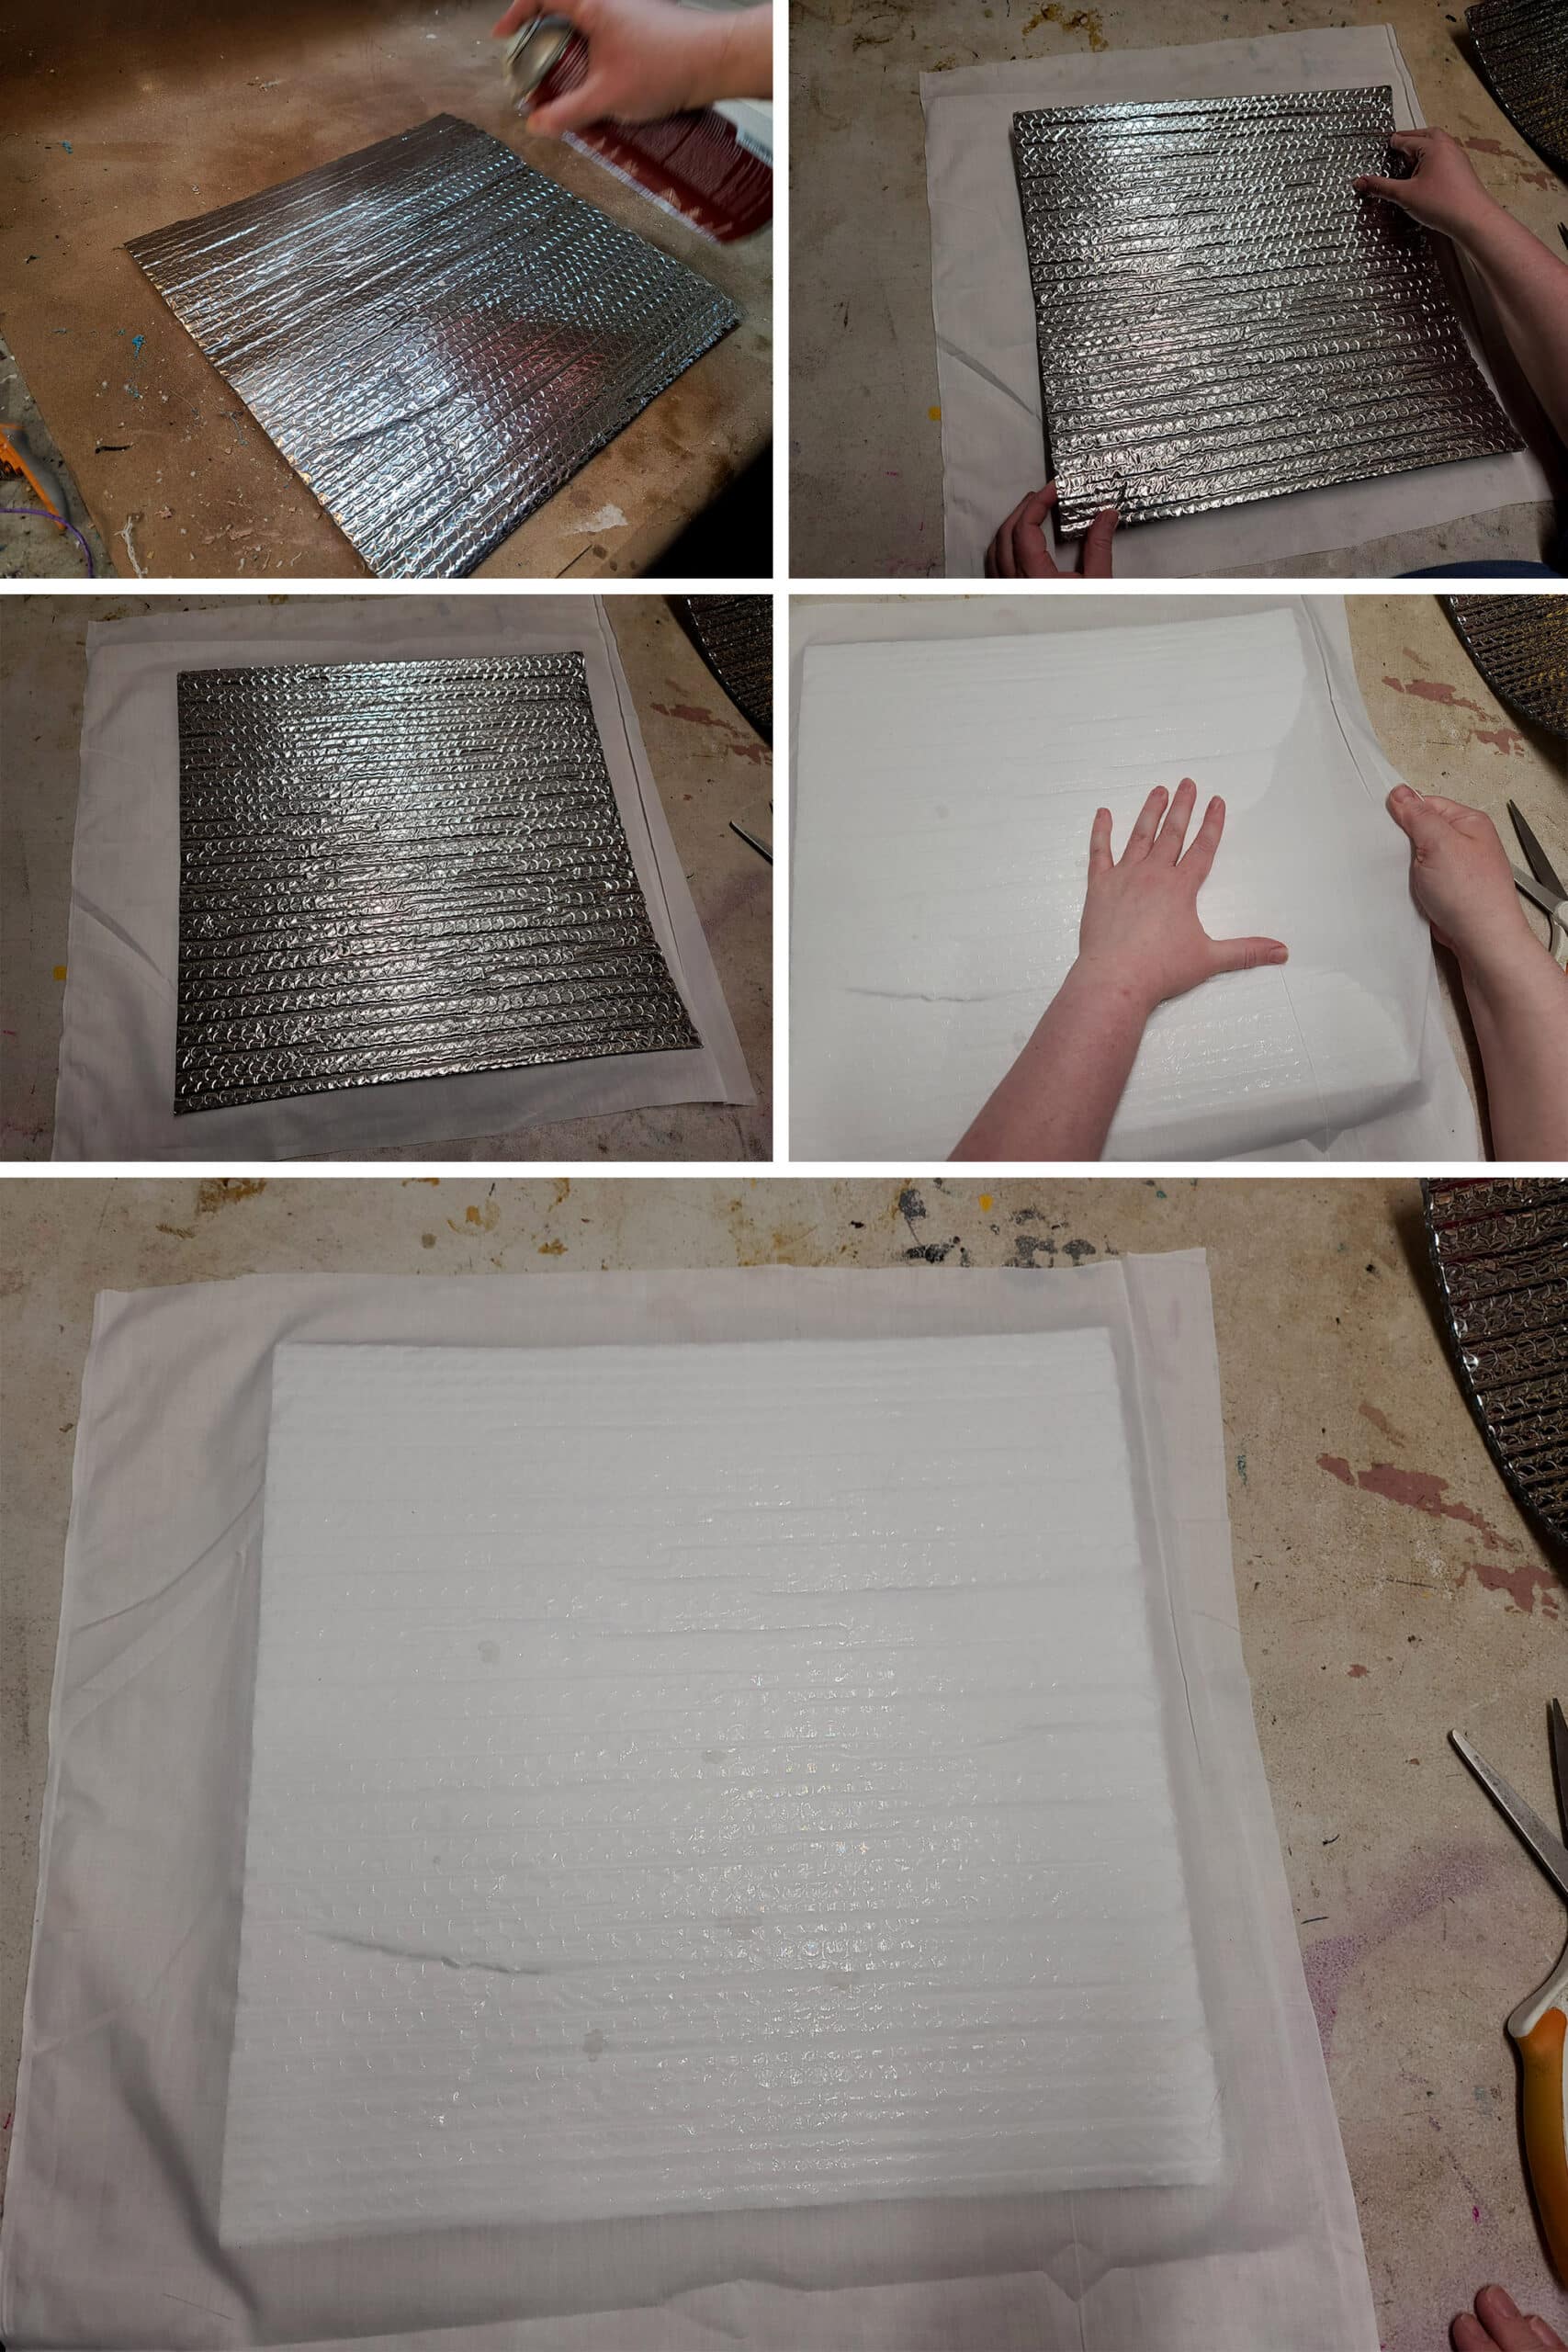
Trim the Window Shade
Once you’re happy with the fabric placement, trim the excess fabric right to the edge of the Reflectix.
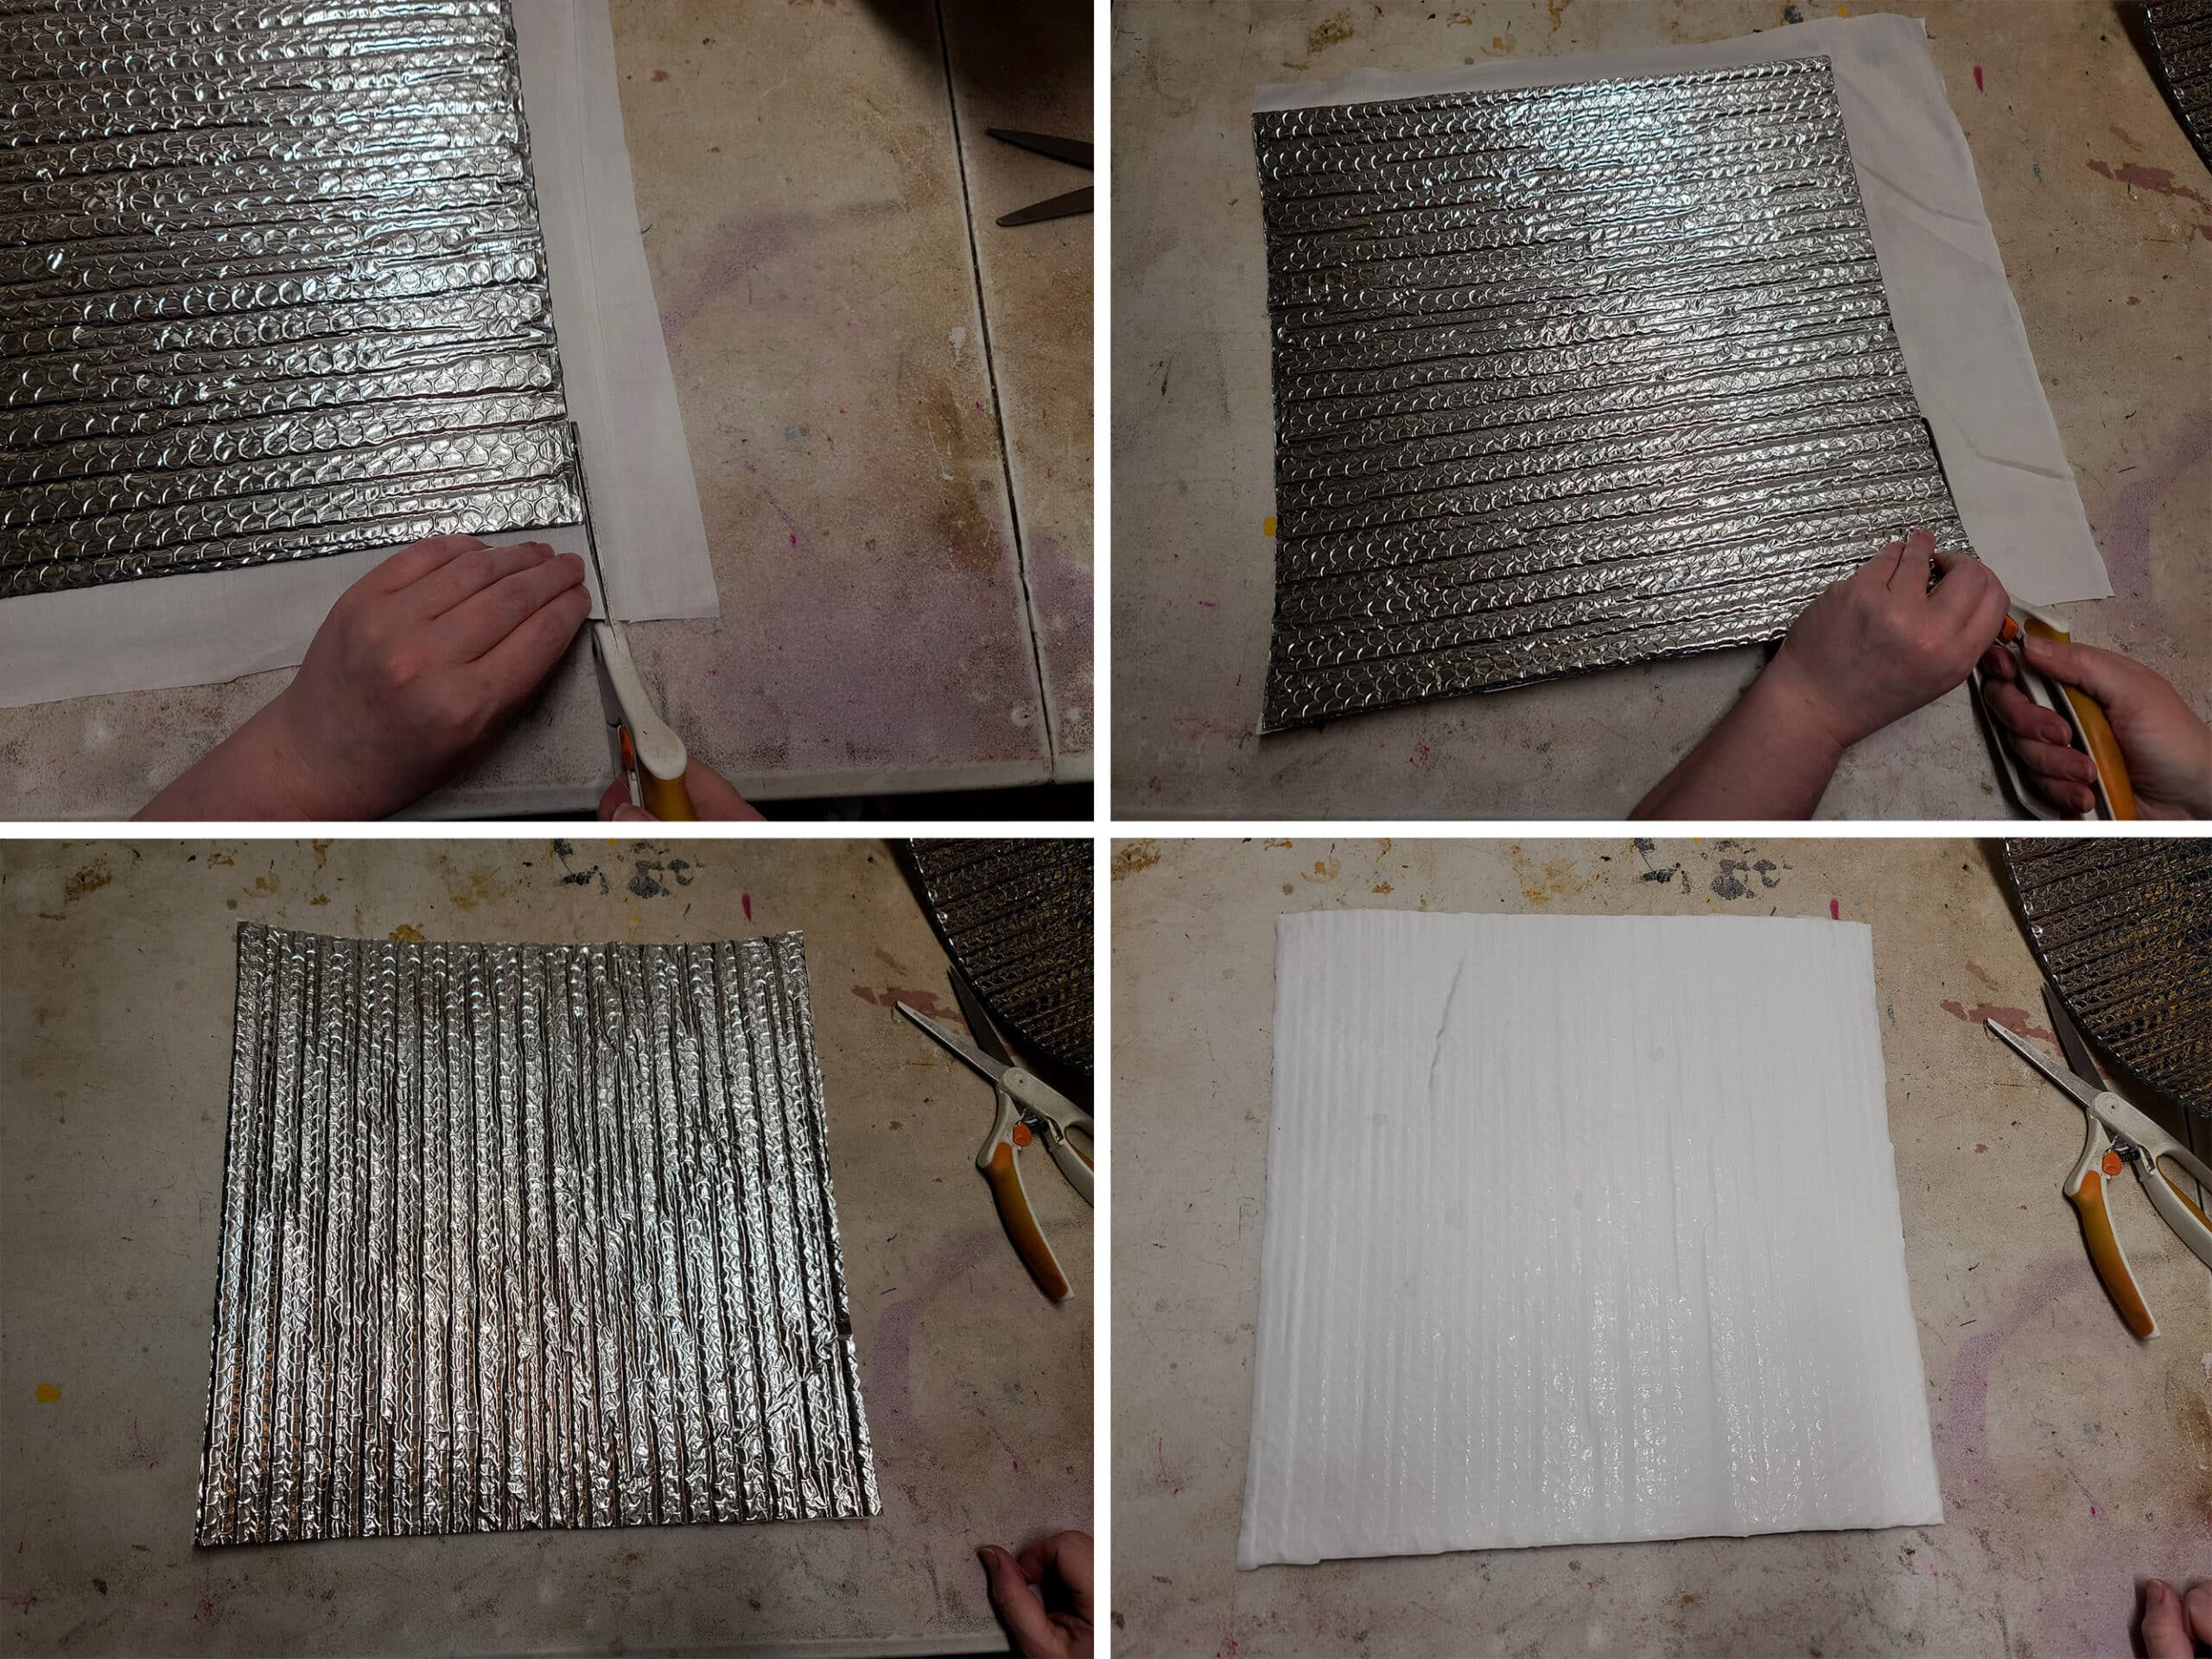
Being careful to keep the edges of the pattern lined up with both edges of the window shade, carefully cut the corner to match your pattern, as shown.
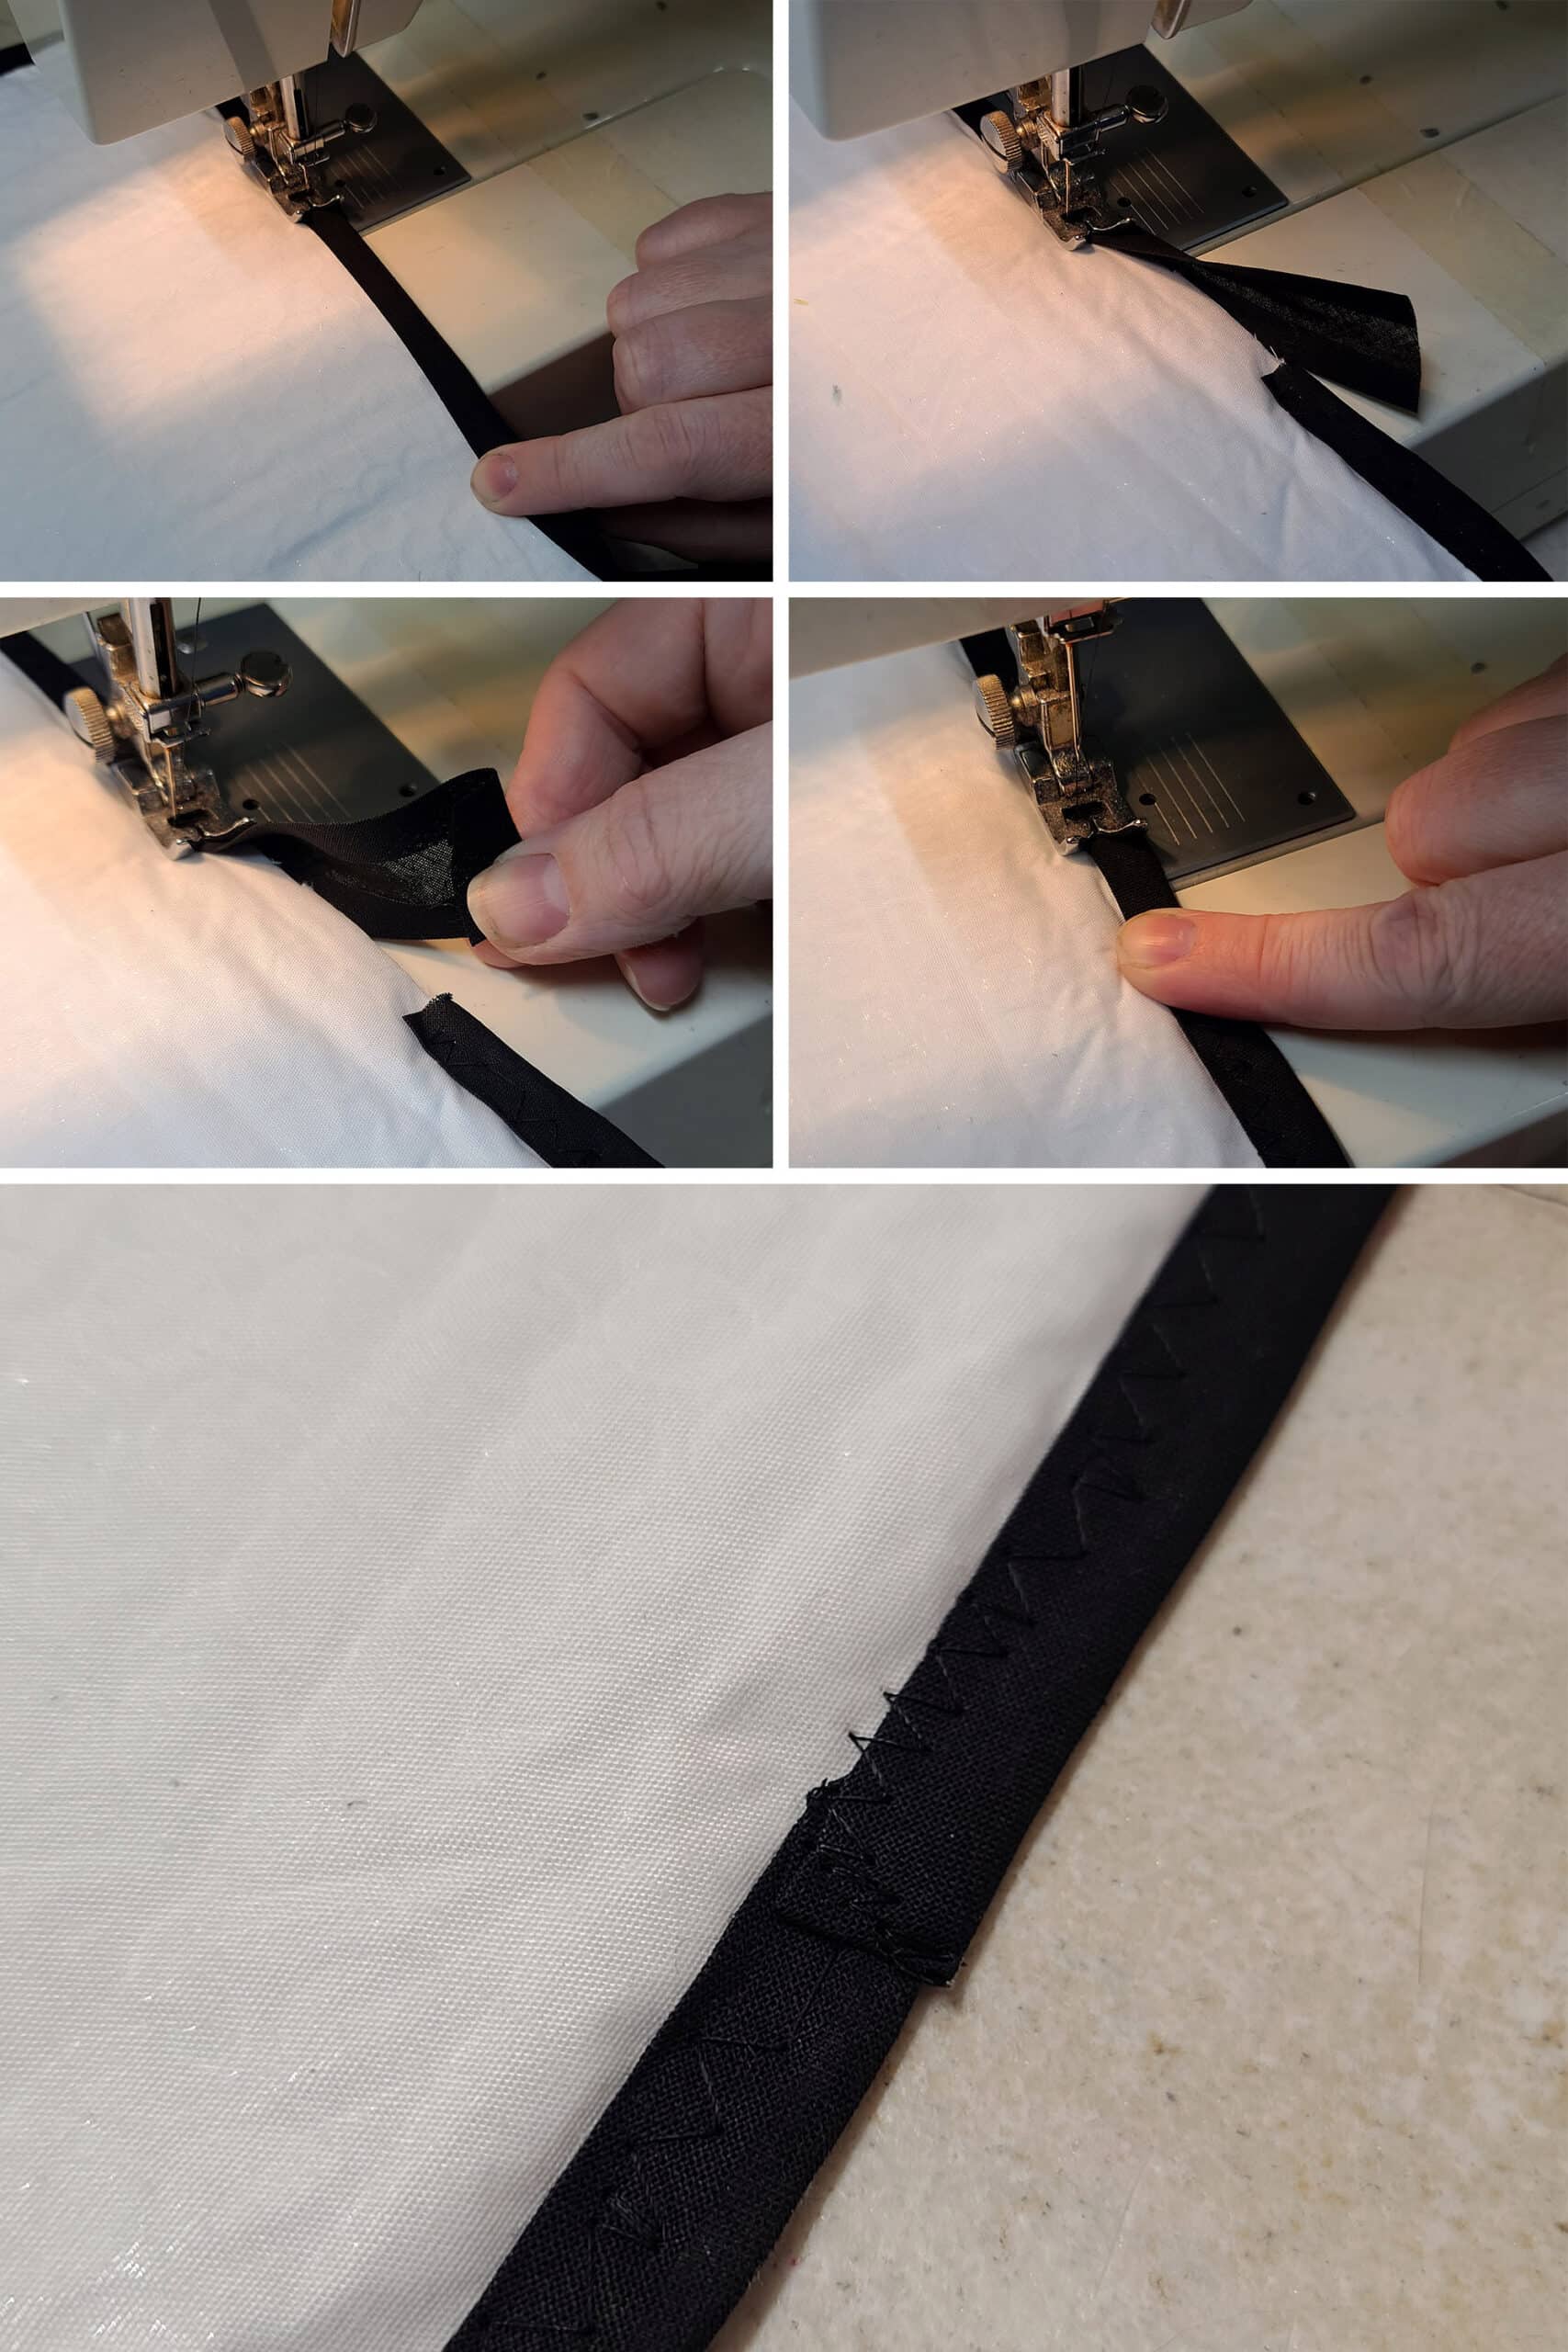
Sew The Trim On
Starting on one of the straight edges, fold the end of your bias tape over the raw edge of your window shade.
I like to do this with the fabric side facing up.
With your machine set to a wide zig zag and a medium stitch length, anchor the bias tape in place.
With the bias tape wrapped tightly over the edge of the window shade, slowly and carefully sew through all layers - the visible top edge of the bias tape, the fabric covered Reflectix, and the outer edge of the bias tape, on the very bottom.
As you come to the first corner, firmly stretch the bias tape around the corner, so there is no excess bias tape fabric to gather, along the inside edge of the curve.
Note: There’s a tutorial video at the end of this post - be sure to check it out, to see what you’re doing, in action!
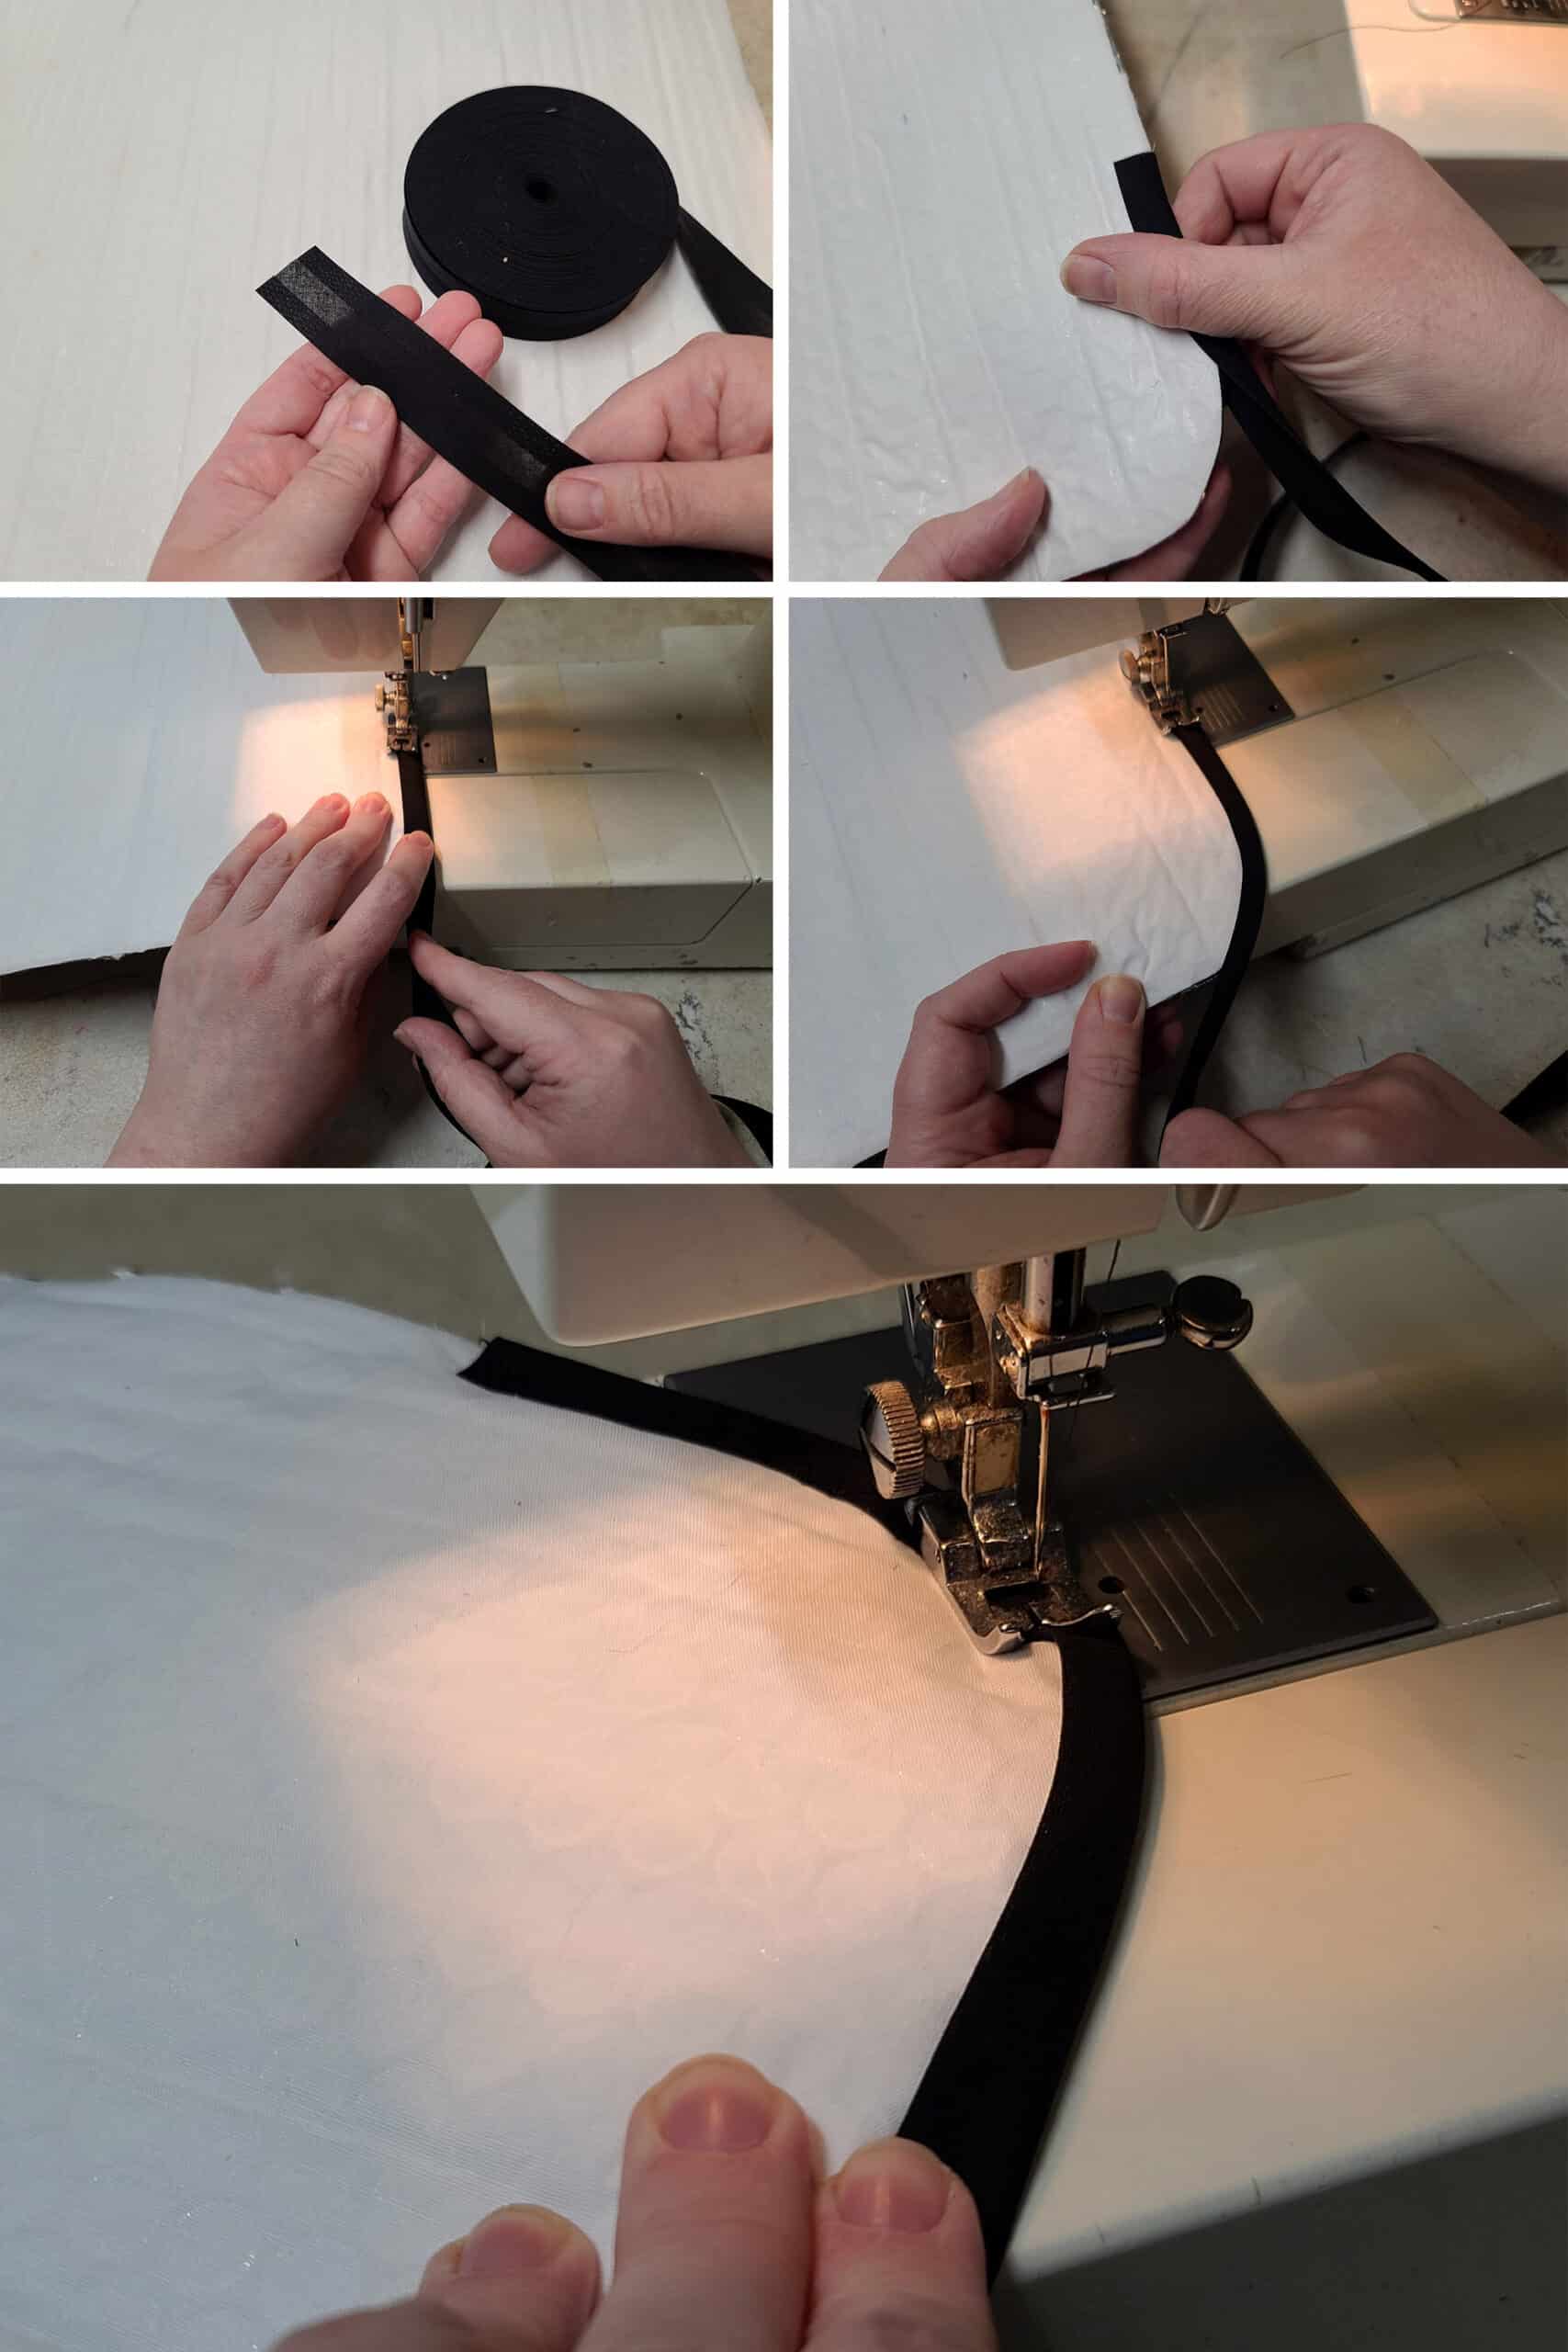
Once you are approaching the start point, cut your length if bias tape to be about an inch or so longer than you need to meet up with the starting point.
Flip a bit of the raw, cut edge of the bias tape under (to lay against the edge of the reflector).
Continue sewing, overlapping the start point, and finishing just beyond it.
Remove your reflector from the sewing machine, trim the thread ends.
Now, repeat for all of your remaining window shades!
Installing your RV Window Shades
There are different ways you can install your new blinds: snaps, hook and loop fasteners (Velcro), etc.
In our next post - Installing RV Window Shades - we’ll show you our easy installation method- using magnets!
Pro Tips for Making RV Window Shades
1. Making small window covers is easy, and definitely a one person job.
If you’re making 2, you’ll probably want to work on a floor - rather than a table.
Also, the sewing part can end up being a two person job, with one person working the sewing machine and bias tape, and the other person holding up the far end of the reflector. This takes strain off the sewing, and can prevent damage during the sewing process.

Do this AFTER it’s all sewn together, but - ideally - before installing it.
Lighter colours will make the interior of the RV seem bigger / lighter than if you use dark colours, which can make a room seem smaller than it is.
Also, keep in mind that really light colours will show dust and dirt more easily than medium-dark colours. (Really dark fabric will show dust easily!).
Also, patterned fabric can hide minor dust, dirt, or staining in a way that a solid colour will not.
4. Using Tinted Window Film in combination with these reflector shades gives you complete daytime privacy - and you don’t have to worry about how the reflector material looks from the outside!
For instance, one of the bedroom windows in our RV is occasionally used for an air conditioner.
For that window, we made one regular, full sized shade... and a second option, for when we need to have the air conditioner exhaust in the window.
To measure for this one, we set up the air conditioner, making note of where we’d need to “cut out” to fit around the tubing, as shown.
Sometimes, you just have to get a bit creative!
More DIY RV Tutorials
Want to check out more of our tutorials for ways to improve your camping experience?
Well, we don’t have many posted yet, but here’s a start!
How to Apply RV Window Tinting
Homemade Fire Starters
Installing RV Window Shades with Magnets
Make a Custom RV Camper Step
RV Window Screen Replacement
Also, be sure to check out our RV Lifestyle section for other tutorials to make RV life great - including photography tutorials. We also have a great Camping Recipes sections... that counts as DIY, right? 🙂
Thanks for Reading!If you loved this post - or have any questions about it - please leave a comment below! We'd also love it if you would consider sharing the link on social media! |