
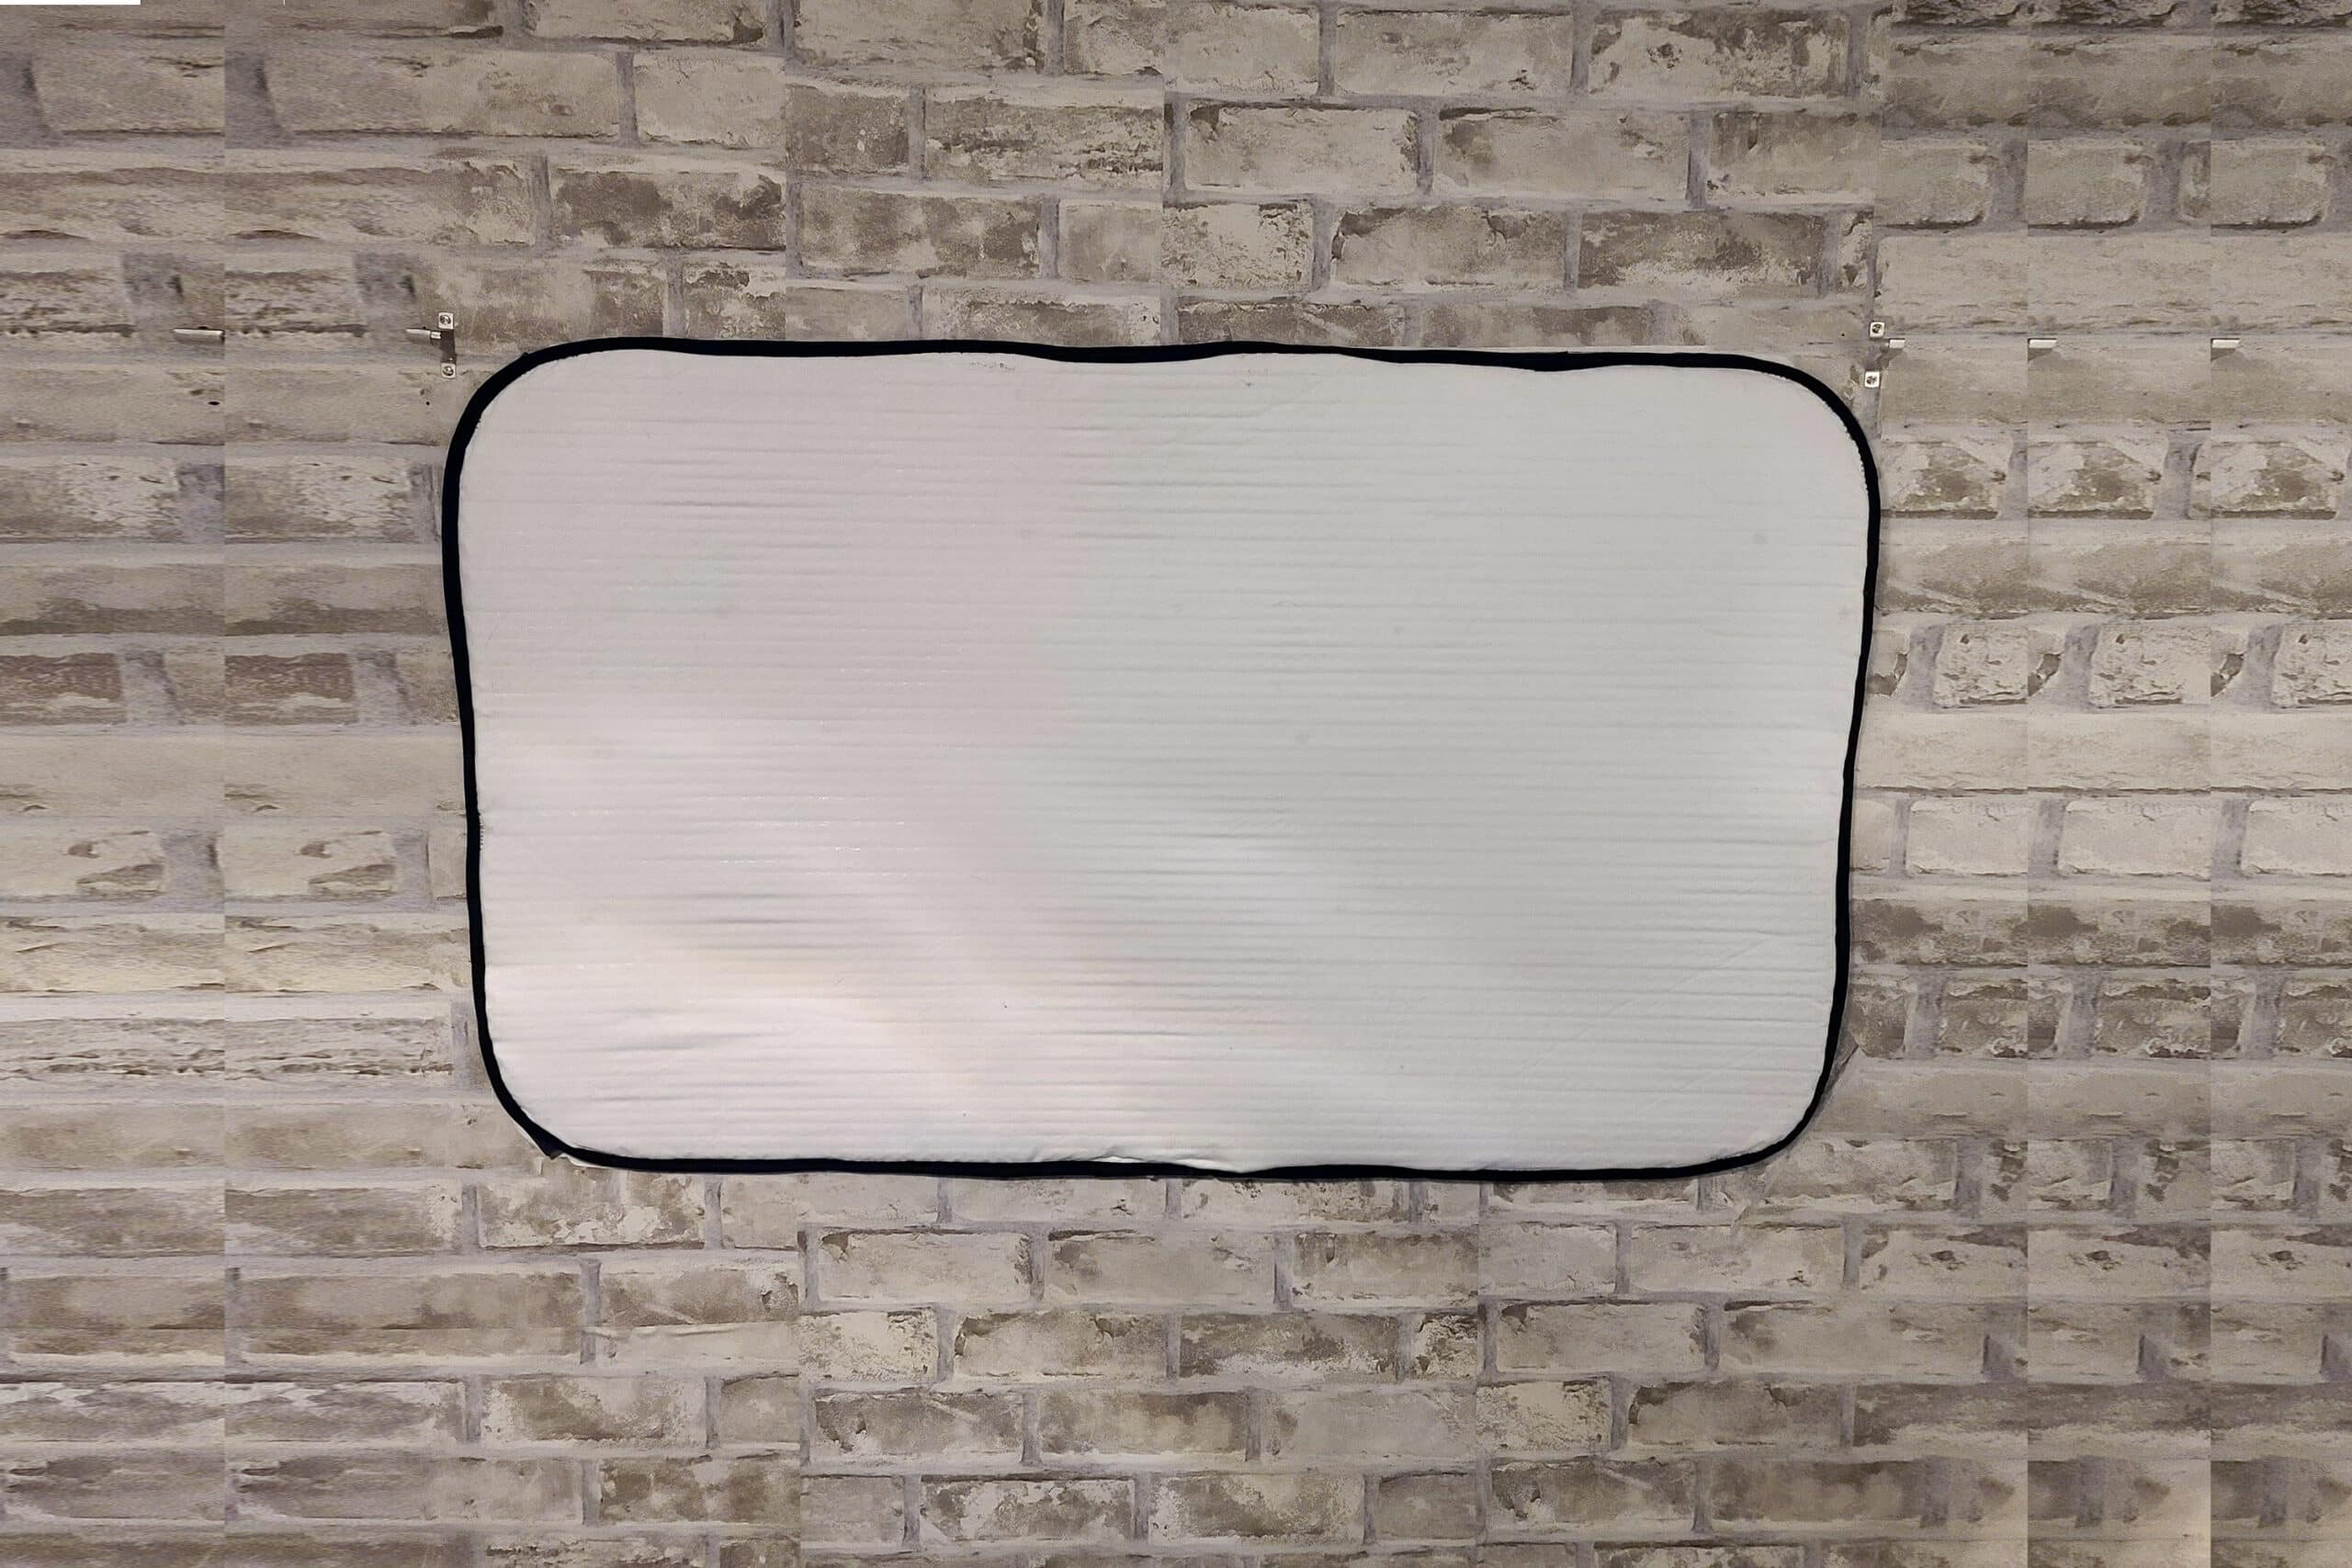
This is our method of installing RV window shades, using magnets. It's an easy project that makes RV life so much better - durable & simple!

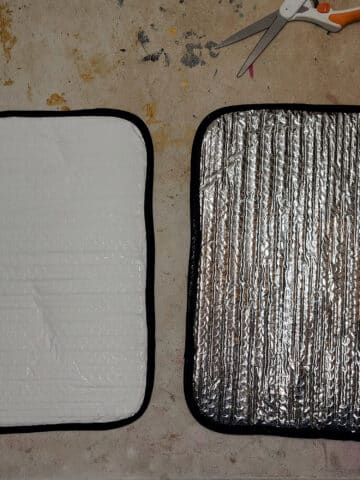
They’re great - when in use, they function as blackout shades, give you complete privacy, moderate the temperature in your RV during the hot summer months, AND protect the stuff in your motorhome, mobile home, fifth wheel, travel trailer or even a toy hauler, from destructive UV rays.
Not only are they easy to make, affordable, and super functional, the fabric covering and trim makes them attractive, and the best option for when you’re actually staying in your trailer. No one wants ugly RV shades!
When it comes to recreational vehicle window coverings, there’s not much more functionality you could ask for, right?
All around, a great design!
Well - as I’ll show you today - those RV blinds also use magnets so that they’re quick, easy, and secure to use!
Maybe we’ll leave them off the RV windows at night, then put them up during the day, to keep the RV cool.
Knowing we’d be putting them up and taking them down often, we wanted to figure out a great way to set them up such that use was quick and easy.
Magnets turned out to be the perfect way to outfit our entire RV with easy-use shades. We literally just slap em up or pull them down!
Anyway, this post will show you our quick installation method, and everything you’ll need to get set up.
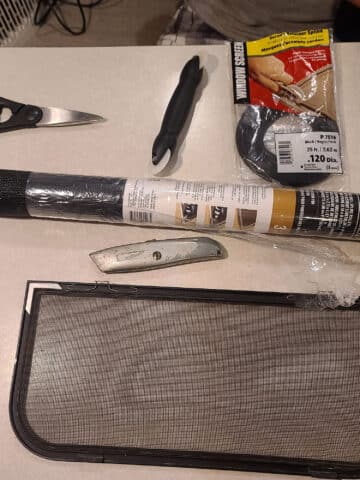
Let’s look at the materials you’ll need:
Supplies and Equipment
Here’s what you’ll need in order to install your custom homemade RV window shades:
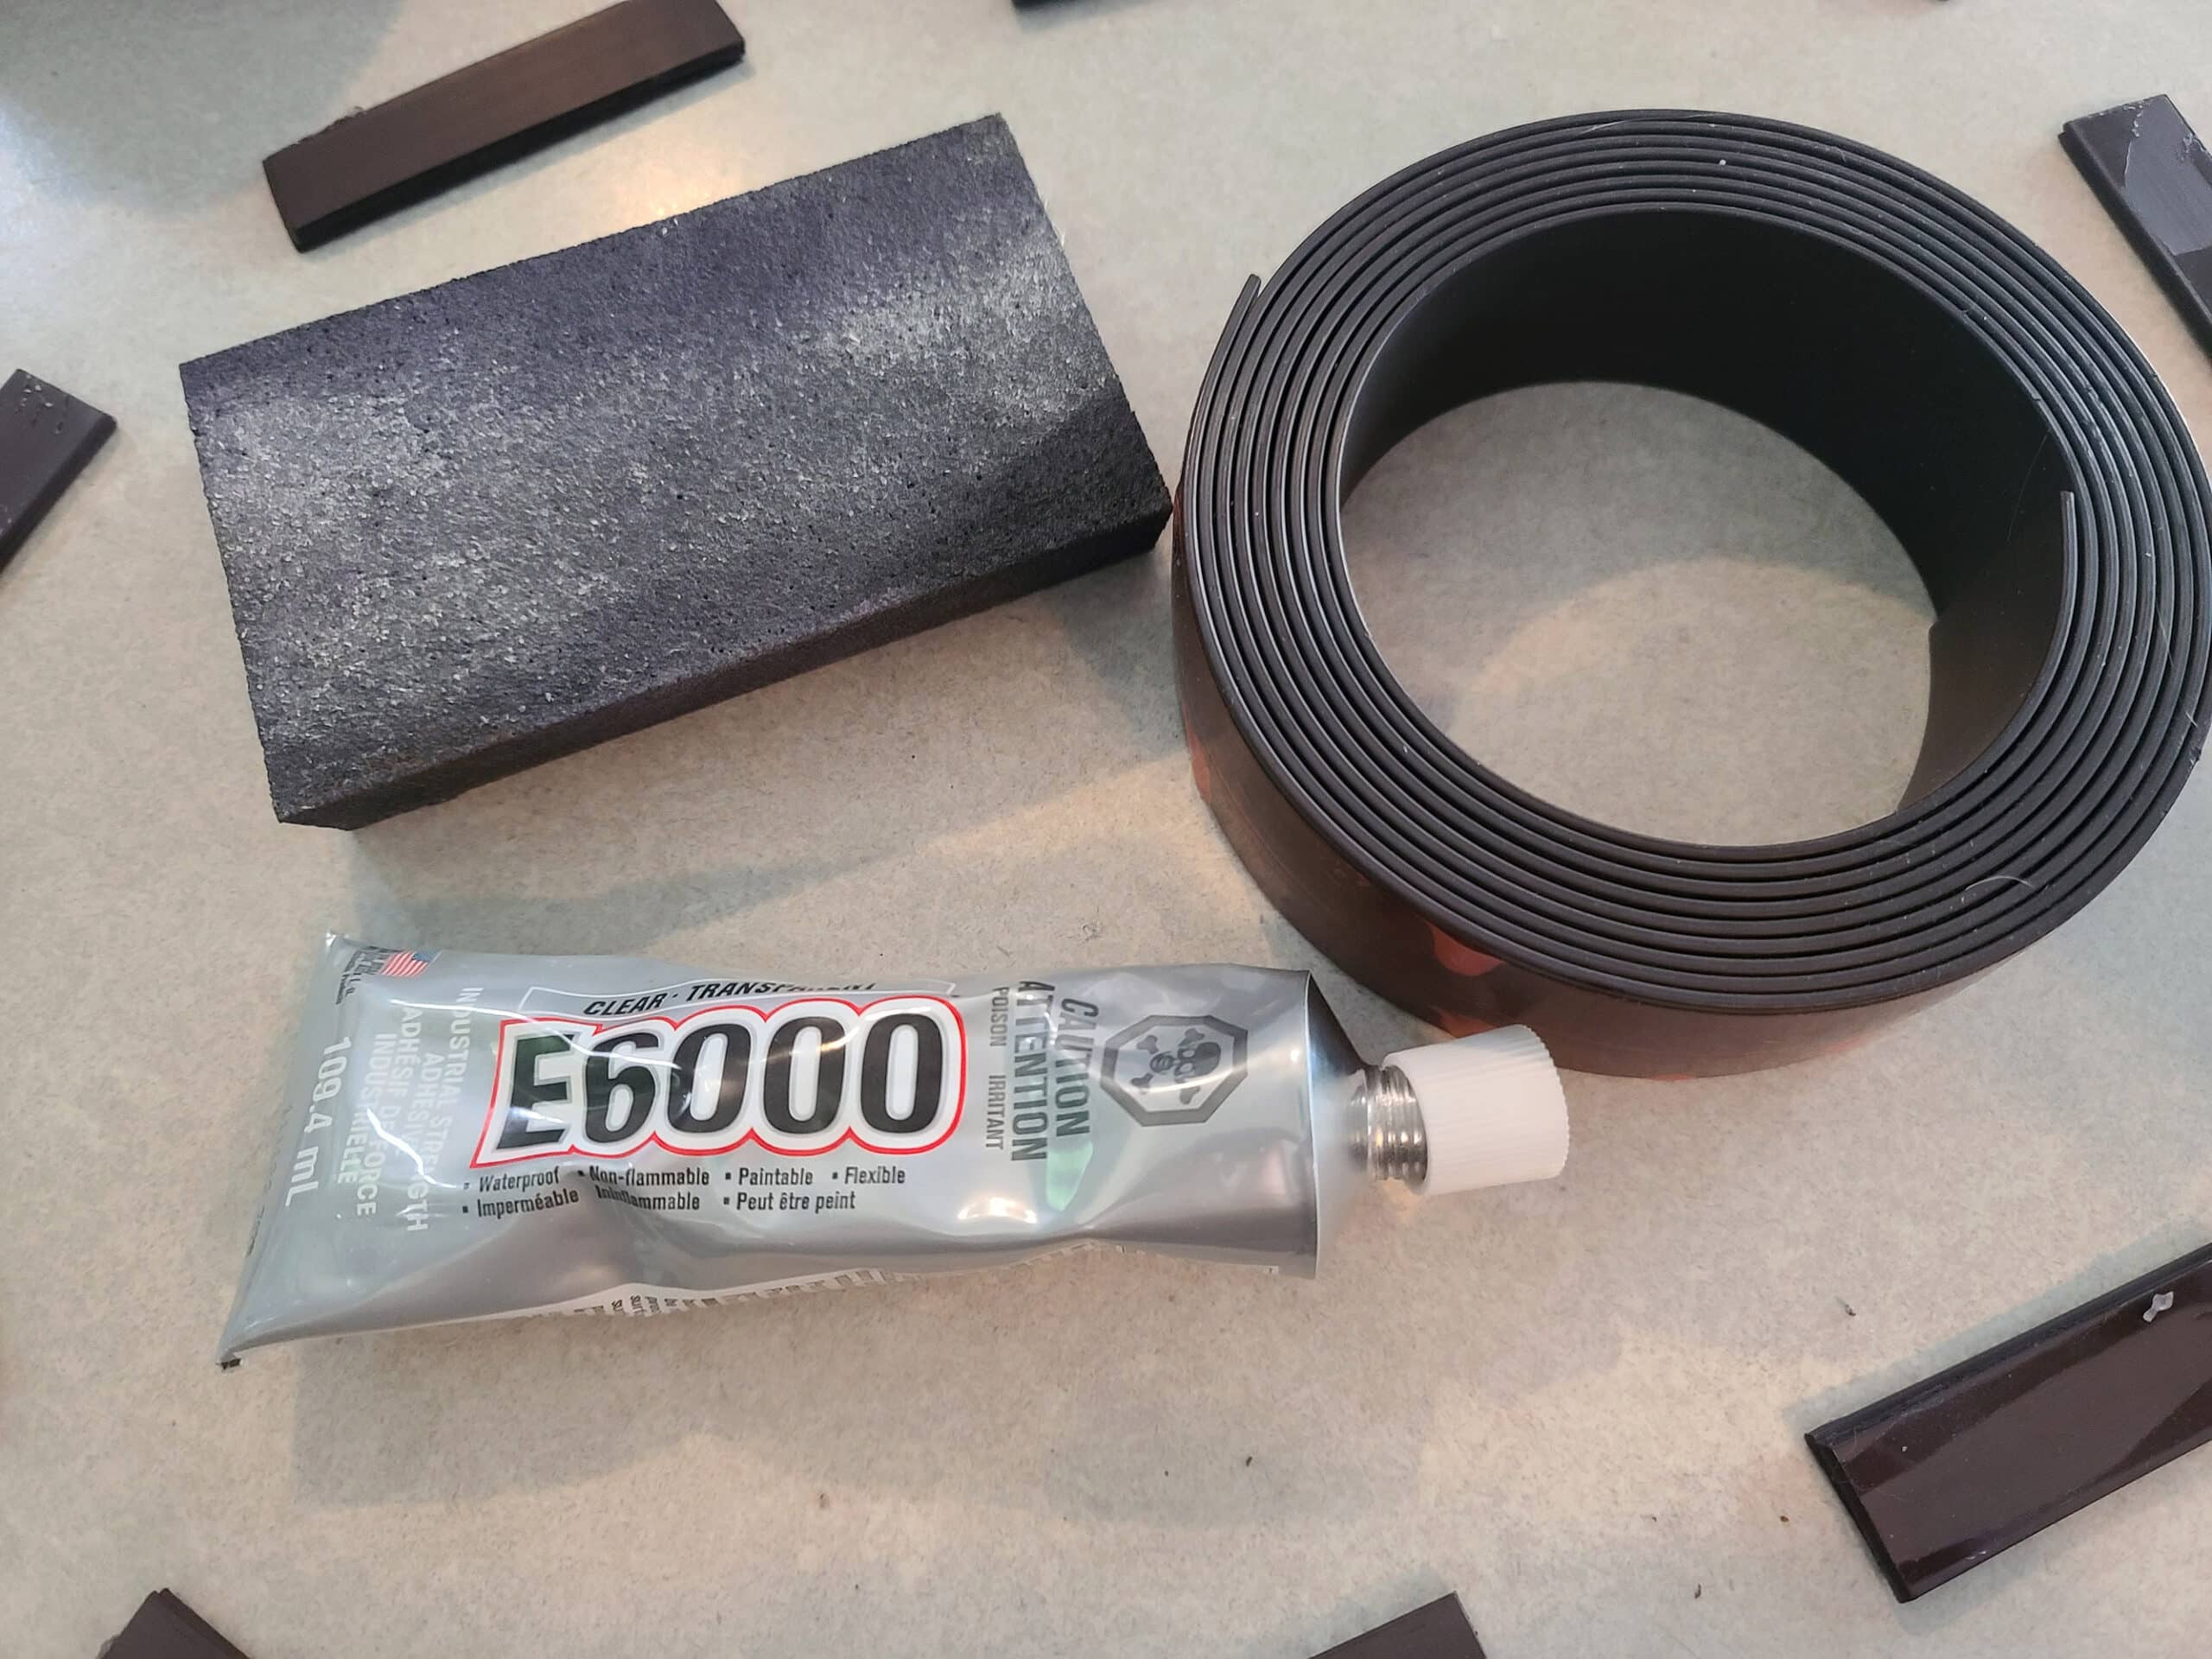
Magnet Tape
We used this 1.5" Flexible Magnetic Tape, but you can really use whatever Flexible Magnetic Tape you want - it doesn’t have to hold a TON of weight.
It also doesn’t need to be self adhesive, even though the one we bought was.
The adhesives on “self adhesive” magnet tape isn’t strong enough to rely on, IMHO.
As a note: We originally tried this technique with hook and loop fasteners - Velcro Tape. While it’ll work, I found the end result really annoying, as the hooks can catch on clothing, hair, etc.
Adhesive
We use E-6000 Adhesive, as we find it to have a great combination of availability, durability, and strength.
You’ll definitely want to have some windows open when using it, as it is SUPER toxic stuff. You can’t go wrong using a respirator, for that matter.
There are other adhesives that would work, just be sure to check the specs, and test them on materials before using.
The big things to keep in mind are that you want something that will stick both to whatever your window frame is made from, as well as the reflectix.
Also, be sure that the temperature specs on your adhesive will work with the conditions in your RV year round. What’s the coldest it will get during winter storage? What’s the hottest you can expect in the summer?
Buy something that says it’ll work under both extremes, then test it out on a small piece of magnet/Reflectix to make sure it doesn’t just peel off when dry.
Sandpaper
You’ll be using sandpaper to rough up your window frame surface, as most adhesives will just peel off when used on a shiny, smooth metal surface.
We recommend using a rough grit - 80 grit or 100 grit.
Painter’s Tape
Finally, you’ll need some Painter's Tape.
This is to hold the magnets - and later, the window shades - in place, as the glue cures.
Because it’s painter’s tape, you’ll be able to use it without damaging you’re the paint or wallpaper on the surrounding wall space.
Share the Love!If you’ve made one of our recipes, be sure to take some pics of your handiwork! If you post it to Bluesky, be sure to tag us - @2NerdsInATruck, or you can tag us on TikTok, if you’re posting video. We're also on Pinterest, so you can save all your favourite recipes and park reviews to your own boards! Also, be sure to subscribe to our free email newsletter, so you never miss out on any of our nonsense. Well, the published nonsense, anyway! |
How to Install RV Window Shades with Magnets
A quick step-by-step guide to installing your homemade RV window shades.
Note: You will want to start this process at LEAST 2 days before any trip, as there are a couple rounds of drying involved.
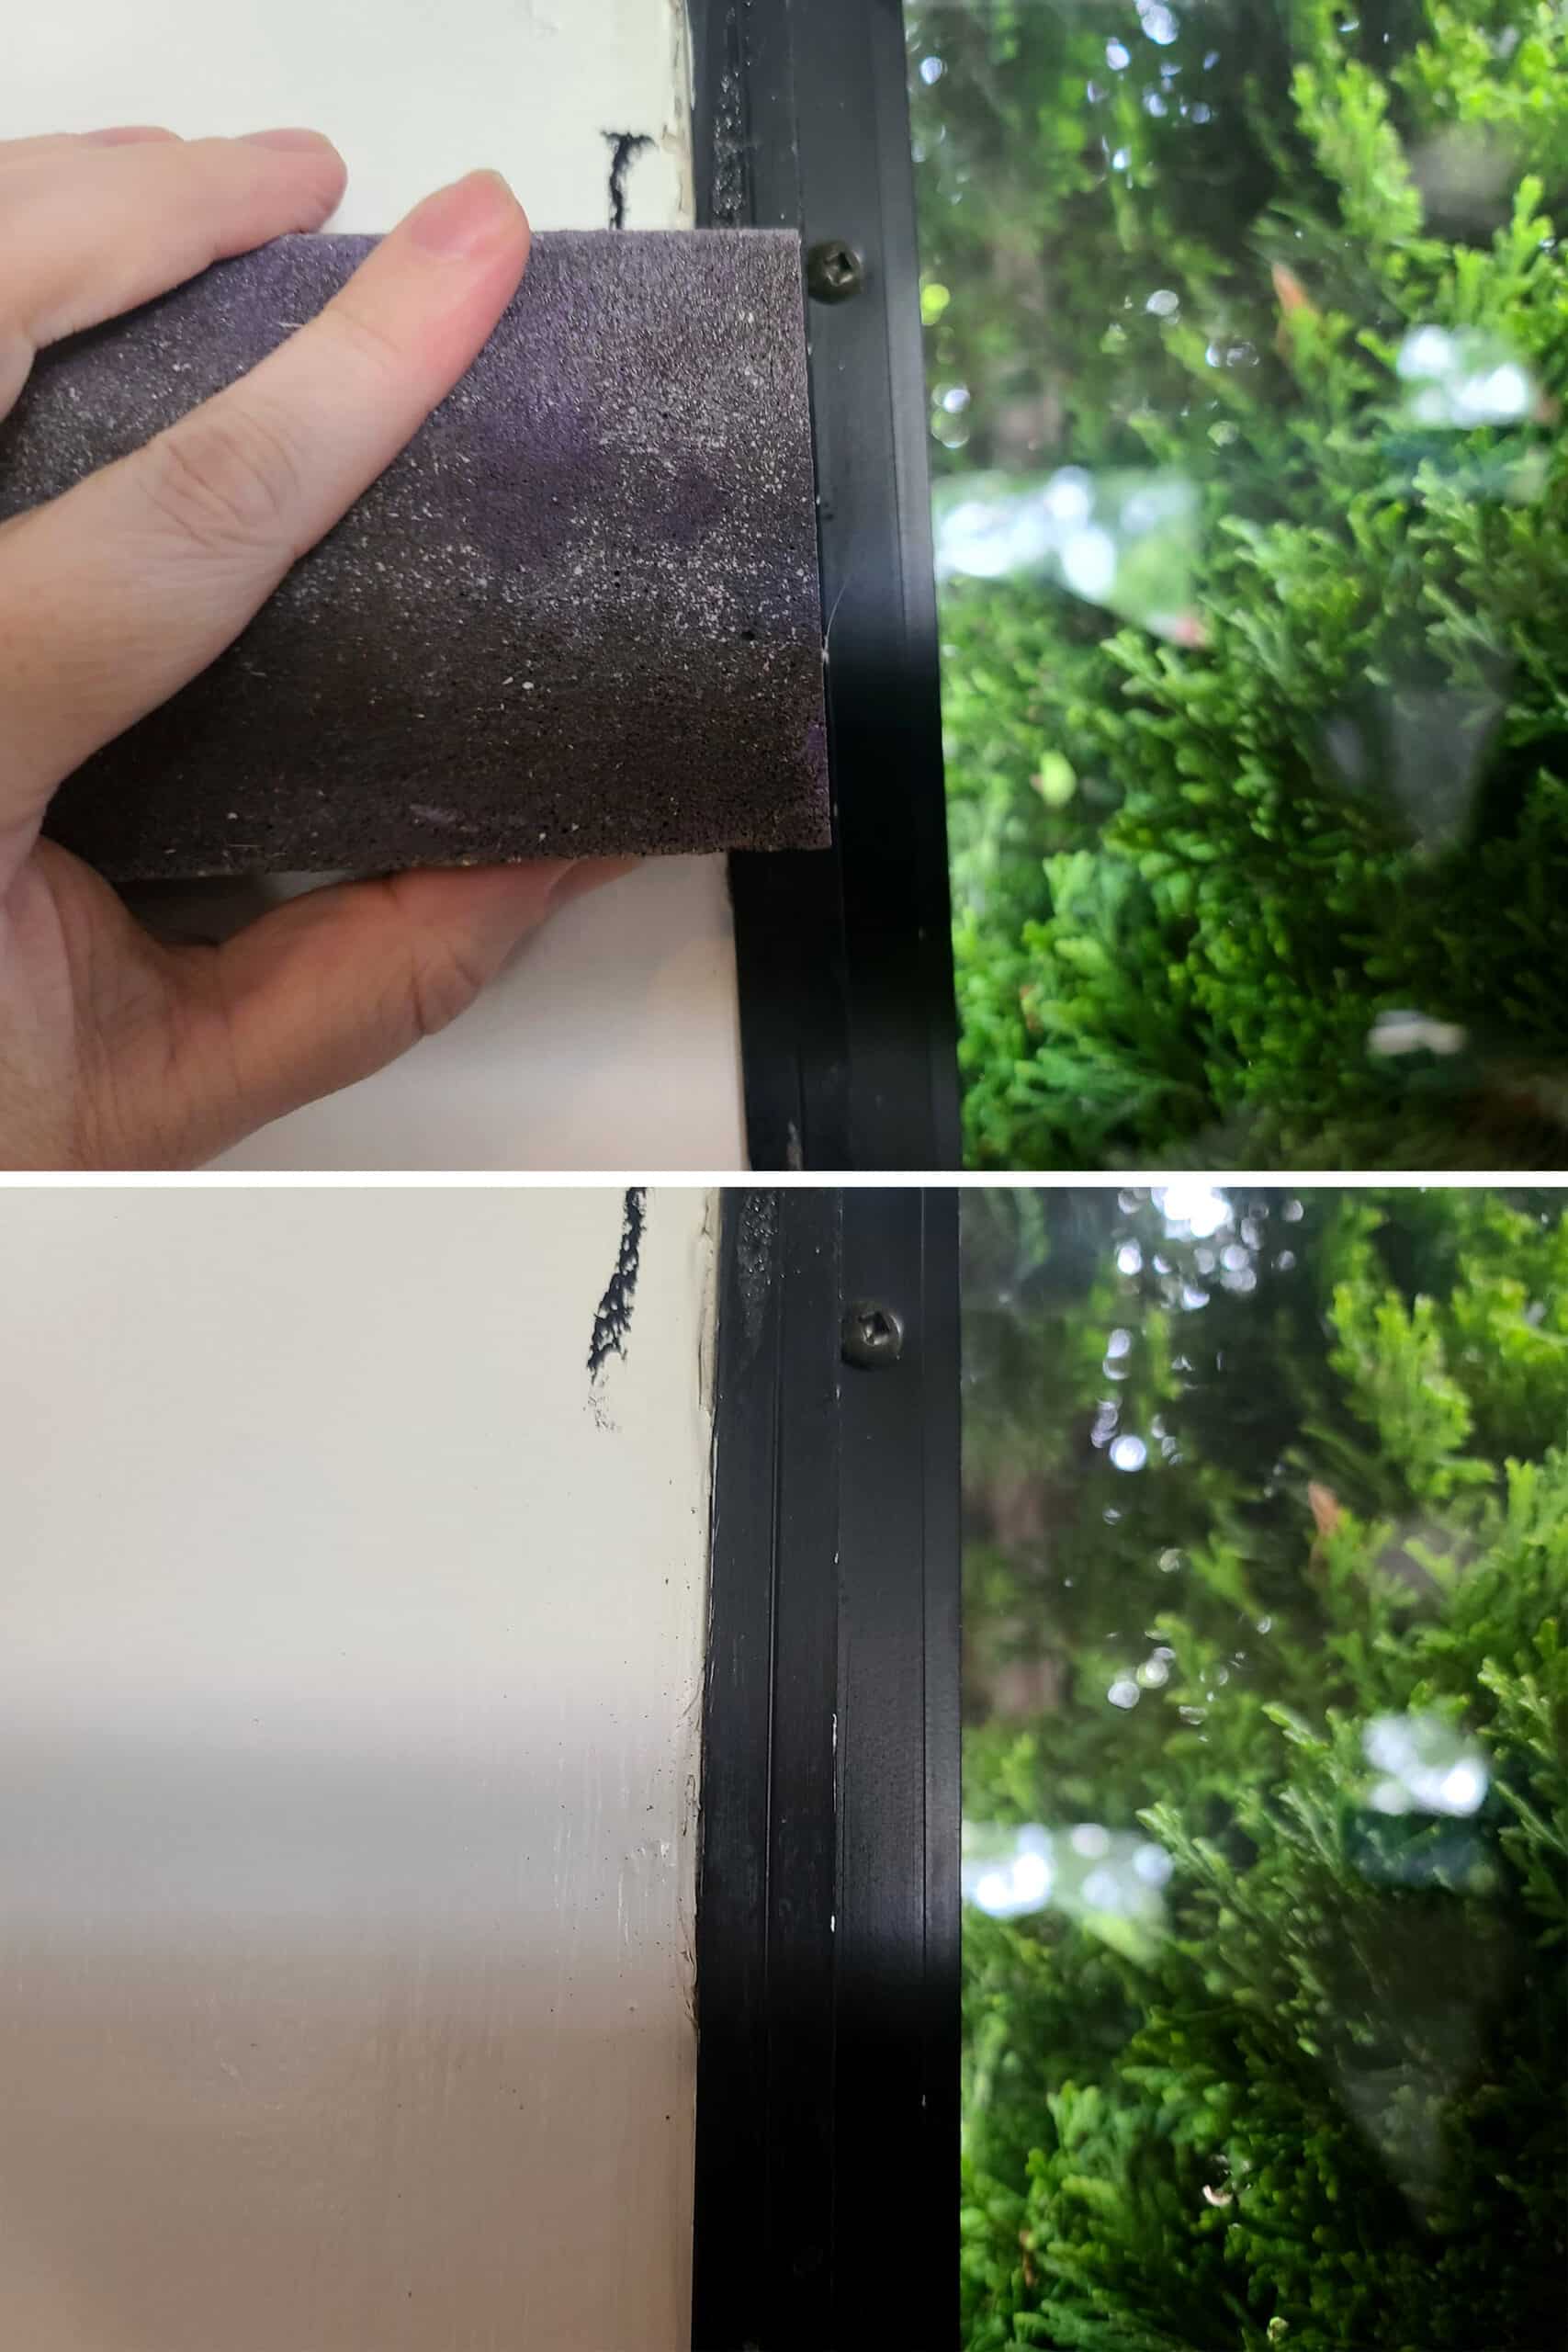
1. Prepare your Surfaces
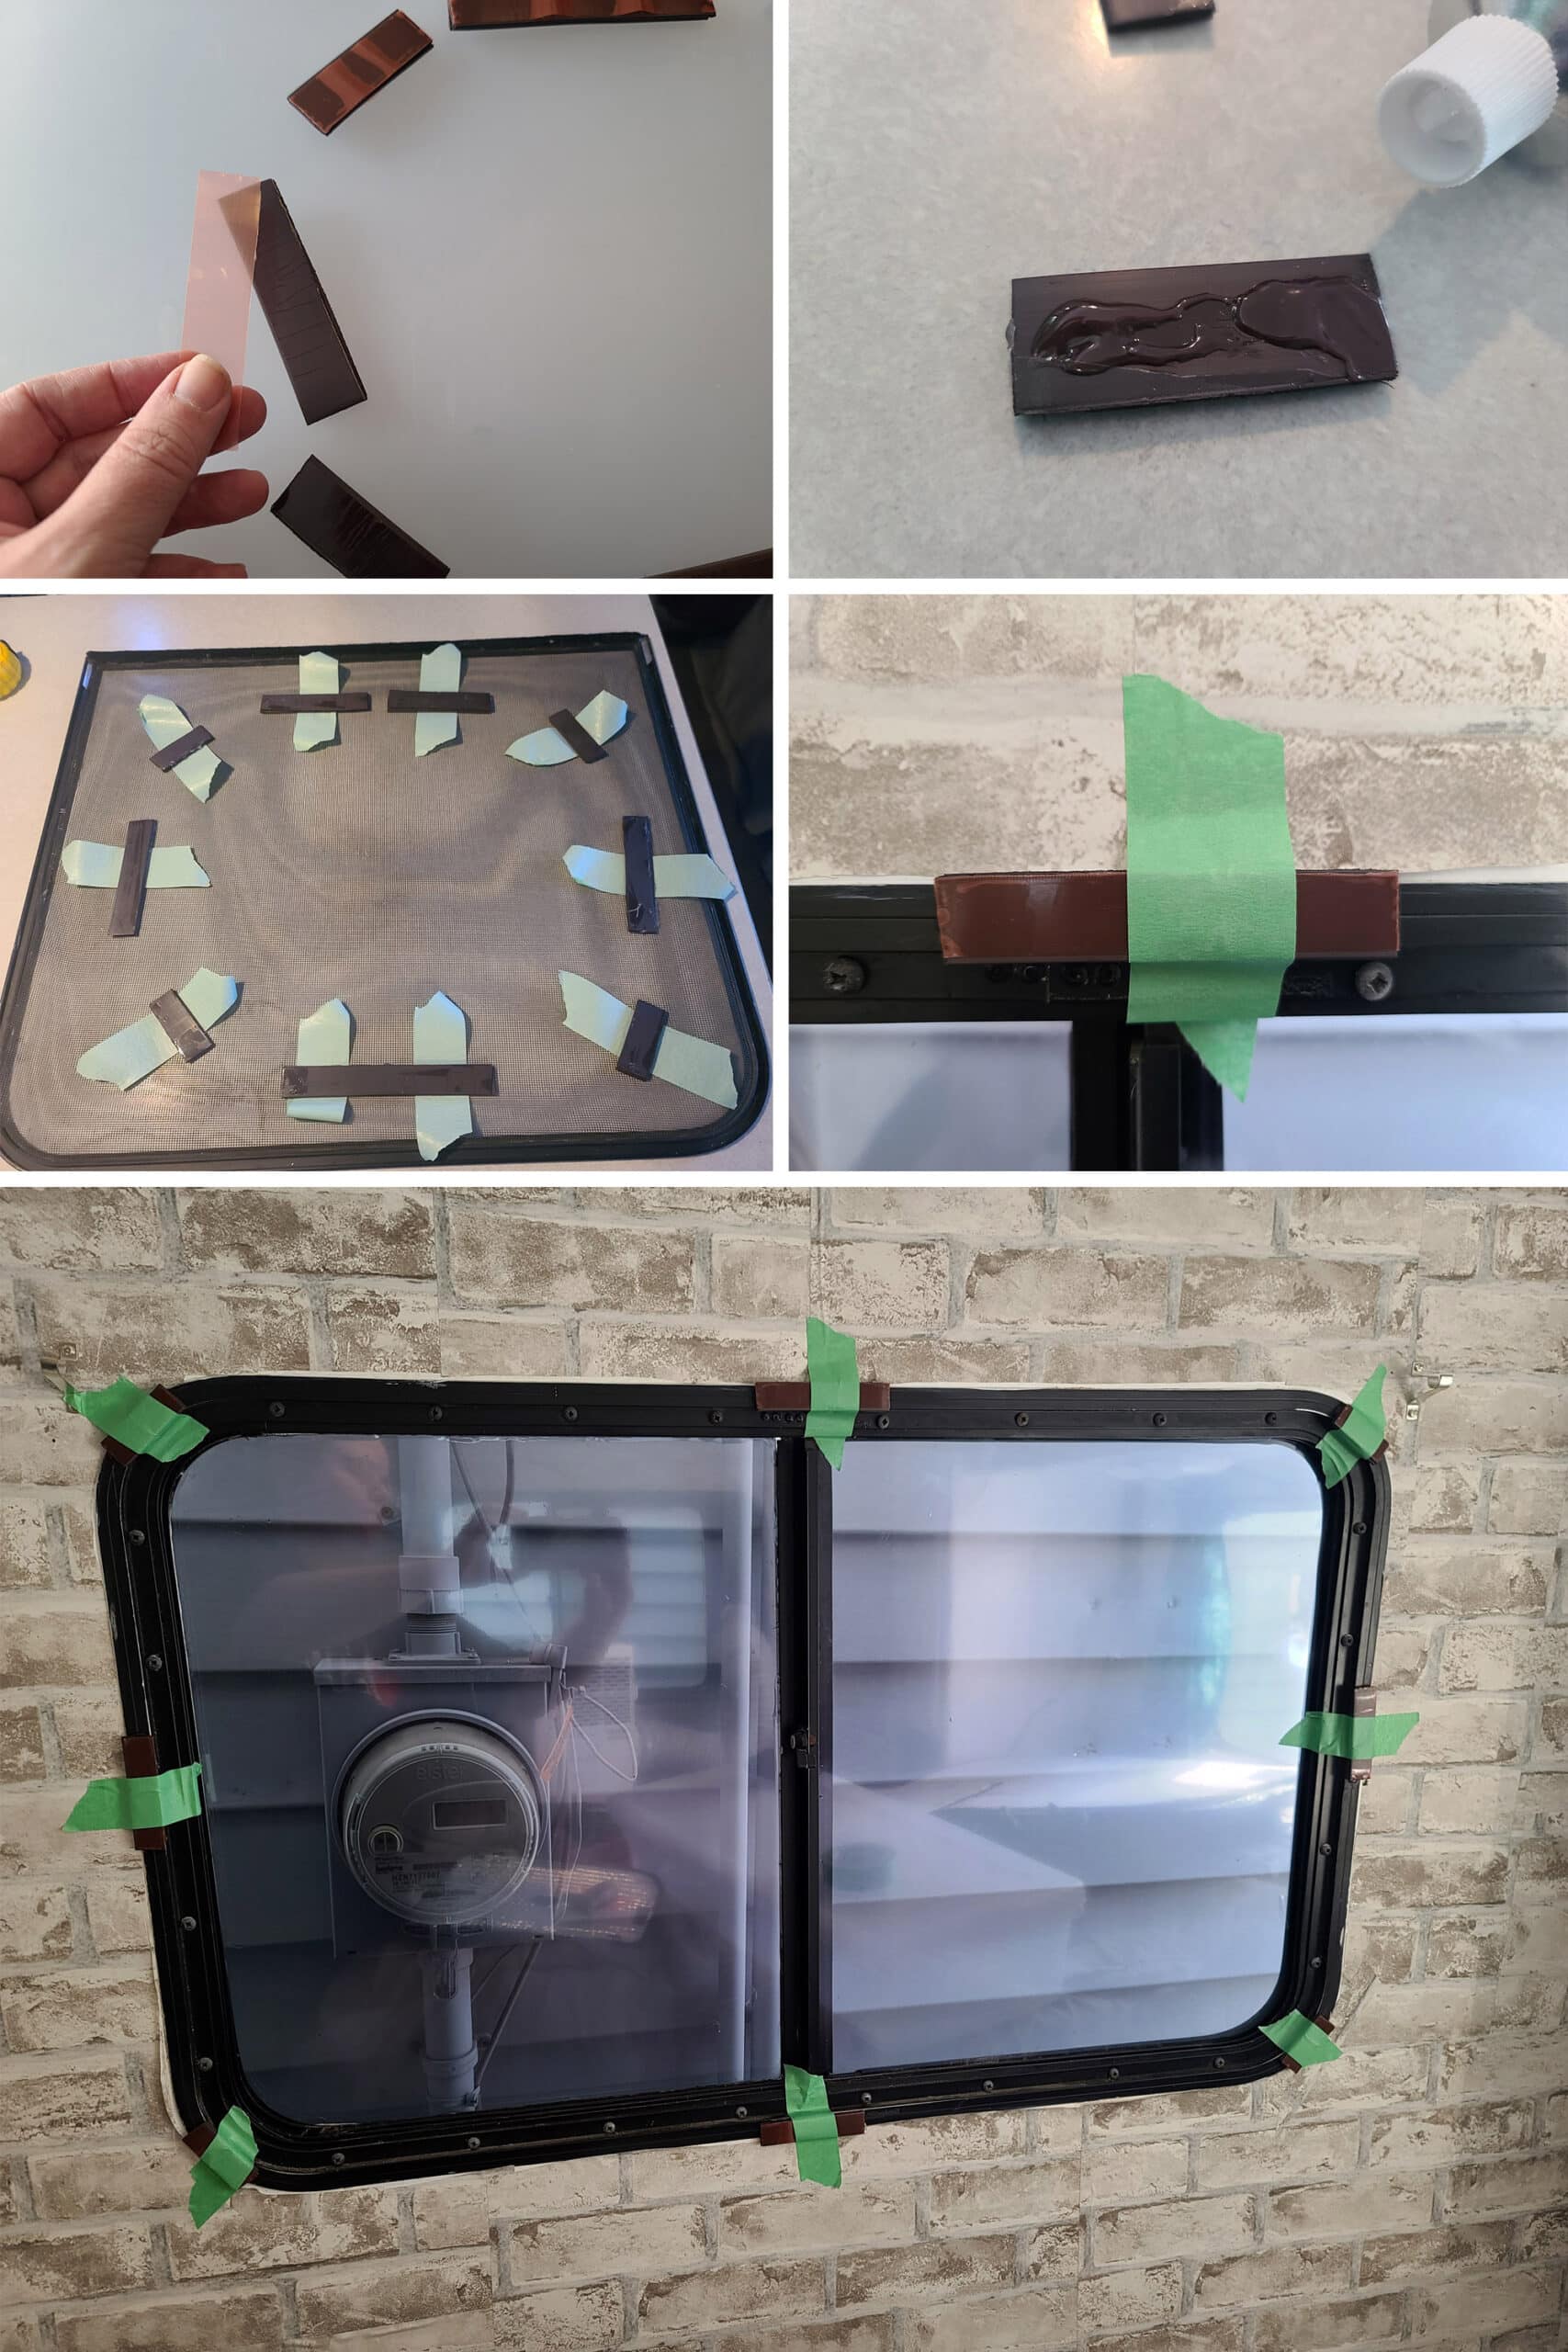
Determine where you’ll be attaching your magnets.
For smaller windows, this is usually one in each corner. For medium size windows, we’ll usually do an extra one each at the centre of the top, and the center of the bottom.
For bigger windows, we’ll usually do a couple extra magnets on the top and bottom, and one each in the middle of each side.
Once you know where you’ll be putting the magnets, use a sanding block to rough up the metal window frame in those spots.
This will help the glue adhere better - if you don’t rough up the surface a bit, the cured glue MAY peel right off it, depending on the surface.
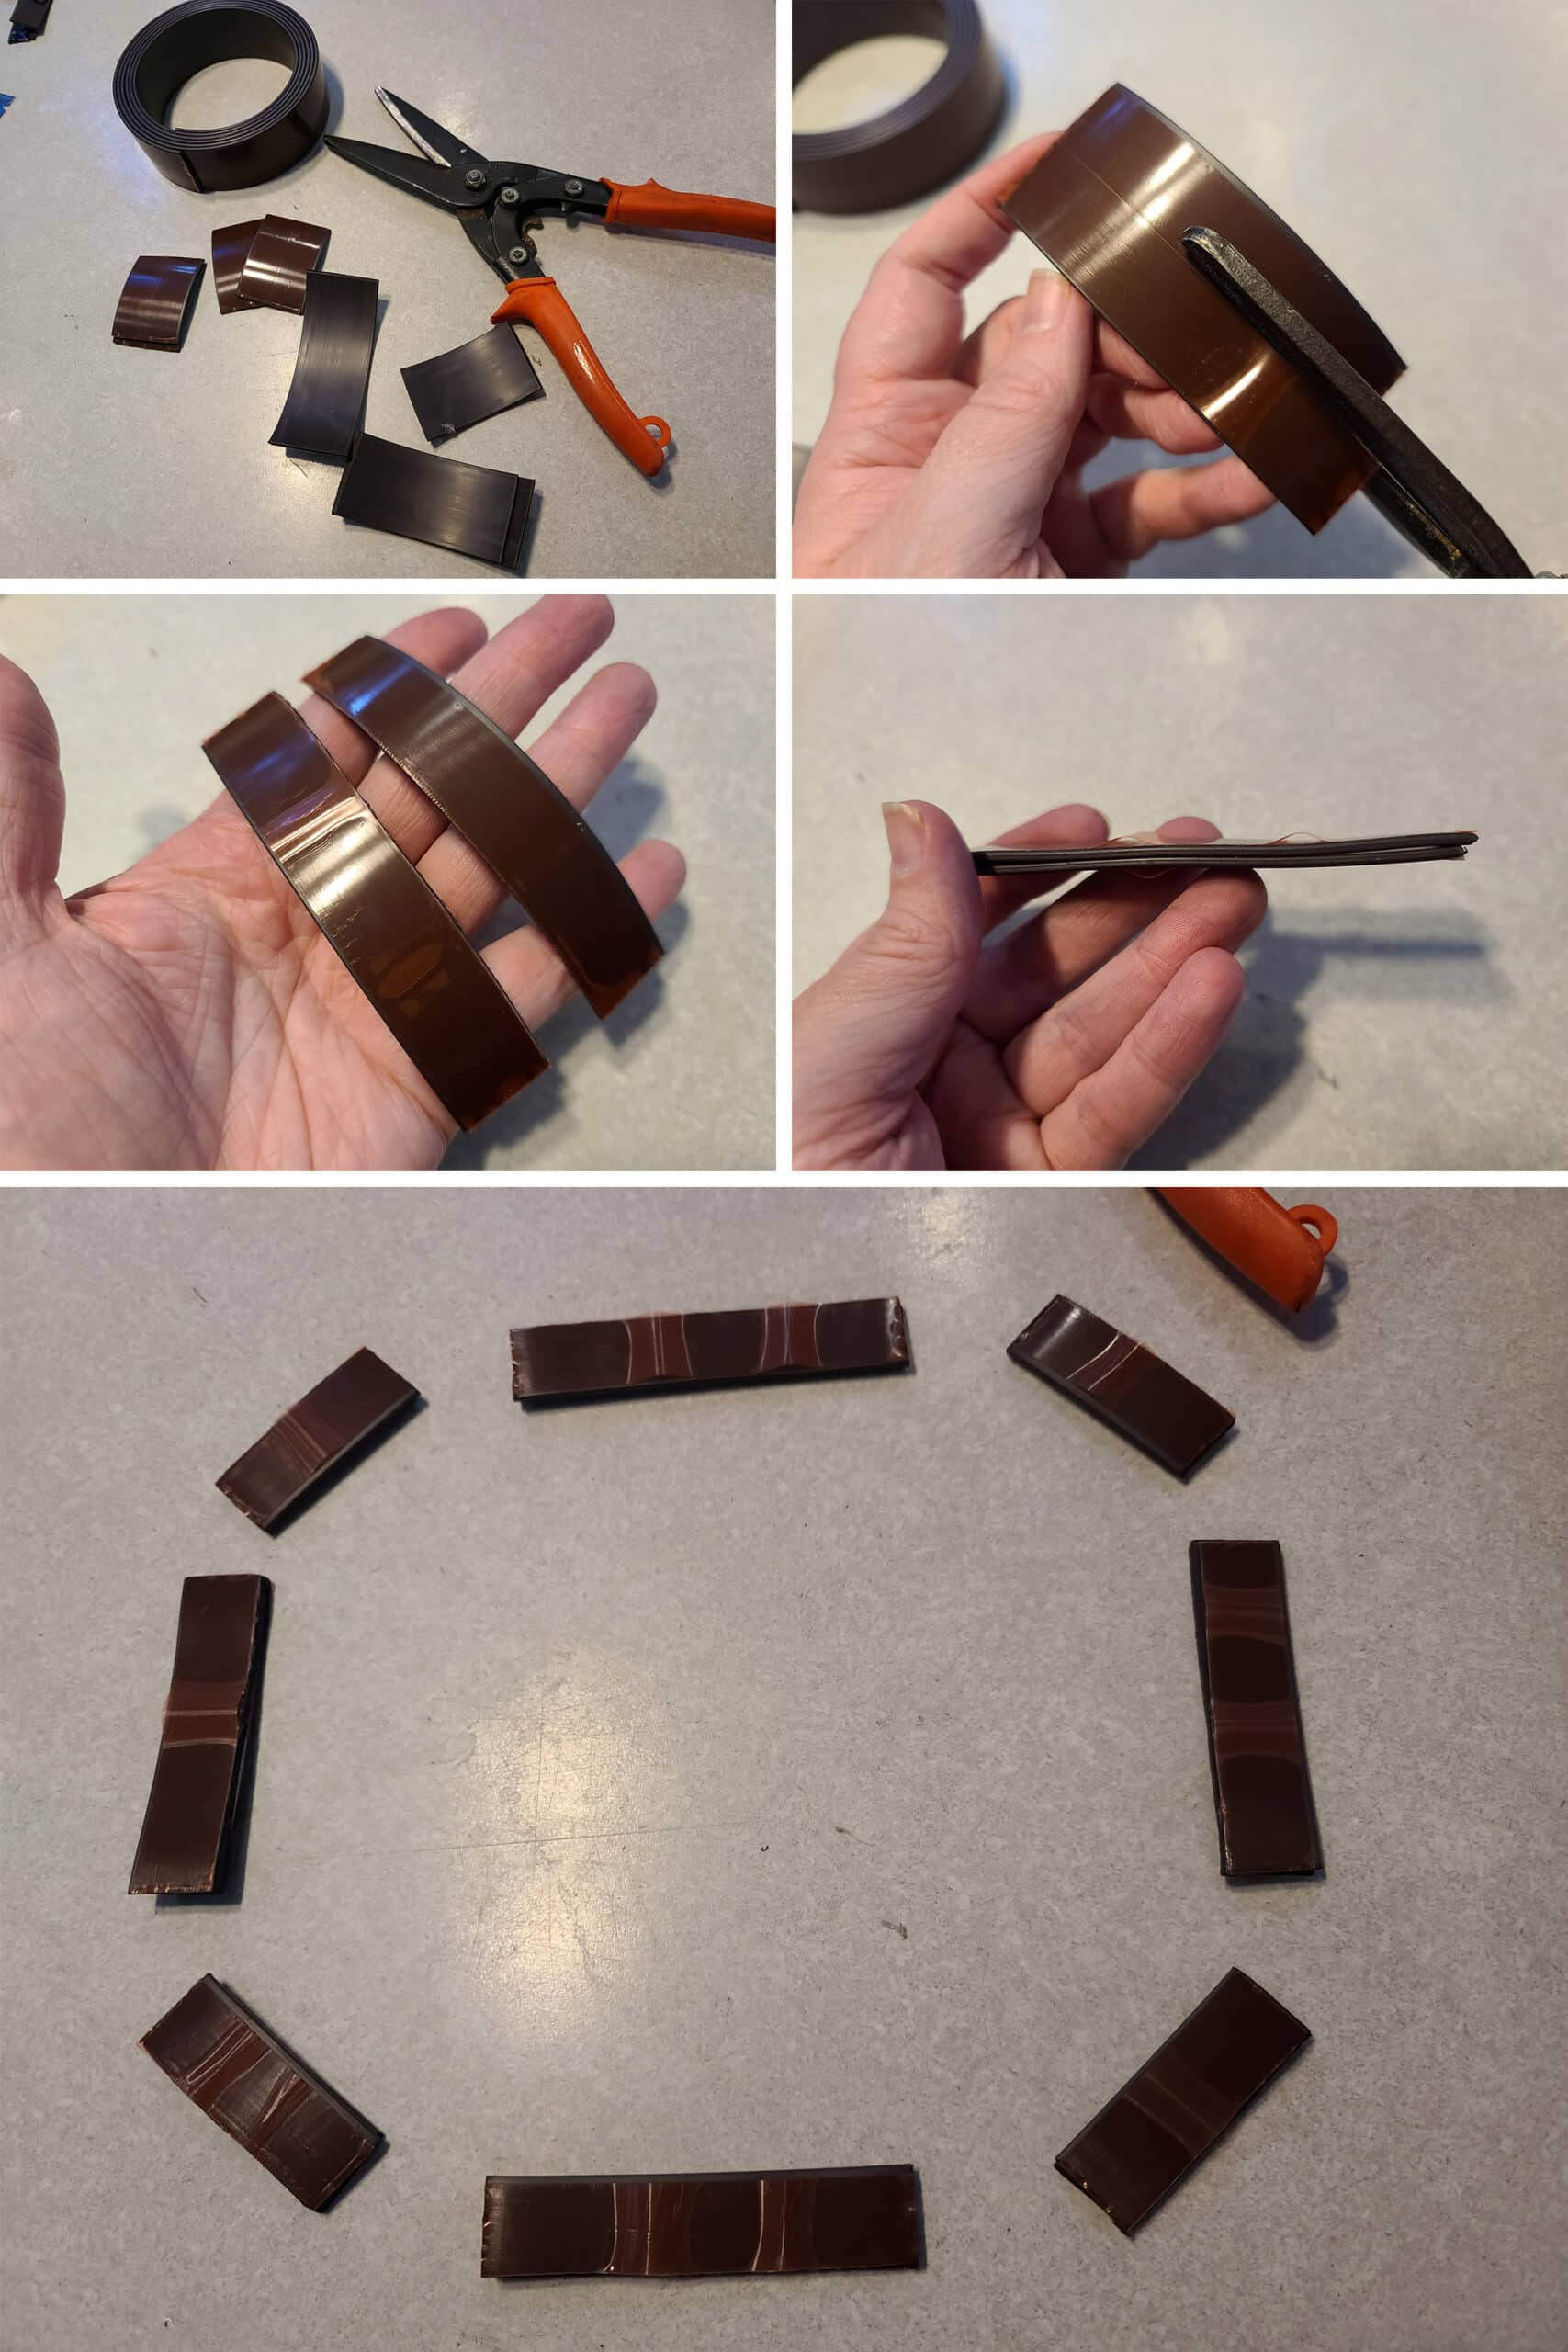
Cut and Arrange Your Magnets
Cut your magnet tape into sections. We’ll usually cut the corner pieces long enough to go diagonally across a corner of a window, being able to touch both sides of the corner.
Pieces intended for the long edges of the shade, we’ll usually cut a bit longer.
The magnet tape we use is one that can be cut up the middle, to make 2 more narrow strips of magnet. We don’t need the full width on those windows, so cutting them like this is the best open.
You’ll want to use a heavy duty pair of scissors to cut the magnet sections - we use something like pruning shears.
Once they’re cut, match up your pieces. Sometimes, you’ll need to turn one piece 180 degrees to make them properly “stick” together.
One way will see the magnets repel each other out to the sides a bit, while one will just directly meet up where they’re placed.
Once matched up, I like to arrange them in approximately the layout I’ll be using them - see below.
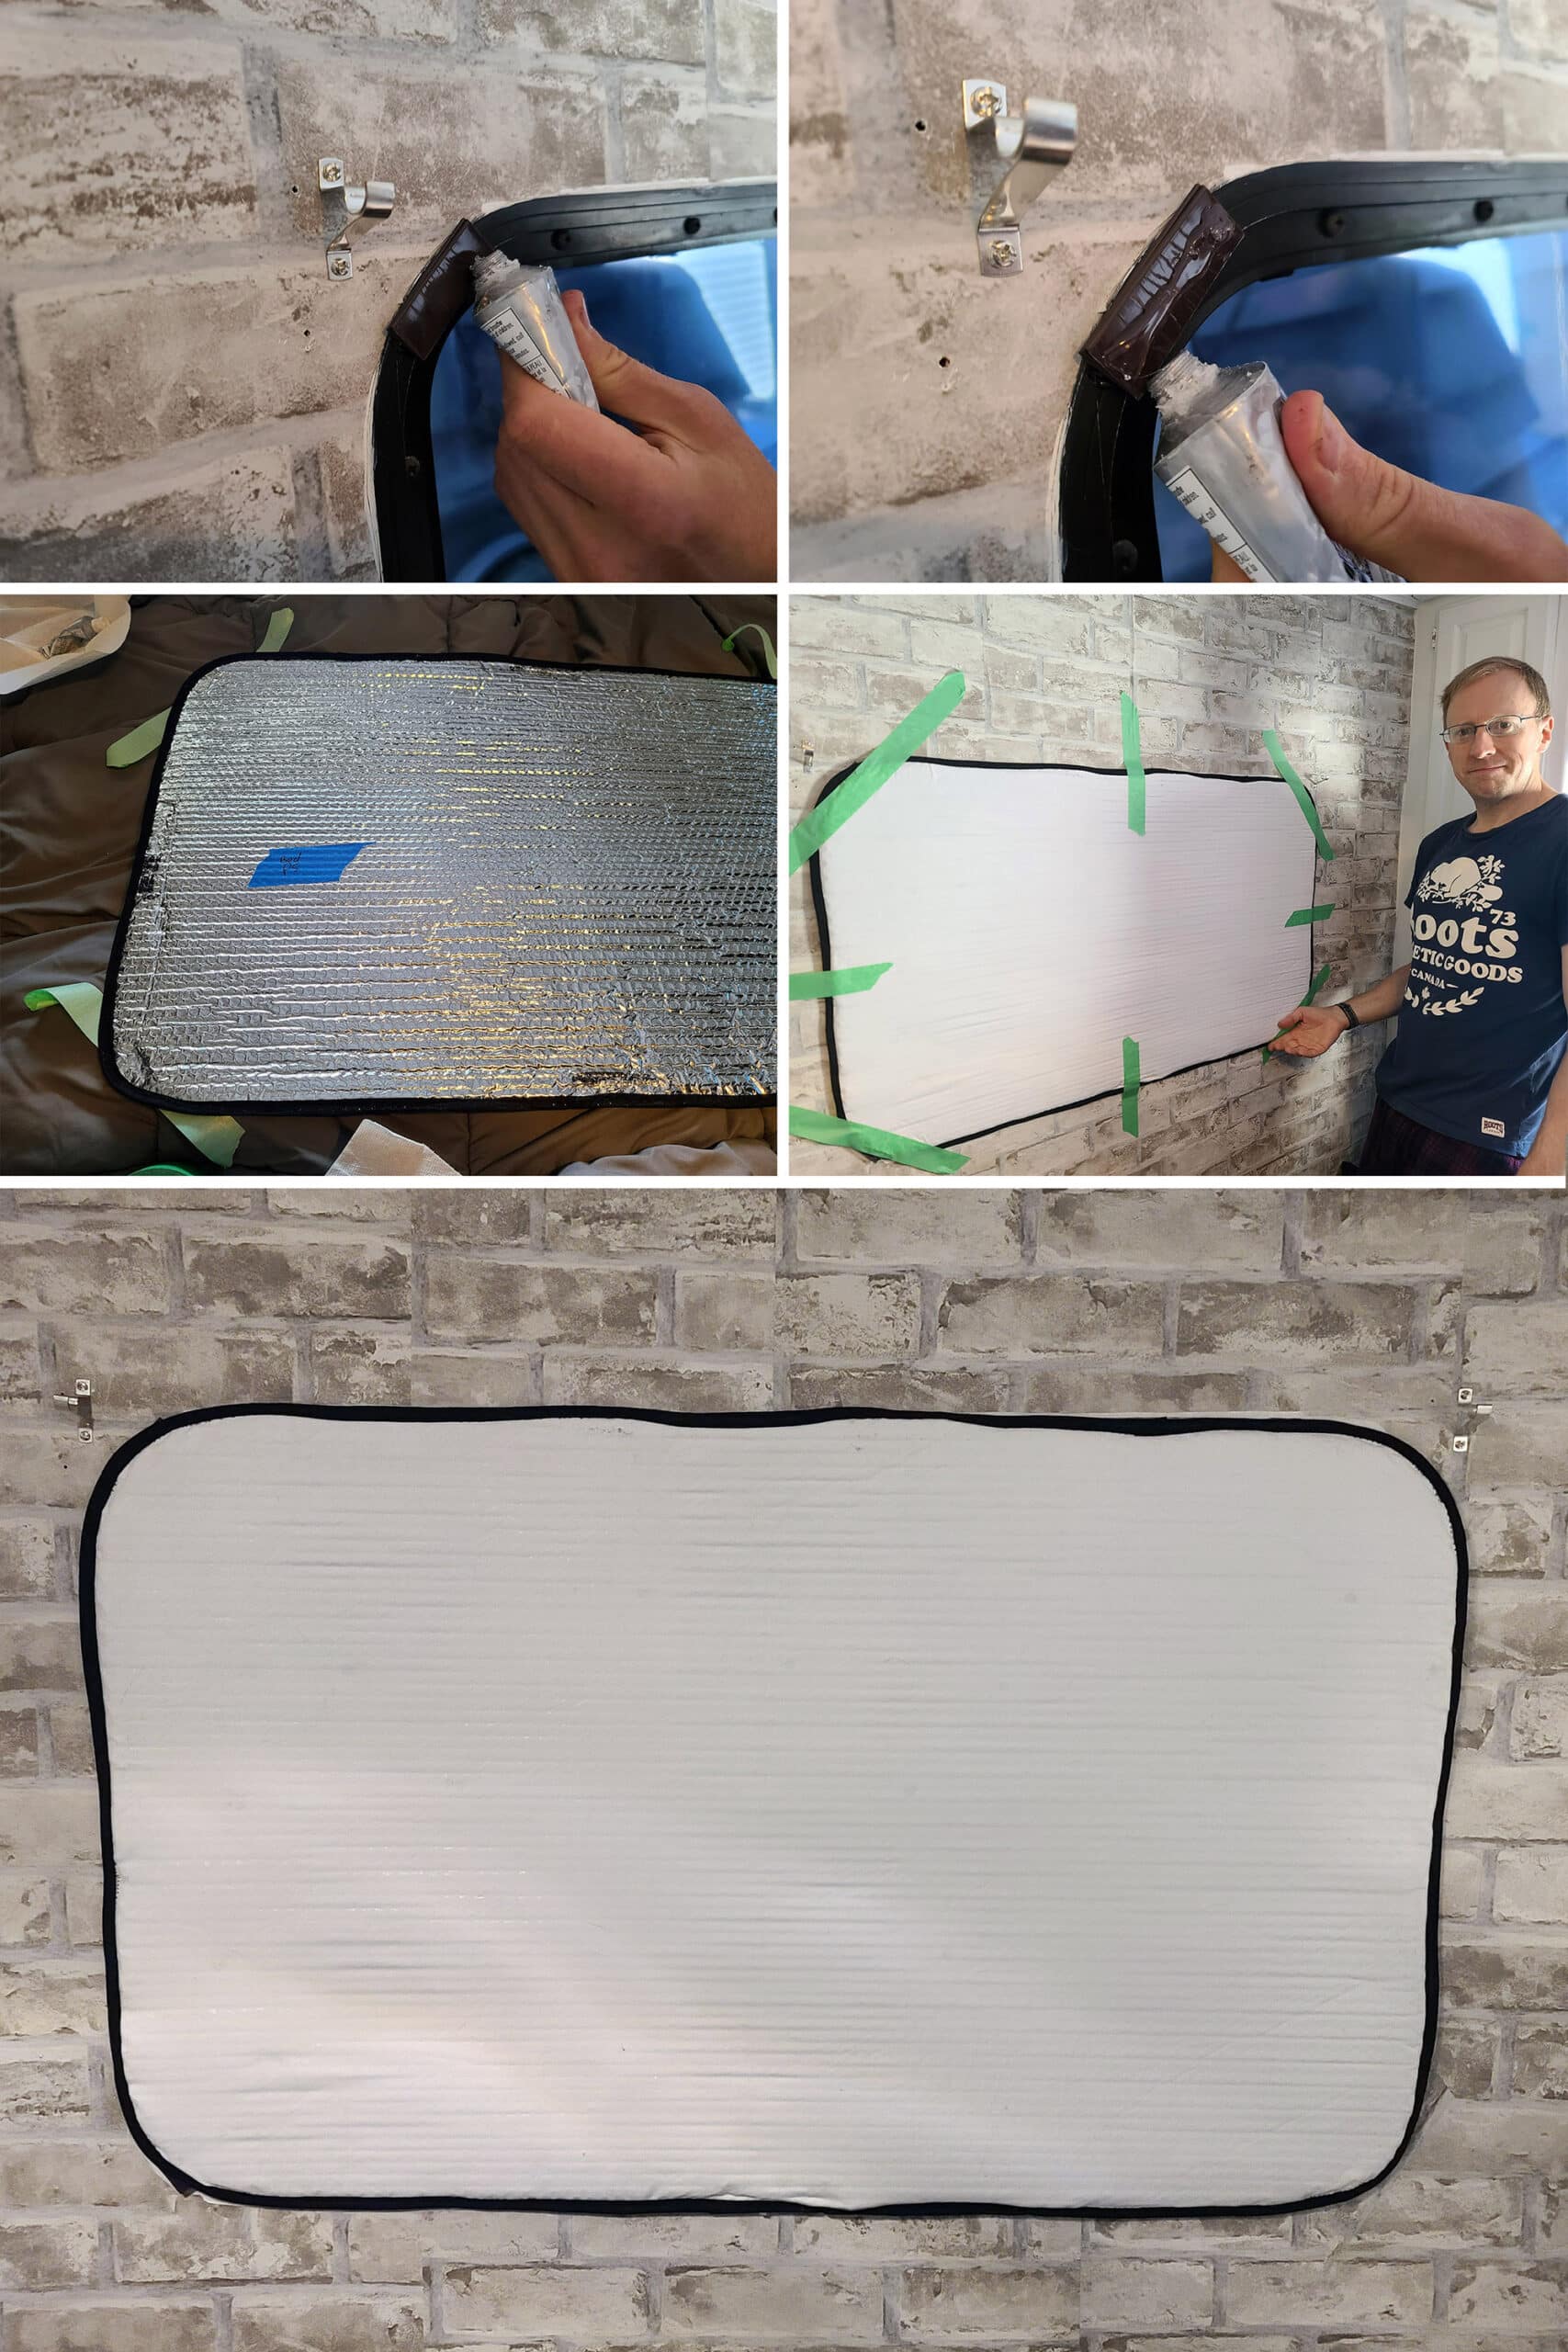
If you leave the backing on and glue to THAT, the backing will just peel off when you try to take the shade off the window.
One section at a time, apply your adhesive to one side of a magnet pair, then use painter’s tape to hold it in place on the window frame.
Note: Keep the magnets paired when doing this!
Once you’ve got all the magnets glued and taped in place, leave them - undisturbed - for at LEAST 24 hours, or whatever’s recommended by the brand of adhesive you’re using.
I like to leave it up for 2-3 days of curing time, just for added security.
Carefully remove the painters tape from each magnet.
Leaving the magnet pair right where it is, remove the backing from the magnet that is facing out - if applicable - and apply your glue. Carefully repeat this for all the magnets on that window frame.
I like to apply long strips of painter’s tape to the window cover that will be going on, before applying it to the glue. You won’t want to be wrestling with cutting and applying tape while trying to hold it in place!
Anyway, very carefully position your window shade over the glued magnet pieces. You’ll want to get the placement right on the first time, so it’s best to work with a helper!
Once you’re happy with the placement, firmly press the window shade in place, and secure with painters tape, as shown below.
Leave the window shade taped up for at least a couple days - or whatever your adhesive says - before removing the tape.
Doing a Second Set
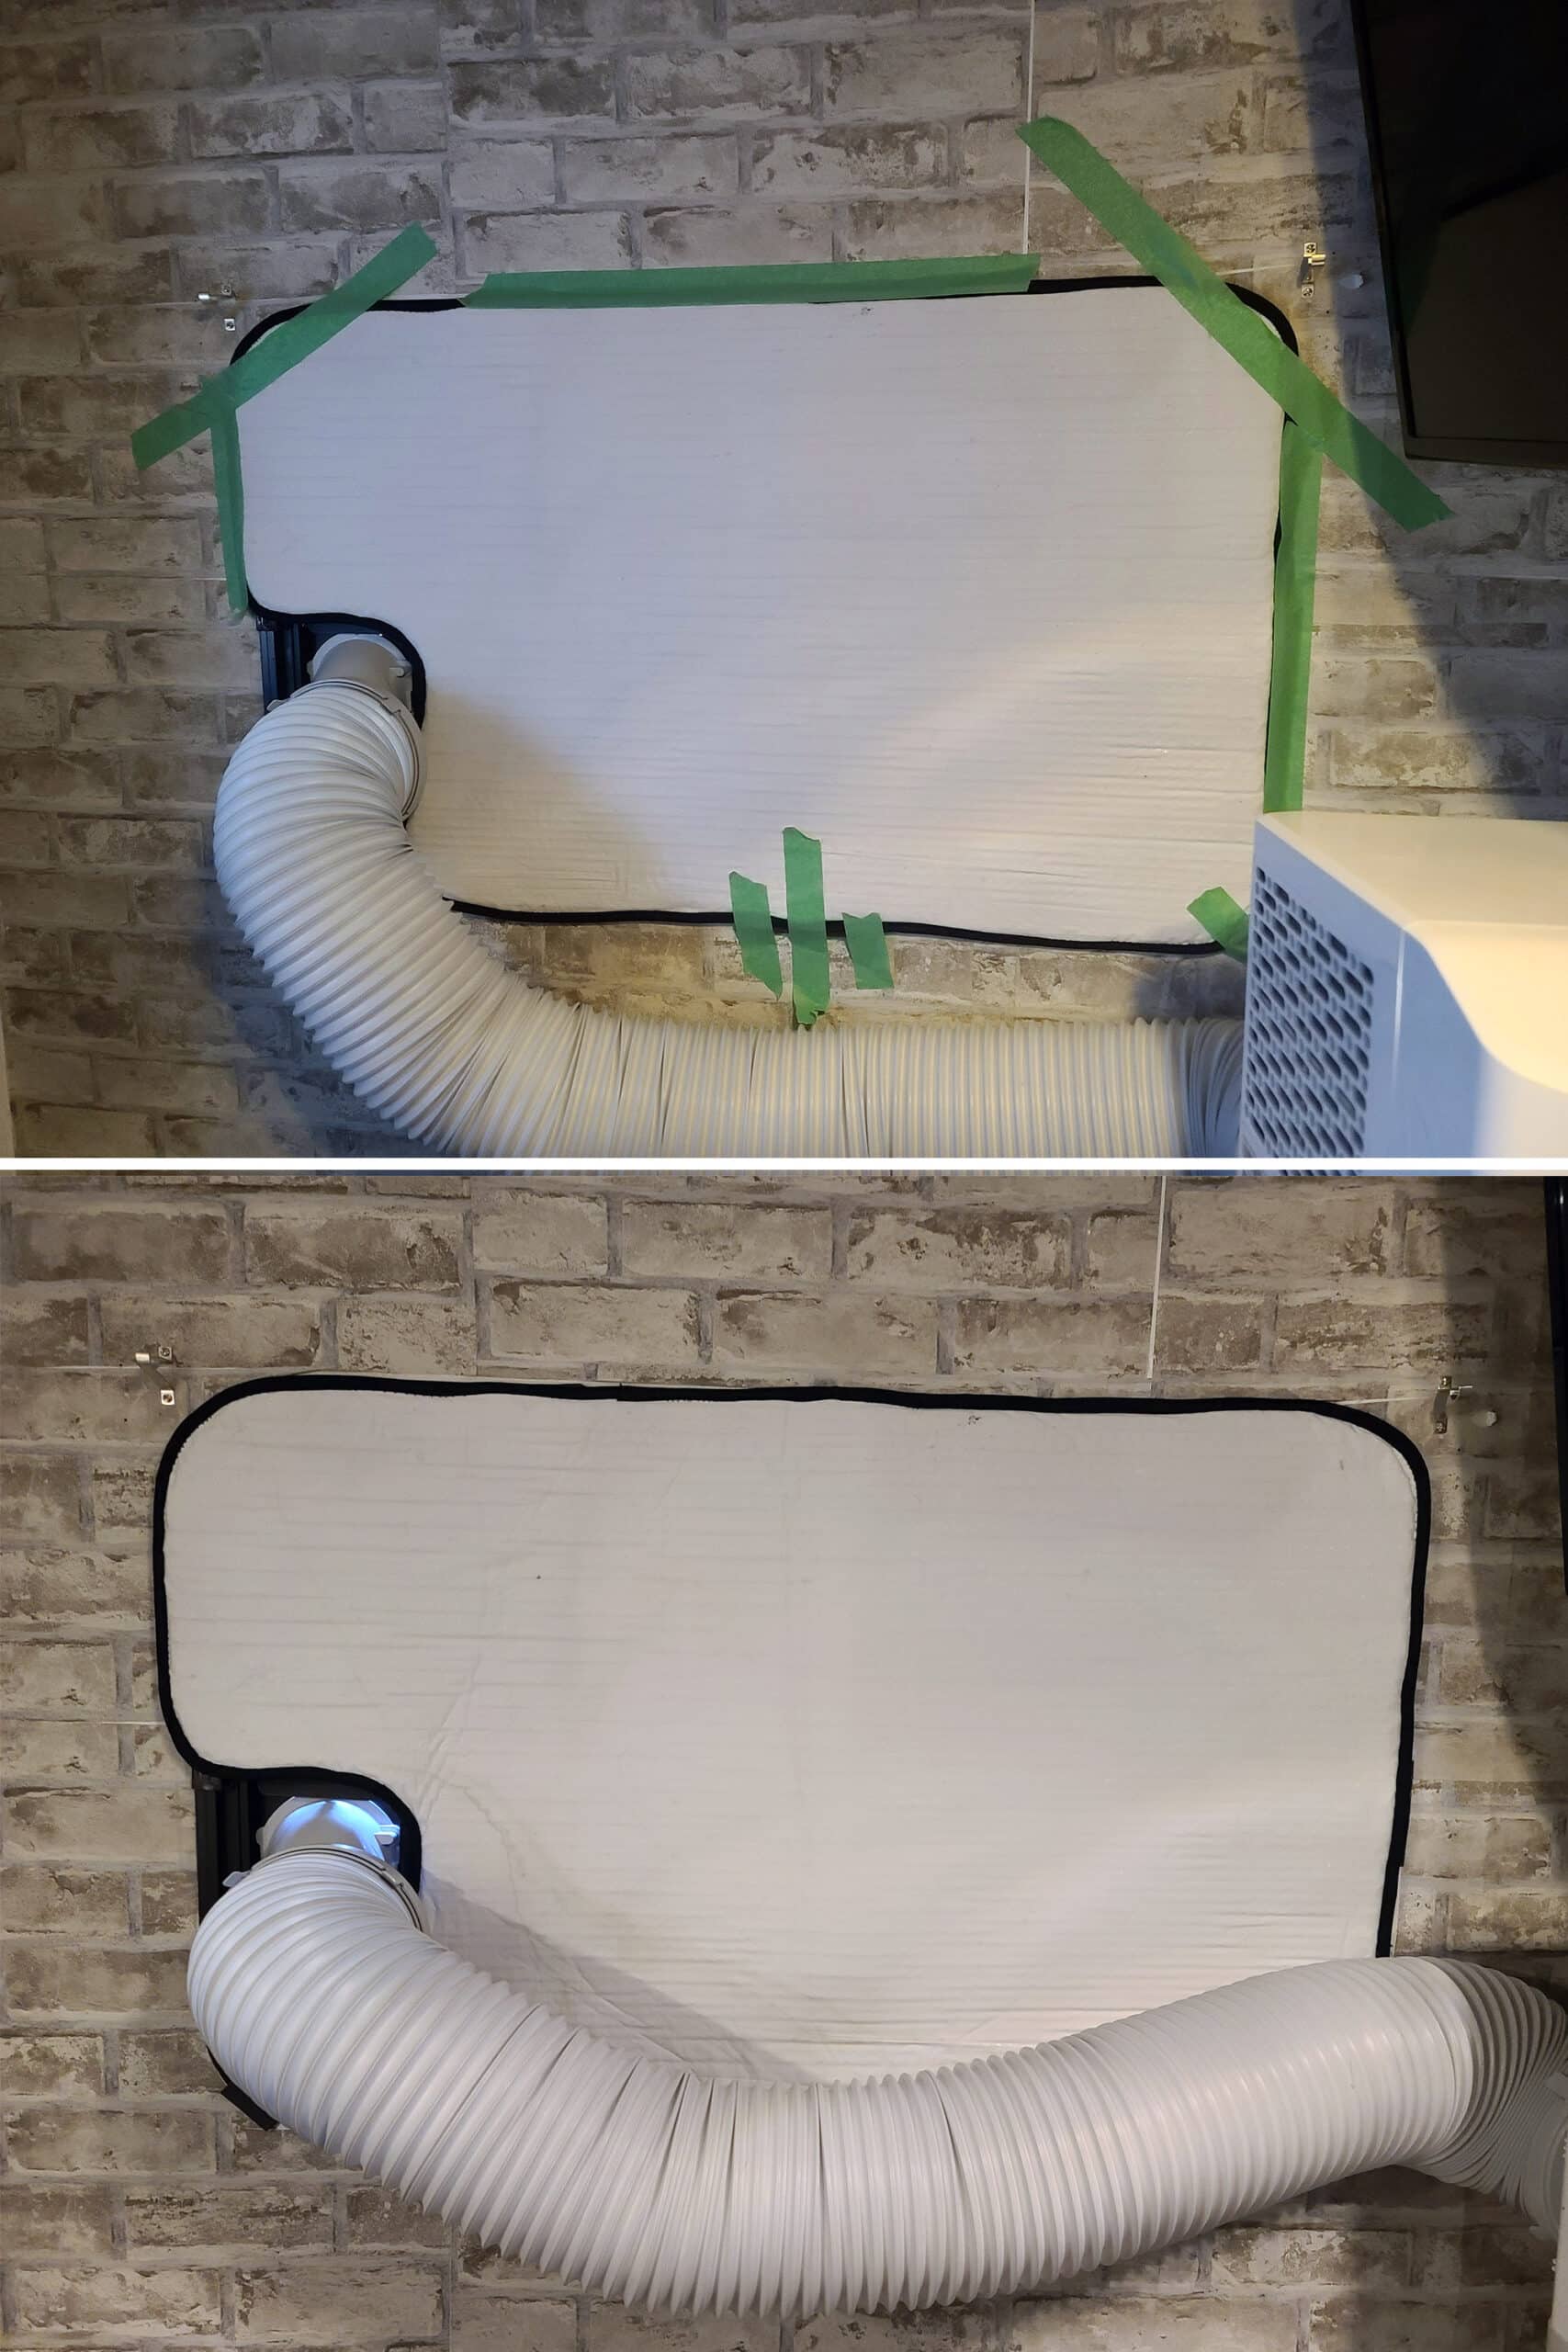
As I mentioned in the window shade tutorial, one of our windows needed a second shade made.
This one involved a corner cut out, to accommodate the air conditioner vent, when in use.
For this window, we did the magnet installation with the basic rectangle shade first, and let it fully cure.
Then, we added a couple more magnet pairs, specific to the cutout shade. So, we cut, paired, and glued those magnets in place, first.
Once those were cured, we cut pieces of magnet to pair with each of the original magnets on the window frame that would be in contact with the modified shade.
These were ones we glued for the first shade (though not ALL of them), which were now each missing their other half. The one in that bottom left corner, we left as-is, as it would not be getting a second magnet.
With the second halves now in place, we glued the outer half of ALL the magnets that would be touching the second shade. That is: we did not glue the one in the lower left corner.
From there, we taped the second shade in place, and let that one cure fully.
Done!
More DIY RV Tutorials
Want to check out more of our tutorials for ways to improve your camping experience?
Well, we don’t have many posted yet, but here’s a start!
DIY Fabric Covered RV Reflector Shades
Homemade Fire Starters
How to Apply RV Window Tinting
Make a Custom RV Camper Step
RV Window Screen Replacement
Also, be sure to check out our RV Lifestyle section for other tutorials to make RV life great - including photography tutorials. We also have a great Camping Recipes sections... that counts as DIY, right? 🙂
Thanks for Reading!If you loved this post - or have any questions about it - please leave a comment below! We'd also love it if you would consider sharing the link on social media! |

Leave a Reply